3-39
CHAPTER
3
IMAGE EDITING FUNCTIONS
SPECIAL FUNCTIONS
Image editing functions
4
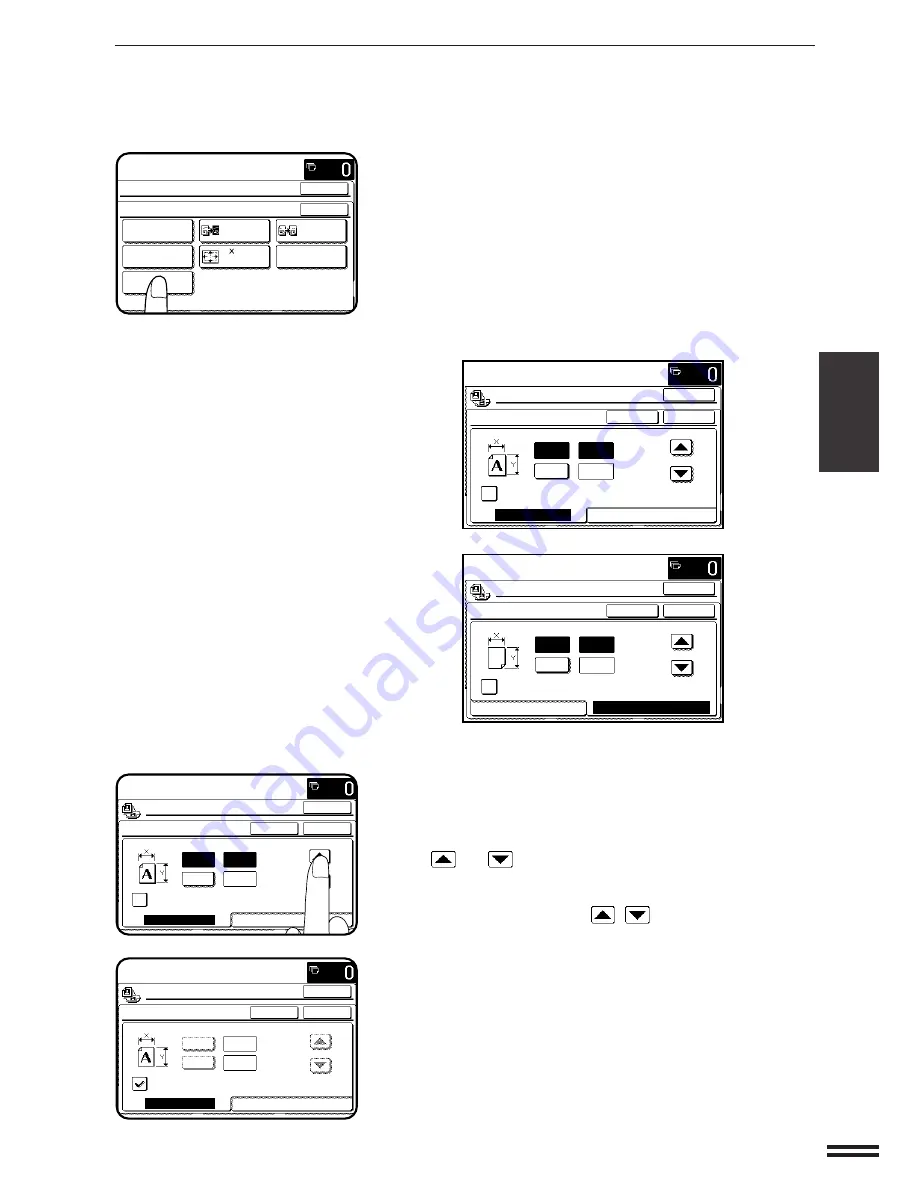
Press the “EXTRA SIZE” key on the touch panel.
●
The setting screen for EXTRA SIZE will appear.
●
If an original on the document glass or paper in the bypass tray
is set on opening the EXTRA SIZE screen, the original and paper
dimensions in X (horizontal) and Y (vertical) will be shown
respectively on the ORIGINAL SIZE tab and the PAPER SIZE
FOR BYPASS tab.
As a starting point, the dimensions shown for extra size originals
or paper will be the closest match to standard sizes.
5
Adjust the original size on the “ORIGINAL SIZE” tab and
paper size on the “PAPER SIZE FOR BYPASS” tab,
respectively.
●
Adjust each X (horizontal) and Y (vertical) dimension using the
and
keys.
●
If the “ENABLE AUTO SIZE DETECTION” check box is checked
on either tab, the size detection function will be activated. In this
case, the “X/Y” keys and “
/
” keys will be grayed out not
to allow any input.
READY TO COPY.
SPECIAL MODES
OK
OK
NEG./POS.
REVERSE
11 17
FULL-BLEED
MIRROR
IMAGE
MULTI-PAGE
ENLARGEMENT
IMAGE EDIT
SINGLE COLOR
PHOTO REPEAT
EXTRA SIZE
4
(5 1/2~17)
inch
(4~11 3/4)
inch
Y
CANCEL
EXTRA SIZE
ENABLE AUTO SIZE DETECTION
PAPER SIZE FOR BYPASS
OK
OK
READY TO COPY.
X
/
12
4
1
ORIGINAL SIZE
(5 1/2~17)
inch
(4~11 3/4)
inch
Y
CANCEL
EXTRA SIZE
ENABLE AUTO SIZE DETECTION
PAPER SIZE FOR BYPASS
OK
OK
READY TO COPY.
X
ORIGINAL SIZE
5
(5 1/2~17)
inch
(4~11 3/4)
inch
Y
CANCEL
EXTRA SIZE
ENABLE AUTO SIZE DETECTION
PAPER SIZE FOR BYPASS
OK
OK
READY TO COPY.
X
/
8
2
1
/
2
1
ORIGINAL SIZE
5
(5 1/2~17)
inch
(4~11 3/4)
inch
Y
CANCEL
EXTRA SIZE
ENABLE AUTO SIZE DETECTION
ORIGINAL SIZE
OK
OK
READY TO COPY.
X
/
8
2
1
/
2
1
PAPER SIZE FOR BYPASS


