background image


20

Basic adjustment settings

Manual setting for each channel (continued)

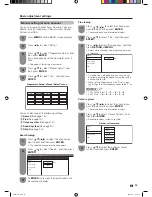
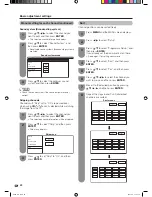
Sound system (Broadcasting system)

Skipping channels

Channels with “Skip” set to “On” are passed over 
when using 

CH

r

/

s

 even if selected while watching 

the image from the TV.

Press 

MENU

 and the MENU screen displays.

1

Press 

c

/

d

 to select “Setup”.

Press 

a

/

b

 to select “Programme Setup”, and 

then press 

ENTER

.

If you already set the password, enter it here.

•  See page 27 for setting a password.

2

3

Press 

a

/

b

 to select “Sort”, and then press 

ENTER

.

4

Press 

a

/

b

 to select “Yes”, and then press 

ENTER

.

5

Repeat the steps 6 and 7 until all desired 
channels are sorted.

8

Press 

a

/

b

/

c

/

d

 to select the channel you 

want to edit, and then press 

ENTER

.

•  The selected channel information displays.

Press 

a

/

b

 to select “Sound System”, and 

then press 

ENTER

.

•  Receivable sound systems (Broadcasting systems) 

are listed.

1

2

MENU    

[Setup ... Programme Setup]

Fine

Search

Colour System

Sound System

Skip

B/G

D/K

I

M

Press 

a

/

b

 to select the optimum sound 

system, and then press 

ENTER

.

3

Sound system menu

NOTE

•  Check the sound system if the sound output were not 

correct.

Press 

a

/

b

 to set “Skip” to “On”, and then 

press 

ENTER

.

3

Fine

Search

Colour System

Sound System

Skip

Off

On

Press 

a

/

b

/

c

/

d

 to select the channel you 

want to edit, and then press 

ENTER

.

•  The selected channel information will be displayed.

1

Press 

a

/

b

 to select “Skip”, and then press 

ENTER

.

•  Skip menu displays.

2

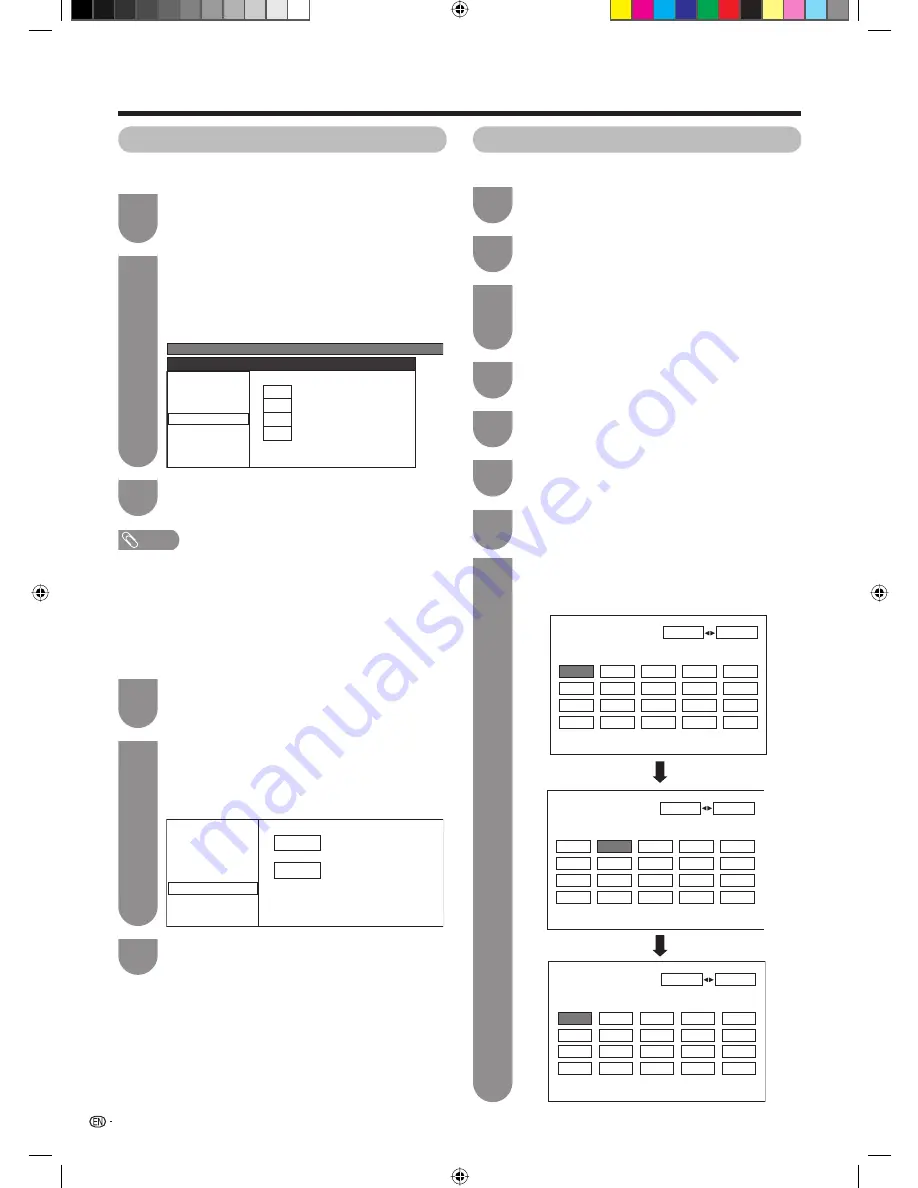
Sort

Channel positions can be sorted freely.

Press 

a

/

b

/

c

/

d

 to select the channel you 

want to move, and then press 

ENTER

.

6

Move it to the desired position by pressing 

a

/

b

/

c

/

d

, and then press 

ENTER

.

7

Skip menu

01

06

SAT.1

KABEL

01 SAT.1

07

08

09

10

03

02

04

05

11

12

13

14

15

16

17

18

19

20

Sort menus

01

06

SAT.1

KABEL

01

02

SAT.1

KABEL

07

08

09

10

03

02

04

05

11

12

13

14

15

16

17

18

19

20

01

06

KABEL

SAT.1

01 KABEL

07

08

09

10

03

02

04

05

11

12

13

14

15

16

17

18

19

20

PX5X_EN.indb   20

PX5X_EN.indb   20

2007-5-9   11:43:18

2007-5-9   11:43:18

Содержание Aquos LC-46PX5X

Страница 1: ...MODEL LC 46PX5X LCD COLOUR TELEVISION OPERATION MANUAL Cover_PX5X indd 1 Cover_PX5X indd 1 2007 5 9 11 36 29 2007 5 9 11 36 29 ...

Страница 2: ...changing volume sound 15 Sleep timer 15 Still image 15 Basic adjustment settings 16 Menu operation buttons 16 On Screen Display 16 TV AV input mode menu items 17 PC input mode menu items 17 Auto installation 18 Programme setup 18 Auto search 18 Manual setting for each channel 19 Search tuning 19 Fine tuning 19 Colour system 19 Sound system Broadcasting system 20 Skipping channels 20 Sort 20 Label ...

Страница 3: ...Setup 36 Input Signal PC input mode only 36 Auto Sync adjustment PC input mode only 37 Fine Sync adjustment PC input mode only 37 Useful features 38 Dual screen functions 38 Teletext language setting 39 Teletext function 40 Using external equipment 42 Displaying an external equipment image 42 Displaying a DVD image Example 42 Connecting a VCR 42 Connecting a DVD player 43 Connecting a game console...

Страница 4: ...or built in installation do not place the product in an enclosed place such as a bookcase or rack unless proper ventilation is provided or the manufacturer s instructions are followed The LCD panel used in this product is made of glass Therefore it can break when the product is struck forcefully or with a sharp object If the LCD panel is broken be careful not to be injured by broken glass Heat sou...

Страница 5: ...g2 AC cord AC cord clamp g2 Cable clamp g2 Operation manual Stand unit Page 12 Page 5 Page 7 Page 7 Page 7 Page 6 NOTE Always use the AC cord supplied with the TV The illustrations and on screen displays in this operation manual are for explanation purposes and may vary slightly from the actual operations Cable tie Page 7 PX5X_EN indb 4 PX5X_EN indb 4 2007 5 9 11 43 14 2007 5 9 11 43 14 ...

Страница 6: ...e batteries 3 Close the battery cover Inserting the batteries Before using the TV for the first time insert two AAA size batteries supplied When the batteries become depleted and the remote control fails to operate replace the batteries with new AAA size batteries Using the remote control unit Use the remote control unit by pointing it towards the remote sensor window Objects between the remote con...

Страница 7: ...to the 4 holes on the rear of the TV Hex key Long screw Soft cushion NOTE To detach the stand perform the steps in reverse order 2 2 2 3 3 1 1 Hex key Short screw Attach the two supporting post for the stand unit onto the base using the box for the stand unit as shown below Confirm the 10 screws supplied with the TV Short screws g6 used in step 2 Long screws g4 used in step 3 1 Insert each of the p...

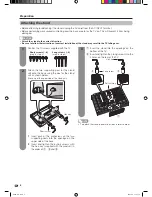
Страница 8: ...he TV in a well ventilated location Place the TV in a level location CAUTION TO PREVENT RISK OF ELECTRIC SHOCK DO NOT TOUCH UN INSULATED PARTS OF ANY CABLES WITH THE AC CORD CONNECTED Bundling the cables Insert the cable clamp in the hole on the TV as shown 2 AC cord AC outlet See pages 8 and 42 45 for connecting antennas and external equipment such as VCR and DVD player AC cord clamp TV rear view...

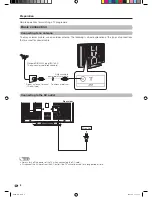
Страница 9: ...ions that are used for coaxial cable NOTE Always turn off the power of the TV when connecting the AC cord Disconnect the AC cord from the AC outlet if the TV will not be used for a long period of time Rear view Standard DIN45325 plug IEC169 2 75 ohm coaxial cable round cable Room antenna terminal 75 ohm type Antenna cable commercially available To antenna terminal AC outlet PX5X_EN indb 8 PX5X_EN ...

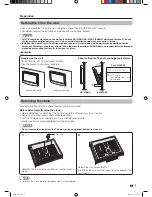
Страница 10: ...er wall mount brackets may result in an unstable installation and may cause serious injuries Installing the Liquid Crystal Television requires special skill that should only be performed by qualified service personnel Customers should not attempt to do the work themselves SHARP bears no responsibility for improper mounting or mounting that results in accident or injury Example 9 NOTE To attach the ...

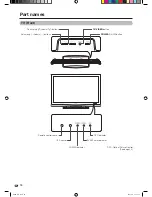
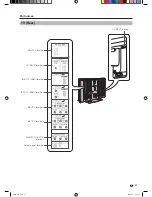
Страница 11: ...ee page 22 Volume up e down f buttons Channel up r down s buttons OPC indicator POWER On Off button TV VIDEO button SLEEP timer indicator OPC sensor Remote control sensor POWER indicator PX5X_EN indb 10 PX5X_EN indb 10 2007 5 9 11 43 15 2007 5 9 11 43 15 ...

Страница 12: ...nal INPUT 3 HDMI terminals INPUT 4 HDMI terminal PC INPUT terminals MONITOR OUTPUT terminals INPUT 2 terminals INPUT 1 terminals Antenna input terminal AC INPUT terminal PX5X_EN indb 11 PX5X_EN indb 11 2007 5 9 11 43 15 2007 5 9 11 43 15 ...

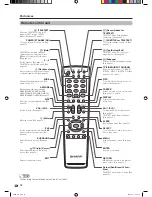
Страница 13: ... See page 26 a b c d Cursor Select a desired item on the setting screen See page 16 EXIT Return to the default screen k Reveal hidden for TELETEXT TELETEXT mode Display hidden characters See page 40 SUBTITLE for TELETEXT To turn the subtitles on and off See page 41 v Top Bottom Full TELETEXT mode Set the area of magnification See page 40 1 Subpage Display the Teletext subpage directly See page 41 T...

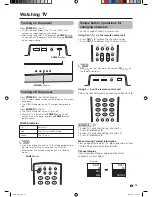
Страница 14: ... going to use this TV for a long period of time be sure to remove the AC cord from the AC outlet Minor power is consumed when the unit is in standby mode Simple button operations for changing channels You can change channels in several ways Using CHr s on the remote control unit Press CHr to increase the channel number Press CHs to decrease the channel number NOTE CHr s on the TV operates the same...

Страница 15: ...de switches between NICAM STEREO and MONO When receiving a bilingual signal Each time you press MPX the mode switches among NICAM CH A NICAM CH B NICAM CH AB and MONO In the TV mode of A2 TV broadcasts When receiving a stereo signal Each time you press MPX the mode switches between STEREO and MONO When receiving a monaural signal When you press MPX MONO displays When receiving a bilingual signal E...

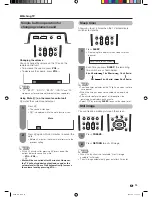
Страница 16: ...ilenced M is displayed while the mute function is on Press e again within 30 minutes to cancel the mute Before 30 minutes the volume level returns to the previous setting 1 2 Sleep Timer Remain 2 hr 00 min Still image You can freeze a motion picture on the screen NOTE The sleep timer indicator on the TV lights up when the time has been set When the time has been set countdown automatically starts ...

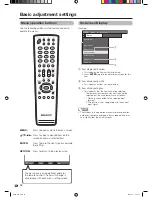
Страница 17: ...for explanation purposes some are enlarged others cropped and may vary slightly from the actual screens MENU Option Colour System Option Audio Only Power Control HDMI Setup PC Setup Colour System Blue Screen Input Select DNR 16 Basic adjustment settings Menu operation buttons Use the following buttons on the remote control to operate the menu MENU Press to open or close the menu screen a b c d Pre...

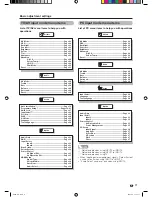
Страница 18: ...s Colour System can be set only when using INPUT1 or INPUT2 Audio Select can be set only when using INPUT3 Input Label Page 28 Language Page 32 Text Language Page 39 Audio Only Page 33 Input Select Input1 Page 33 Input2 Page 33 Power Control No Operation Off Page 35 Power Management Page 35 PC Setup Input Signal Page 36 Auto Sync Page 37 H Position Page 37 V Position Page 37 Clock Page 37 Phase Pa...

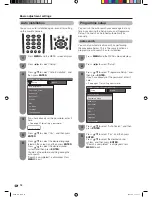
Страница 19: ...b to select Yes and then press ENTER 5 MENU Setup Auto Installation Setup Option Child Lock Input Label Auto Installation Programme Setup Position Language Text Language 4 3 Mode WSS Auto search You can also automatically search by performing the procedure below This is the same function as programme auto search in auto installation Press MENU and the MENU screen displays Press c d to select Setup...

Страница 20: ...rogramme Setup Fine Colour System Sound System Skip Search 179 25 MHz NEXT As ENTER is pressed the next channels will be searched in order 3 Fine tuning Press a b c d to select the channel you want to edit and then press ENTER The selected channel information displays 1 Press a b to select Fine and then press ENTER 2 Press c d to adjust the frequency and then press RETURN or MENU Adjust while chec...

Страница 21: ...rogramme Setup Fine Search Colour System Sound System Skip B G D K I M Press a b to select the optimum sound system and then press ENTER 3 Sound system menu NOTE Check the sound system if the sound output were not correct Press a b to set Skip to On and then press ENTER 3 Fine Search Colour System Sound System Skip Off On Press a b c d to select the channel you want to edit and then press ENTER Th...

Страница 22: ...ress a b to select Erase Programme and then press ENTER 4 Press a b to select Yes and then press ENTER 5 Erase Programme The individual programme can be erased Press a b c d to select the channel you want to erase and then press ENTER 6 Basic adjustment settings Press a b to select characters and c d to move to the desired digit and then press ENTER to complete the label setting 7 Press ENTER to e...

Страница 23: ...e remote control unit NOTE You can select a different AV MODE item for each input mode For example select STANDARD for TV input and DYNAMIC for VIDEO input During PC input mode only STANDARD and USER can be selected under the AV mode selection AV input mode AV Mode STANDARD AV Mode DYNAMIC FIXED AV Mode MOVIE AV Mode DYNAMIC AV Mode USER TV AV Mode GAME PC input mode AV Mode STANDARD AV Mode USER ...

Страница 24: ...ure Basic adjustment settings Selected item Backlight Contrast Brightness Colour Tint Sharpness cbutton The screen dims For less contrast For less brightness For less colour intensity Skin tones become purplish For less sharpness dbutton The screen brightens For more contrast For more brightness For more colour intensity Skin tones become greenish For more sharpness Adjustments items MENU Picture ...

Страница 25: ... are four options you can choose from Basic adjustment settings NOTE For resetting all adjustment items to factory preset values press a b to select Reset and then press ENTER NOTE 3D Y C is not selectable depending on the input signal type 3D Y C may not operate depending on the input signal type or noisy input signal Press c d to adjust the item to your desired position 5 Selected item C M S Hue...

Страница 26: ...ed source originally encoded at 24 25 frames second depending on the vertical frequency analyses it then recreates each still film frame for high definition picture quality Press a b to select Film Mode and then press ENTER 4 Press a b to select On and then press ENTER 5 25 Basic adjustment settings PX5X_EN indb 25 PX5X_EN indb 25 2007 5 9 11 43 20 2007 5 9 11 43 20 ...

Страница 27: ...ment items to factory preset values press a b to select Reset press ENTER press a b to select Yes and then press ENTER Surround can be selected for each AV Mode setting Balance cannot be adjusted when Surround is set to On Press c d to select Audio 2 Press MENU and the MENU screen displays 1 Press a b to select a specific adjustment item 3 Audio Treble Bass Balance Surround Reset 0 0 L 0 R STANDARD...

Страница 28: ...umber to use the Child Lock function Press MENU and the MENU screen displays 1 Press c d to select Setup 2 Press a b to select Child Lock and then press ENTER 3 If you already set the password enter it here 4 Press a b to select Change Password and then press ENTER 5 Change Password Channel Setting Reset New Password Reconfirm Enter the 4 digit number as a password using 0 9 6 Setting a channel Re...

Страница 29: ...the desired digit to label the input source When you want to change the input label that you have already assigned to the default name press c d to move to CLEAR on the Input Label screen and then press ENTER 5 Press MENU and the MENU screen displays 1 Press c d to select Setup 2 Press a b to select Position and then press ENTER 3 Press a b to select H Pos or V Pos 4 Press c d to adjust the item t...

Страница 30: ...ignal contains no WSS information the function will not work even if enabled Picture aspect ratio The WSS signal has 4 3 auto switching that allows you to select between Normal and Panorama Press MENU and the MENU screen displays 1 Press c d to select Setup 2 Press a b to select 4 3 Mode and then press ENTER 3 Press a b to select Panorama or Normal and then press ENTER 4 WSS signal 4 3 screen 4 3 ...

Страница 31: ...signal currently received 1 Press WIDE or a b while the WIDE MODE menu displays on the screen As you toggle down the options each is immediately reflected on the TV 2 WIDE MODE Normal Zoom 14 9 Panorama Full Cinema 16 9 Cinema 14 9 4 3 Mode set to Panorama 4 3 Mode set to Normal Auto Selection If you set WSS and 4 3 Mode in the Setup menu on page 29 the optimum WIDE mode is automatically chosen for...

Страница 32: ... mode for PC input mode You can select the screen size NOTE Connect the PC before making adjustments See page 45 Selectable screen size may vary with input signal type Press WIDE The WIDE MODE menu displays 1 a Screen size images WIDE MODE Normal Full Press WIDE or a b to select a desired item on the menu 2 PX5X_EN indb 31 PX5X_EN indb 31 2007 5 9 11 43 22 2007 5 9 11 43 22 ...

Страница 33: ...from among 3 languages English Chinese and Arabic Press MENU and the MENU screen displays 1 Press c d to select Setup 2 Press a b to select Language and then press ENTER 3 Press a b to select the desired language listed on the screen and then press ENTER 4 PX5X_EN indb 32 PX5X_EN indb 32 2007 5 9 11 43 22 2007 5 9 11 43 22 ...

Страница 34: ...NU screen displays 1 Press c d to select Option 2 Press a b to select Input Select and then press ENTER 3 Press TV VIDEO on the remote control unit or TV VIDEO on the TV to select the input source An image from the selected source automatically displays You can also select the input source by pressing a b 2 Selecting input signal type For setting the signal type of external equipment Press TV VIDE...

Страница 35: ...our equipment and then press ENTER 4 AUTO PAL SECAM NTSC 3 58 NTSC 4 43 PAL 60 34 Useful adjustment settings Colour system setting You can change the colour system to one that is compatible with the image on the screen NOTE Factory preset value is AUTO If AUTO is selected colour system for each channel is automatically set If an image does not display clearly select another colour system e g PAL N...

Страница 36: ... for a certain time Off Mode1 Mode2 35 NOTE If you turn off the power by disconnecting AC cord when setting Mode2 in power management the TV may not function properly after turning the power on again In such case press POWER on the remote control unit Pressing POWER on the display will have the same result Useful adjustment settings Power Control Power Control setting allows you to save energy No ...

Страница 37: ... type from the HDMI terminal User settings for this item are normally in effect only when the TV is connected with a DVI HDMI conversion cable When connected to an HDMI device the TV automatically detects the Signal Type and ignores user settings Select the video colour matrix type when a YCbCr signal is input Select the YCbCr colour system when a YCbCr signal is input When an RGB signal is input ...

Страница 38: ... 4 V Position H Position Auto Sync Input Signal Clock Phase 60 90 90 8 Reset Selected item H Position V Position Clock Phase Description Centres the image by moving it to the left or right Centres the image by moving it to the up or down Adjusts when the image flickers with vertical stripes Adjusts when characters have low contrast or when the image flickers Press c d to adjust the item to your desi...

Страница 39: ...e on the active screen A selected image displays Press P P to exit dual screen NOTE This function does not work under the following input conditions 1 Two pictures from the same source e g INPUT 1 and INPUT 1 2 Two pictures with different vertical frequency e g PAL and PAL 60 PAL 50 Hz and NTSC 60 Hz When you press P P the current input is moved to the left side screen display and the other input ...

Страница 40: ...ach table is compatible with the Teletext languages listed below Press a b to select receivable teletext broadcasting language in your country and then press ENTER NOTE Teletext can display only when it is sent by a network Not used to convert between languages West Europe English French Scandinavian Czech German Spanish Italian East Europe Polish French Scandinavian Czech German Slovenian Croatia...

Страница 41: ...creen Each time you press m the screen switches as shown upper right If you select a programme with no Teletext signal No Teletext available is displayed TELETEXT TELETEXT When viewing the Teletext information Press CHr to increase the page number Press CHs to decrease the page number NOTE When you turn TELETEXT on and change a Teletext page right after changing channels the relevant page may not ...

Страница 42: ...ormation sent by the broadcasting station To stop updating subtitle automatically press 3 Press to exit the subtitle screen Press m to display Teletext Press 1 to display the subpage as shown below NOTE Subtitle will not be displayed when the service does not contain the subtitle information Select the desired subpage by using c d 0 9 directly selects the desired subpage Press 1 to exit the subpag...

Страница 43: ...e in clearly you may need to change the input signal type setting on the Input Select menu Refer to your external equipment operation manual for the signal type Displaying an external equipment image Explanation here is for the setting when connecting DVD to INPUT1 terminal Using external equipment You can connect many types of external equipment to your TV like a VCR DVD player HDTV tuner game co...

Страница 44: ...input source see page 42 and the input signal type see page 33 Composite cable AUDIO commercially available Composite cable VIDEO commercially available 43 Using external equipment Connecting a DVD player You can use the INPUT 1 INPUT 3 HDMI or INPUT 4 HDMI terminals when connecting to a DVD player and other audiovisual equipment NOTE When using a DVI HDMI conversion adaptor input the Audio Signal...

Страница 45: ...nt cable commercially available Audio cable commercially available When using component cable select Component for Input Select in the menu 44 Using external equipment Connecting a Digital TV STB Set Top Box You can use the INPUT 2 terminal when connecting to a Digital TV STB and other audiovisual equipment PX5X_EN indb 44 PX5X_EN indb 44 2007 5 9 11 43 25 2007 5 9 11 43 25 ...

Страница 46: ...ible Refer to page 46 for a list of PC signals compatible with the TV TV INPUT1 INPUT2 INPUT3 INPUT4 PC Signal names for 15 pin mini D sub connector NOTE Macintosh adaptor may be required for use for some Macintosh computers Pin No 5 is not used for inputting the signal 15 14 13 12 9 11 10 8 7 6 5 4 3 2 1 Pin No Signal name Pin No Signal name Pin No Signal name R GND Ground Not connected G GND Gro...

Страница 47: ...r set See page 15 Is connection to other equipment correct See pages 42 to 45 Has input signal setup been done correctly after connection See page 33 Is the correct input selected See page 33 Is picture adjustment correct See pages 23 to 25 Is the antenna connected properly See page 8 Is On selected in Audio Only See page 33 Is the volume too low See page 15 This is not a malfunction This happens ...

Страница 48: ... length Parity bit Stop bit Flow control Communication procedure Send the control commands from the PC via the RS 232C connector The TV operates according to the received command and sends a response message to the PC Do not send multiple commands at the same time Wait until the PC receives the OK response before sending the next command Command format Parameter Input the parameter values aligning...

Страница 49: ...C U D P P P P P P L O O O O C S R D D H P W 1 1 1 2 2 2 M S S S S K E 0 _ _ _ 0 1 3 0 1 3 _ _ _ _ _ _ _ _ _ _ _ _ _ _ _ _ _ _ _ _ _ _ _ _ _ _ _ _ _ _ _ _ _ _ _ _ _ _ _ _ _ _ _ _ CONTROL ITEM COMMAND PARAMETER CONTROL CONTENTS W W W W W W W M M M A A A T T A O O O O O O TOGGLE NORMAL ZOOM 14 9 PANORAMA FULL CINEMA 16 9 CINEMA 14 9 TOGGLE MUTE ON MUTE OFF SURROUND TOGGLE SURROUND ON SURROUND OFF DUA...

Страница 50: ...A IN INPUT 1 INPUT 2 INPUT 3 INPUT 4 MONITOR OUTPUT RS 232C OSD language Power Requirement PAL SECAM NTSC 3 58 NTSC 4 43 PAL 60 PAL B G D K I SECAM B G D K K K1 NTSC M 44 25 863 25 MHz S1 S41ch including Hyperband Auto Preset 99 ch 450 cd m2 60 000 hours at Backlight Standard position UHF VHF 75 q DIN type VIDEO in AUDIO in COMPONENT in 480I 576I 480P 576P 720P 60Hz 1080I 50Hz 1080I 60Hz VIDEO in ...

Страница 51: ...50 Dimensional drawings Unit mm LC 46PX5X 200 660 1127 1021 4 98 124 309 449 790 728 62 200 100 575 4 PX5X_EN indb 50 PX5X_EN indb 50 2007 5 9 11 43 26 2007 5 9 11 43 26 ...

Страница 52: ...51 Memo Password PX5X_EN indb 51 PX5X_EN indb 51 2007 5 9 11 43 27 2007 5 9 11 43 27 ...

Страница 53: ...Memo PX5X_EN indb 52 PX5X_EN indb 52 2007 5 9 11 43 27 2007 5 9 11 43 27 ...

Страница 54: ...Cover2_PX5X indd 1 Cover2_PX5X indd 1 2007 5 23 17 24 25 2007 5 23 17 24 25 ...

Страница 55: ...Cover2_PX5X indd 2 Cover2_PX5X indd 2 2007 5 23 17 24 26 2007 5 23 17 24 26 ...

Страница 56: ...Printed in Malaysia TINS D134WJZZ 07P07 MA NF Printed on post consumer recycled paper Cover_PX5X indd 2 Cover_PX5X indd 2 2007 5 9 11 36 30 2007 5 9 11 36 30 ...

Отзывы: