background image


13

Preparation

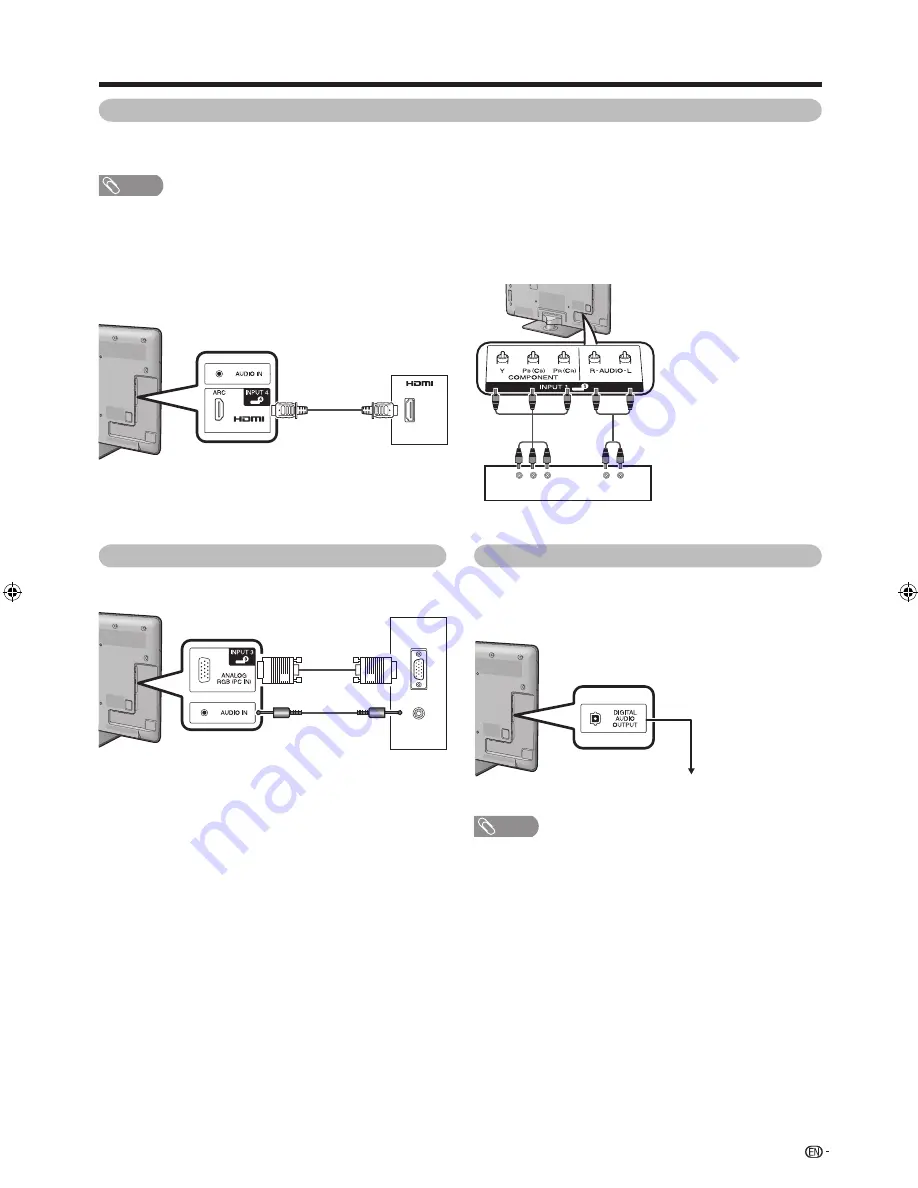
Using Digital Audio Output

It is possible to output audio through the 

DIGITAL 

AUDIO OUTPUT 

terminal. PCM audio outputs from 

the terminal.

To optical digital input of external audio devices

Optical fi bre cable 
(commercially 
available)

NOTE

•  The DIGITAL AUDIO OUTPUT terminal usually outputs the 

same audio from the speakers. (The audio of the content 
you are viewing is output from the terminal.)

•  The DIGITAL AUDIO OUTPUT terminal does not output 

some signals, depending on devices and software.

Connecting a Digital TV STB (Set Top Box)

You can use the INPUT4 (ARC)/INPUT5/INPUT6/INPUT7 (HDMI) or the INPUT1 (component)/INPUT2 (composite) 
terminals when connecting to a Digital TV STB (Set Top Box), and other audiovisual equipment.

NOTE

•  When using a DVI-HDMI adaptor or conversion cable, input the Audio Signal from the AUDIO terminal of AUDIO IN. (See page 

40.)

When using HDMI cable 
(commercially available)

When using component cable 
(commercially available)

R – AUDIO – L

Y

P

B

(C

B

)

P

R

(C

R

)

STB (Set Top Box)

STB
(Set Top 
Box)

Connecting a PC

You can use the INPUT3 (PC) terminal when connecting to a 
PC. (See page 44.)

ANALOGUE

RGB

AUDIO

(L/R)

PC

40LE820M_en_vn_id.indd   13

40LE820M_en_vn_id.indd   13

2010/06/11   9:49:47

2010/06/11   9:49:47

Содержание Aquos LC-40LE820M

Страница 1: ...LC 40LE820M LC 46LE820M LC 52LE820M ENGLISH TIVI MÀU LCD LCD COLOUR TELEVISION LC 40LE820M LC 46LE820M LC 52LE820M OPERATION MANUAL OPERATION MANUAL ...

Страница 2: ......

Страница 3: ...V STB Set Top Box 13 Connecting a PC 13 Using Digital Audio Output 13 Inserting the batteries 14 Using the remote control unit 14 Cautions regarding the remote control unit 14 Turning the TV on off 15 Turning on off the power 15 Standby mode 15 Initial auto installation 15 About Menu operations 16 What is Menu 16 Basic Menu operations 16 About Guide Display 16 Watching TV Setting channels automati...

Страница 4: ...ection 36 Connecting an AQUOS BD Player via the AQUOS LINK compatible audio system 36 Connecting an AQUOS BD Player only 36 AQUOS LINK Setup 36 AQUOS LINK control 36 AQUOS LINK Auto power on 36 Selecting recorder 37 Selecting channel key 37 Audio return channel ARC 37 Operating an AQUOS LINK device 38 Recorder power on off 38 Playback of titles using AQUOS LINK 38 Setup menu 38 Selecting media typ...

Страница 5: ...aying Subtitles 50 Other useful features Connecting a USB device 51 Connecting a Home network server 51 USB media Home network 51 Video mode 52 Music mode 53 Photo mode 53 DivX setup 54 List of files compatible with USB mode 54 Tool menu items 55 Appendix Troubleshooting 56 Reset 57 Information 57 Identification 57 Updating your TV via USB 58 Information on the software license for this product 58 S...

Страница 6: ...h an abrasive cloth or with excessive force as this could cause the panel surface to be scratched If the LCD panel is greatly soiled clean it gently with a soft cloth made of cotton floss etc soaked with a small amount of water Do not clean with excessive force so as to avoid the scratch of the panel surface If dust sticks on the surface of the LCD panel clean the panel with a commercially availabl...

Страница 7: ...ncluding amplifiers To prevent fire never place any type of candle or naked flames on the top or near the TV set To prevent fire or shock hazard do not place the AC power cord under the TV set or other heavy items Do not place heavy objects on this product or stand on it Doing so could cause injury if the product overturns Take special care near children and pets The LCD panel is a very high technolog...

Страница 8: ...le clamp Stand unit Page 10 Page 14 Page 12 Page 11 Page 7 Others Used with batteries inserted For bundling cables Put all parts of the stand unit together and then attach it to the TV Make sure the following accessories are provided with the product Operation manual Warranty ...

Страница 9: ...hold the stand so it will not drop from the edge of the base area NOTE When attaching the stand with the TV laying flat spread a soft cushion on the table and lay the TV on it To detach the stand perform the steps in reverse order Angle adjustment You can rotate up to 20 degrees to the right or left CAUTION Adjust the screen with both hands Place one hand on the TV and rotate the screen while holdi...

Страница 10: ...explanation purposes and may vary slightly from the actual operations The Illustrations used throughout this manual are based on LC 40LE820M TV Front 1 VOL k l Volume up down buttons 2 CH r s Channel up down buttons 3 INPUT button 4 MENU button 5 POWER a On Off button 6 OPC sensor 7 Remote control sensor 8 Illumination LED 1 2 3 4 5 6 7 8 ...

Страница 11: ...nnot be operated when headphones are plugged in You can set the volume to different levels for each input source Volume display when headphones are plugged in 20 OUTPUT Headphones AUDIO L R terminal INPUT6 HDMI terminal DIGITAL AUDIO OUTPUT terminal INPUT4 HDMI ARC terminal INPUT7 HDMI terminal INPUT3 PC input terminal USB terminal ETHERNET 10 100 terminal AUDIO IN terminal The AUDIO IN terminal c...

Страница 12: ...EXIT Turn off the On Screen Display 16 FREEZE Freeze a motion picture on the screen See page 22 SURROUND Select surround settings See page 34 17 INPUT INPUT SOURCE Select an input source TV INPUT1 INPUT2 INPUT3 PC INPUT4 INPUT5 INPUT6 INPUT7 and USB See pages 12 13 40 to 42 and 44 18 ECO Select Energy save setting See page 26 19 AV MODE Select a video setting See page 29 20 m Teletext Select the t...

Страница 13: ...he cable clamp to the rear of the TV 2 Bundle the cable 4 Plug the AC cord in to the AC outlet Place the TV close to the AC outlet and keep the power plug within reach Disconnect the AC cord from the AC outlet if the TV will not be used for a long period of time TV rear view Connecting the antenna cable To enjoy a clearer picture use an outdoor antenna The following is a brief explanation of the t...

Страница 14: ...terminals when connecting to a DVD player and other audiovisual equipment When using HDMI cable commercially available When using component cable commercially available NOTE When using a DVI HDMI conversion adaptor input the Audio Signal from the AUDIO terminal of AUDIO IN See page 40 R AUDIO L Y PB CB PR CR When using component cable commercially available R AUDIO L Y PB CB PR CR Connecting exter...

Страница 15: ... signals depending on devices and software Connecting a Digital TV STB Set Top Box You can use the INPUT4 ARC INPUT5 INPUT6 INPUT7 HDMI or the INPUT1 component INPUT2 composite terminals when connecting to a Digital TV STB Set Top Box and other audiovisual equipment NOTE When using a DVI HDMI adaptor or conversion cable input the Audio Signal from the AUDIO terminal of AUDIO IN See page 40 When us...

Страница 16: ...rresponding to the e and f indications in the battery compartment 2 Insert the two supplied AAA size batteries 3 Close the battery cover 5 m Use the remote control unit by pointing it towards the remote sensor window Objects between the remote control unit and sensor window may prevent proper operation Cautions regarding the remote control unit Do not subject the remote control unit to shock In ad...

Страница 17: ...their settings and the connected antenna To abort the initial auto installation in progress press RETURN 5 NOTE HOME mode Settings are optimised for normal home viewing and energy efficiency STORE mode Settings are designed for maximum impact in retail store displays To change the STORE mode to HOME mode please refer to page 57 to reset the unit If you turn off the power on the TV after performing ...

Страница 18: ...n Screen Display to perform settings for the TV The On Screen Display for the settings is called Menu The Menu can be operated with the remote control unit Press MENU and the MENU screen displays Press c d to select the desired menu Press a b c d to select the desired menu item Press ENTER to proceed if necessary 1 2 3 Press EXIT or MENU to exit the MENU Press RETURN as necessary to return to the ...

Страница 19: ... enter it here See page 24 for setting a password 5 7 Press a b to select the desired language listed on the screen and then press ENTER You do not need to do anything during the auto search Press c d to select Yes and then press ENTER 6 Watching TV Setting channels automatically You can run auto installation again even after setting up the preset channels Press b c d to select View setting 3 Setu...

Страница 20: ...ollowed by 2 To select a 2 digit channel e g channel 12 Press 1 followed by 2 Watching TV 20 Changing the volume You can change the volume on the TV or on the remote control unit To increase the volume press VOL e To decrease the volume press VOL f Selecting programmes Adjusting the volume Example Channel display TV BBC 1 PAL B G STEREO 05 When viewing Teletext information View a page directly whi...

Страница 21: ...hannel Store Memorise the current display channel Cancel Return to the previous screen The search result will not be stored 3 Fine tuning Press a b c d to select the channel you want to edit and then press ENTER The selected channel information displays 1 Press a b to select Fine and then press ENTER 2 Press c d to adjust the frequency and then press RETURN or MENU Adjust while checking the backgr...

Страница 22: ...ing the child lock You can block the viewing of any channel Press a b c d to select the channel you want to edit and then press ENTER The selected channel information will be displayed 1 Press a b to set Lock to On and then press ENTER 3 Fine Colour sys Off On Sound sys Label Skip Lock Search 48 25 PAL I Off Off Press a b to select Lock and then press ENTER Child lock menu will be displayed 2 Lock...

Страница 23: ...en press ENTER Erasing programmes The individual programme can be erased Press a b c d to select the channel you want to erase and then press ENTER A message screen pops up Press c d to select Yes and then press ENTER All the subsequent programmes move up Repeat the steps 8 and 9 until all desired channels are erased 10 Erase programme menus 01 06 SAT 1 PRO7 KABEL 01 SAT 1 Please select channel to...

Страница 24: ...he currently tuned channel to the previously tuned channel Press A again to switch back to the currently tuned channel Press A to toggle between the currently selected input source and the previously selected one Press A to return to the previous page in teletext mode Outputting only audio When listening to music from a music programme you can set the display off and enjoy audio only Press MENU an...

Страница 25: ...signal Each time you press MPX the mode switches between NICAM STEREO and MONO When receiving a bilingual signal Each time you press MPX the mode switches among NICAM CH A NICAM CH B NICAM CH AB and MONO In the TV mode of A2 TV broadcasts When receiving a stereo signal Each time you press MPX the mode switches between STEREO and MONO When receiving a monaural signal When you press MPX MONO display...

Страница 26: ...nfirm 9 Press c d to select Yes and then press ENTER 7 Password Yes No Setting Password You can change or clear Password Enter your new password Use 4 digits Enter the password again to confirm Enter the 4 digit number as a password using 0 9 8 NOTE As a precautionary measure make a note of your password on the back of this operation manual cut it out and keep it in a safe place that children canno...

Страница 27: ...is blocked Button Control Lock The operation with main unit buttons is blocked NOTE You cannot set both RC Control Lock and Button Control Lock at the same time Press MENU on the TV and VOL k l to select Setup 1 Press CHs and VOLk l to select Option 2 Press CHr s to select Key lock and then press INPUT 3 NOTE See page 16 for the functions of the TV control panel buttons To cancel Button Control Lo...

Страница 28: ...nged Press MENU and the MENU screen displays 1 Press c d to select Setup 2 Press a b to select ECO picture control 4 Press c d to select On or Off 5 Press a b to select Energy save and then press ENTER 4 Press a b to select Standard or Advanced and then press ENTER 5 Selected item Description Standard Reduces the backlight brightness Advanced Reduces the backlight brightness more than Standard Off...

Страница 29: ...he end of a broadcast day 2 2 Press b c d to select ECO 3 Press b c d to select ECO 3 Selecting the Wide Screen Signalling WSS picture size automatically WSS allows a television to switch automatically among the different screen formats Press MENU and the MENU screen displays 1 Press c d to select Setup 2 Press a b to select WSS 4 Press c d to select On or Off 5 NOTE Try to set WIDE mode if an ima...

Страница 30: ...ally Press WIDE The WIDE MODE menu displays The menu lists the wide mode options selectable for the type of TV video signal currently received 1 Press WIDE or a b while the WIDE MODE menu displays on the screen As you toggle down the options each mode is immediately reflected on the TV 2 WIDE MODE Normal Zoom 14 9 Panorama Full Cinema 16 9 Cinema 14 9 4 3 Mode set to Panorama 4 3 Mode set to Normal...

Страница 31: ... values No adjustments are allowed NOTE You can select a different AV mode item for each input mode For example select STANDARD for TV input and DYNAMIC for VIDEO input The item marked with is available only when selecting INPUT4 INPUT5 INPUT6 INPUT7 or INPUT3 PC from the INPUT in the CH list menu The item marked with is available only when accepting an x v Colour signal through an HDMI terminal P...

Страница 32: ... steps to adjust the picture Watching TV Setup CH list Menu Picture Exit Enter Select Backlight AV mode OPC Off STANDARD STANDARD 16 16 3 Manual picture settings Selected item cbutton dbutton OPC Sets whether or not the screen brightness is automatically adjusted according to the lighting condition in the room OPC setting See this page Backlight The screen dims The screen brightens Contrast For le...

Страница 33: ...anging the value of each item H Gamma adjustment Adjust mid level brightness The adjustment range of the gamma can be set to a maximum of 2 and a minimum of 2 by pressing c or d H Film mode Automatically detects a film based source originally encoded at 24 25 frames second depending on the vertical frequency analyses it then recreates each still film frame for high definition picture quality H Active...

Страница 34: ... MENU screen displays 1 Press c d to select Setup 2 Press a b to select Position and then press ENTER 5 Press a b to select H Pos or V Pos 6 Press c d to adjust the item to your desired position 7 Position Display position adjustment 0 H Pos 0 8 8 V Pos 8 8 NOTE For resetting all adjustment items to the factory preset values press a b to select Reset and then press ENTER Adjustments are stored sep...

Страница 35: ... a b to select Time format and then press ENTER 6 Press c d to select the desired time format and then press ENTER 7 Selected item Description On Display the clock time On half hourly Display the clock time in 30 minutes increments Off Hide the clock time Watching TV On On half hourly Off Displaying the clock On Off Time format Time display 24HR AM PM Selecting time format Time format Time display...

Страница 36: ...ing DVD movies and TV programmes broadcast in surround sound Off Outputs the normal sound Press b c d to select Audio Press MENU and the MENU screen displays Press c d to select On or Off Press a b to select SRS TS HD Press c d to select Setup Press c d to select Setup Automatic volume adjustment Different sound sources sometimes do not have the same volume level such as a programme and its commer...

Страница 37: ...ernal devices You can also call up the external player s Top menu or AQUOS BD Player s Title list provided that the devices support AQUOS LINK Multiple control of HDMI devices You can select which HDMI device to operate using OPTION Controlling the AQUOS LINK compatible audio system You can adjust the volume and select the sound mode of the AQUOS LINK compatible audio system NOTE Point the remote ...

Страница 38: ...ting an AQUOS BD Player only Optical fibre cable commercially available HDMI certified cable HDMI certified cable HDMI certified cable AQUOS BD Player AQUOS LINK compatible audio system AQUOS BD Player AQUOS LINK Setup Press OPTION and the Link operation screen displays 1 Press a b to select AQUOS LINK setup and then press ENTER 2 AQUOS LINK Auto power on If this is activated the One Touch Play functi...

Страница 39: ...ink operation screen displays 1 Press a b to select AQUOS LINK setup and then press ENTER 2 Press a b to select Selecting channel key and then press ENTER 3 Connection for using Audio return channel You need to use ARC compatible cables devices and connect to the INPUT4 terminal to activate this function The connection method is the same as the Connecting an AQUOS BD player only on page 36 Press O...

Страница 40: ...n in the menu screen Press a b to select Recorder power on off and then press ENTER 2 Every time you press ENTER in Recorder power on off the CEC compatible recorder will be turned on off 3 Recorder power on off This function is for turning of the CEC compatible recorder on off NOTE You can go to Top menu title list from Link operation in the menu screen Press OPTION and the Link operation screen ...

Страница 41: ...n screen displays 1 Press a b to select Media change and then press ENTER Selecting media type for CEC compatible recorder If your recorder has multiple storage media select the media type here Select the desired medium such as DVD or HDD The media type changes every time you press ENTER 3 AQUOS LINK Press OPTION and the Link operation screen displays 1 Press a b to select Model select and then pr...

Страница 42: ...an HDMI certified cable When you want to output the audio and picture from an HDMI output device on the TV select INPUT4 INPUT5 INPUT6 or INPUT7 by switching the input source HDMI output device Selected items Description Enable Disable Set whether or not to use WIDE MODE based on signal recognition including an HDMI signal Settings when using HDMI output devices HDMI cable commercially available Pr...

Страница 43: ...d the MENU screen displays 2 Press c d to select Setup 3 Press a b to select Input label and then press ENTER 6 Labelling input sources CH list Tool Menu INPUT Exit Enter INPUT2 INPUT1 INPUT3 INPUT4 INPUT5 DVD INPUT7 USB Home network Not switchable Switchable Switchable Switchable Switchable Switchable Switchable Switchable Switchable Repeat the above until the name is fully spelt out and then pre...

Страница 44: ... Press b c d to select Option 3 Press a b to select Colour system and then press ENTER 4 Press a b to select a compatible video signal system of your equipment and then press ENTER 5 Auto PAL SECAM NTSC3 58 NTSC4 43 PAL 60 You can change the colour system to one that is compatible with the image on the screen NOTE Factory preset value is Auto If Auto is selected colour system for input signal is a...

Страница 45: ...illuminated in several ways Press b c d to select Option Press MENU and the MENU screen displays 1 3 Press a b to select the desired item and then press ENTER After you select Off or Standby press c d to select Yes and then press ENTER 5 2 Press c d to select Setup 4 Press a b to select Illumination and then press ENTER Selected items Description Off The LED is not illuminated Standby The LED is i...

Страница 46: ... 3 5 mm stereo minijack cable commercially available RGB cable commercially available HDMI Connection PC PC INPUT 4 5 6 7 INPUT 5 HDMI certified cable ø 3 5 mm stereo minijack cable DVI HDMI cable Audio select for connecting a PC When using the INPUT3 PC terminal you must select which terminal uses the AUDIO R L jack for analogue audio input Go to MENU s Setup s Option s Terminal setting s PC inpu...

Страница 47: ...o select Setup 4 Press a b to select Option for view and then press ENTER Input Signal Cinema Normal 1024g768 For viewing wide screen programs The top and bottom of the image is slightly cropped Keeps the original aspect ratio in a full screen display Full Dot by Dot An image fully fills the screen Detects the resolution of the signal and displays an image with the same number of pixels on the scre...

Страница 48: ...up or down Clock Adjusts when the image flickers with vertical stripes Phase Adjusts when characters have low contrast or when the image flickers Adjusting the PC image automatically Adjusting the PC image manually Connecting a PC Press c d to select Yes and then press ENTER Auto Sync starts 7 NOTE Auto Sync is likely to succeed when an input PC image has wide vertical stripes e g pattern with high ...

Страница 49: ... the control commands from the PC via the RS 232C connector The TV operates according to the received command and sends a response message to the PC Do not send multiple commands at the same time Wait until the PC receives the OK response before sending the next command Command format Parameter Input the parameter values aligning left and fill with space s for the remainder Be sure that four values...

Страница 50: ...N AV MODE SELECTION A V M D 0 _ _ _ TOGGLE A V M D 1 _ _ _ STANDARD A V M D 2 _ _ _ MOVIE A V M D 3 _ _ _ GAME A V M D 4 _ _ _ USER A V M D 5 _ _ _ DYNAMIC Fixed A V M D 6 _ _ _ DYNAMIC A V M D 7 _ _ _ PC A V M D 8 _ _ _ x v Colour A V M D 1 0 0 _ AUTO VOLUME V O L M _ _ VOLUME 0 60 POSITION H P O S _ H POSITION AV fnn nn H P O S _ H POSITION PC fnn nn V P O S _ V POSITION AV fnn nn V P O S _ V PO...

Страница 51: ...reen Each time you press m the screen switches as shown to the upper right If you select a programme with no Teletext signal No Teletext available is displayed The same message displays during other modes if no teletext signal is available TELETEXT TELETEXT When viewing the teletext information Press CHr to increase the page number Press CHs to decrease the page number Button functions Colour Red ...

Страница 52: ...rope Polish French Scandinavian Czech German Slovenian Croatian Italian Rumanian Greek Turkish English French Scandinavian Turkish German Spanish Italian Greek Cyrillic English Russian Estonian Czech German Slovenian Croatian Ukrainian Lettish Teletext function 1 3 4 Subpage screen Press m to display Teletext Press 1 to display the subpage as shown below Select the desired subpage by using CHr CHs...

Страница 53: ... the drive server in step 1 when there is only one drive in the connected USB device or there is only one Home network server connected to the TV 16 is the maximum number of USB drives and 10 is the maximum number of Home network servers that can be displayed Press ENTER 3 CAUTION Do not use a USB extension cable when connecting a USB device to the USB terminal of the TV Using a USB extension cabl...

Страница 54: ...ailable on the screen with the operation panel You can call up this operation panel by pressing CONTROL on the remote control unit or select Control USB from Option s Option for view Reverse fast forward continues from one file to another during continuous playback H Viewing video Video_01 wmv 0 00 05 0 03 34 0 00 05 538 Video_01 wmv Previous Next REW FWD Play Pause Back Guide off On Stop Resume ju...

Страница 55: ...ter this directory When selecting a photo thumbnail Display the photo in full screen a b c d Cursor Select a desired item B button Go to the USB menu in the USB mode Go to the Home network menu in the Home network mode R button Select deselect photos shown in the slide show in the USB mode Move to the parent folder in the Home network mode G button Selecting BGM This is not available in the Home n...

Страница 56: ...es may not be playable depending on the bitrate USB device USB Memory USB card reader Mass Storage class File system FAT FAT32 Photo file format JPEG jpg DCF2 0 compliant Music file format MP3 mp3 Bitrate 32 k 40 k 48 k 56 k 64 k 80 k 96 k 112 k 128 k 160 k 192 k 224 k 256 k 320 kbps Sampling frequency 32 k 44 1 k 48 kHz DivX setup This is the function to confirm your registration code Press a b to s...

Страница 57: ... 31 3D Y C Page 32 Monochrome Page 32 Range of OPC Page 32 Reset Page 30 NOTE Some menu items may not be displayed depending on the selected input source Audio Auto volume Page 34 Treble Page 34 Bass Page 34 Balance Page 34 SRS TS HD Page 34 Bass enhancer Page 34 Reset Page 34 Clear voice Page 34 Wide mode Page 28 Control USB Page 52 Screen effect Channel selecting effect Page 43 Position Page 32 ...

Страница 58: ...room that is too bright Check the colour system setting See pages 19 and 42 Check the HDMI auto view setting See page 40 Power is suddenly turned off The unit s internal temperature has increased Remove any objects blocking the vent or clean Check the ECO setting See pages 26 and 27 Is the sleep timer set See page 26 No picture Is the connection to external equipment correct See pages 12 and 13 Is...

Страница 59: ...d to its original settings 7 Reset If you have already set the password enter it here Return to factory pre settings displays on the screen 5 Information Press a b to select the desired language listed on the screen and then press ENTER Press c d to select HOME or STORE and then press ENTER 8 10 The TV searches for sort and stores all the receivable TV stations according to their settings and the ...

Страница 60: ...ghts BSD License This product includes software developed by the University of California Berkeley and its contributors libjpeg This software is copyright 1991 1996 Thomas G Lane Portions of this software are based in part on the work of the Independent JPEG Group Portions copyright 2004 Intel Corporation 58 Appendix Updating your TV via USB This function allows you to update to the latest softwar...

Страница 61: ...0I 60Hz 1080P 50Hz 1080P 60Hz 1080P 24Hz INPUT 7 HDMI HDMI input 480I 576I 480P 576P 720P 50Hz 720P 60Hz 1080I 50Hz 1080I 60Hz 1080P 50Hz 1080P 60Hz 1080P 24Hz DIGITAL AUDIO OUTPUT Optical Digital audio output RS 232C 9 pin D Sub male connector ETHERNET 10 100 Home network connector USB USB OUTPUT Ø 3 5 mm jack Audio output OSD language English Simplified Chinese Arabic Thai Power requirement AC 1...

Страница 62: ...450 39 123 84 300 300 132 275 39 125 993 707 659 48 404 890 6 503 2 Dimensional drawings 400 400 211 1127 734 444 785 51 1023 4 577 6 540 340 39 158 106 67 39 60 Unit mm Appendix LC 40LE820M LC 46LE820M ...

Страница 63: ...Dimensional drawings Continued Unit mm Appendix LC 52LE820M 1157 400 1260 540 340 39 39 106 158 67 653 484 861 811 50 400 172 61 ...

Страница 64: ...tand Before setting TV on the wall Remove the connected cables DVD VCR etc from the terminals Detach the four caps at the 4 locations on the rear of the TV 62 1 2 2 1 3 1 Unfasten the 4 screws 2 Remove the supporting post from the TV Remove the screws at the 4 locations on the rear of the TV Lay the TV flat Spread a cushion over the base area to lay the TV on Unfasten the screw on the rear of the T...

Страница 65: ...e TV You can ask a qualified service professional about using a SHARP recommended AN 37AG2 AN 37P30 or AN 52AG4 bracket to mount the TV to the wall Carefully read the instructions that come with the bracket before beginning work Appendix NOTE Detach the cable clamps on the rear of the TV when using the optional mount bracket Hanging on the wall AN 37AG2 AN 37P30 and AN 52AG4 wall mount bracket See ...

Страница 66: ...sword input screen displays 7 Press and hold both CHr and VOL k on the TV simultaneously until the message appears on the screen Press MENU and the MENU screen displays 1 Press c d to select Setup 2 Press a b to select Individual setting and then press ENTER 4 Press a b to select Password and then press ENTER 5 Press b c d to select View setting 3 NOTE To set the password again refer to Password s...

Страница 67: ......

Страница 68: ...LC 40LE820M LC 46LE820M LC 52LE820M OPERATION MANUAL Printed in Malaysia TINS E732WJZZ 10P06 MA NG ...

Отзывы: