background image

5

6

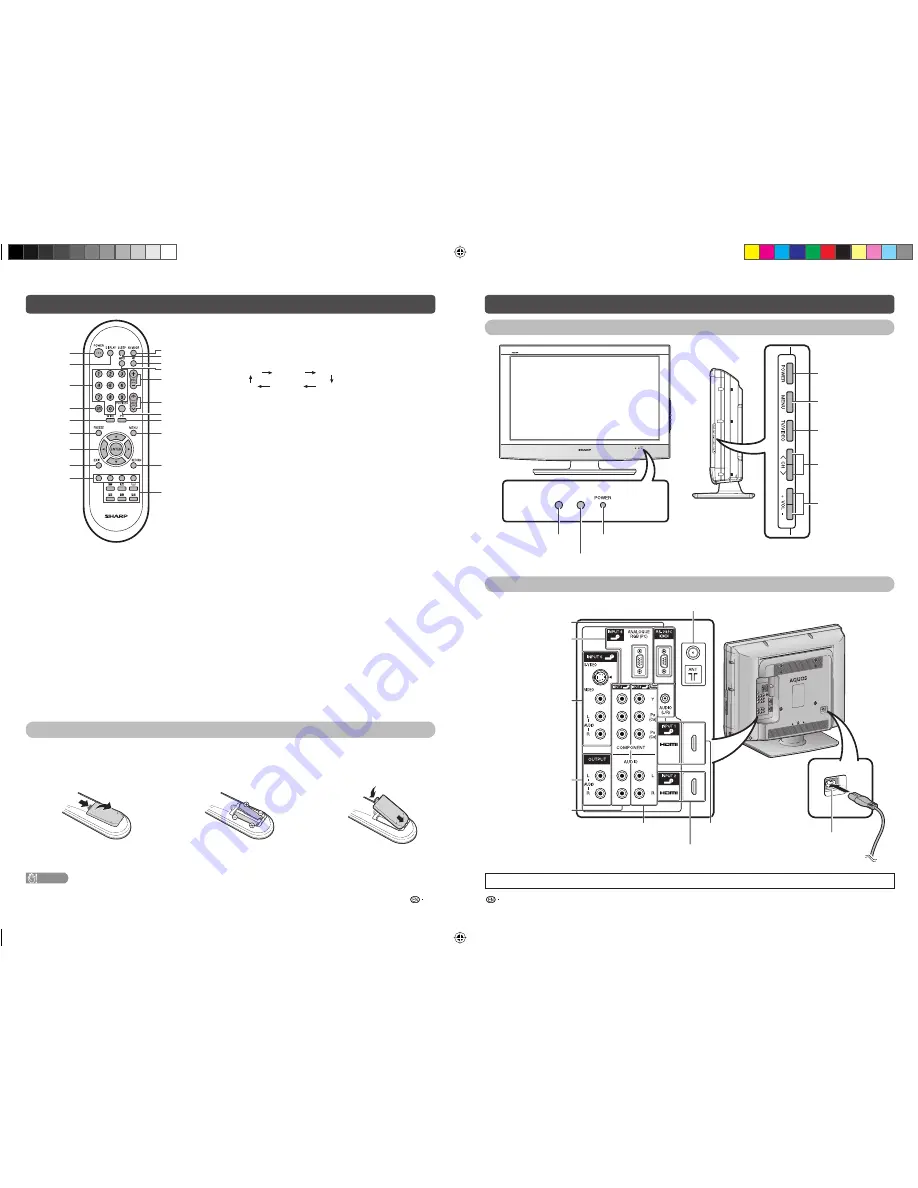
Remote control unit

Part names

TV (Front/Side)

POWER

 (On/Off) 

button

MENU

 button

TV/VIDEO

 button

Channel up (

r

)/

down (

s

) buttons

Volume up (

e

)/

down (

f

) buttons

POWER indicator

OPC sensor

TV (Rear)

• The illustrations in this operation manual are for explanation purposes and may vary slightly from the actual operations.

INPUT 5 terminals

INPUT 6 (PC) terminals

INPUT 1 (HDMI) 
terminal

Antenna input terminal

INPUT 2 (HDMI) terminal

AC INPUT terminal

INPUT 3 terminals

OUTPUT terminals

RS-232C terminal

INPUT 4 terminals

Inserting the batteries

Before using the TV for the fi rst time, insert two “AA” size batteries (supplied).  When the batteries become 
depleted and the remote control fails to operate, replace the batteries with new “AA” size batteries.

1

Open the battery cover.

2

Insert the two supplied “AA” size 
batteries.

3

Close the battery cover.

• Place batteries with their terminals 

corresponding to the (

e

) and (

f

) indications in 

the battery compartment.

CAUTION 

• Batteries (battery pack or batteries installed) shall not be exposed to excessive heat such as sunshine, fi re or the like.

11 
12 

14 

13 

15 

17 

16 

18 

19 

10 

20 

1 POWER 

(STANDBY/ON)


To switch the power on and off. (See page 7.)

2 DISPLAY


Display the channel or input information.

3  0 – 9


Set the channel.


TELETEXT mode: Set the page. (See page 13.)

A

 (Flashback)


Press to return to the previous selected channel or 
external input mode.

5 WIDE


Change the wide image mode. (See page 12 and 13.)

6 FREEZE


Freeze a motion picture on the screen. (See page 12.)

a

/

b

/

c

/

d

 (Cursor)


Select a desired item on the setting screen.

 ENTER


Execute a command.

8 EXIT


Return to the default screen.

9 Colour 

(Red/Green/Yellow/Blue)


TELETEXT mode: Select a page. (See page 13.)

10 AV MODE


Select an audio and video setting. (See page 8.)

11 SLEEP


Set the Sleep timer.


0hr.30min.

1hr.00min.

2hr.30min.

1hr.30min.

2hr.00min.

Off

12 

e

 (Mute)

 Press 

s

 Mutes sound.

 Press 

again 

s

 Restores sound.


Mute will be cancelled after 30 minutes. However, the TV will 
not suddenly output loud sound as the volume level will be set 
to 0 automatically. Increase the volume level by pressing 

VOL


k

.

13 MPX


Select the sound multiplex mode.

14 VOL

k

/VOL

l


Set the volume.


(

k

) Increase  the  volume.


(

l

) Decrease  the  volume.

15 CH

r

/CH

s


TV input mode: Select the channel.


TELETEXT mode: Select the page. (See page 13.)


(

r

) Increase the channel number.


(

s

) Decrease the channel number.

16  TV/VIDEO (INPUT SOURCE)


Select an input source.

17 PC


Directly select the PC terminal.

18 MENU


Display the menu screen.

19 RETURN


MENU mode: Return to the previous menu screen.

20 

m

 (TELETEXT)


Select the TELETEXT mode. (all TV image, all TEXT image, 
TV/TEXT image) (See page 13.)


k

 (Reveal hidden for TELETEXT)


TELETEXT mode: Display hidden characters. (See page 13.)


[

 (SUBTITLE for TELETEXT)


To turn the subtitles on and off. (See page 13.)


3

 (Hold)


TELETEXT mode: Stop updating Teletext pages automatically. 
Press 

3

 again to release the hold mode. (See page 13.)


1

 (Subpage)


Display the Teletext subpage directly. (See page 13.)


v

 (Top/Bottom/Full)


TELETEXT mode: Set the area of magnifi cation. (See page 13.)

Remote control sensor

LC32A37M_EN.indd   3

LC32A37M_EN.indd   3

8/24/2009   9:49:38 AM

8/24/2009   9:49:38 AM

Содержание Aquos LC-32A37M

Страница 1: ... fall from the cart Ventilation The vents and other openings in the cabinet are designed for ventilation Do not cover or block these vents and openings since insufficient ventilation can cause overheating and or shorten the life of the product Do not place the product on a bed sofa rug or other similar surface since they can block ventilation openings This product is not designed for built in insta...

Страница 2: ...y available AC cord AC outlet You can connect many types of external equipment to your TV like a VCR game console camcorder DVD player Digital TV STB Set Top Box and PC To view external source images select the input source from TV VIDEO on the remote control unit or TV VIDEO on the TV CAUTION To protect all equipment always turn off the TV before connecting to a VCR game console camcorder DVD pla...

Страница 3: ...otion picture on the screen See page 12 7 a b c d Cursor Select a desired item on the setting screen ENTER Execute a command 8 EXIT Return to the default screen 9 Colour Red Green Yellow Blue TELETEXT mode Select a page See page 13 10 AV MODE Select an audio and video setting See page 8 11 SLEEP Set the Sleep timer 0hr 30min 1hr 00min 2hr 30min 1hr 30min 2hr 00min Off 12 e Mute Press s Mutes sound...

Страница 4: ...ystem to receive Auto PAL SECAM NTSC 3 58 NTSC 4 43 PAL 60 H Sound System Broadcasting system Select the optimum sound system Broadcasting system to receive B G D K I M H Label When a TV channel sends its Network Name the auto installation detects the information and assigns a name to it However you can change individual channel names 1 Repeat steps 1 to 5 in Manual Adjust 2 Press a b c d to selec...

Страница 5: ...e the same volume level for example the changing from movie to the advertisements The Automatic Volume Control Auto Vol solves this problem and equalises the volume levels H Clear Voice This function emphasises speech voice against the background noise for more intelligibility It is not recommended for music sources NOTE For resetting all adjustment items to the factory preset values press a b to ...

Страница 6: ...e labelling menu NOTE You cannot change labels if the input source is TV H HDMI Setup HDMI input mode only 1 Repeat steps 1 to 3 in Input Label 2 Press a b to select HDMI Setup and then press ENTER 3 Press a b to select Auto View or Audio Select and then press ENTER 4 Press c d to select the desired item and then press ENTER HDMI Setup items Description Auto View Set whether or not to use WIDE MOD...

Страница 7: ... XGA 1024 g 768 48 4 kHz 60 Hz WXGA 1360 g 768 47 7 kHz 60 Hz SXGA 1280 g 1024 64 0 kHz 60 Hz Power Management is a registered trademark of Sun Microsystems Inc VGA and XGA are registered trademarks of International Business Machines Corp Return code 0DH Normal response Return code 0DH Problem response communication error or incorrect command NOTE If an underbar _ appears in the parameter column e...

Страница 8: ...fore having the TV serviced Problem Possible Solution No power Check if you pressed POWER on the remote control unit See page 7 If the indicator on the TV lights up red press POWER Is the AC cord disconnected See page 3 Has the power been turned on See page 7 Unit cannot be operated External influences such as lightning static electricity etc may cause improper operation In this case operate the un...

Отзывы: