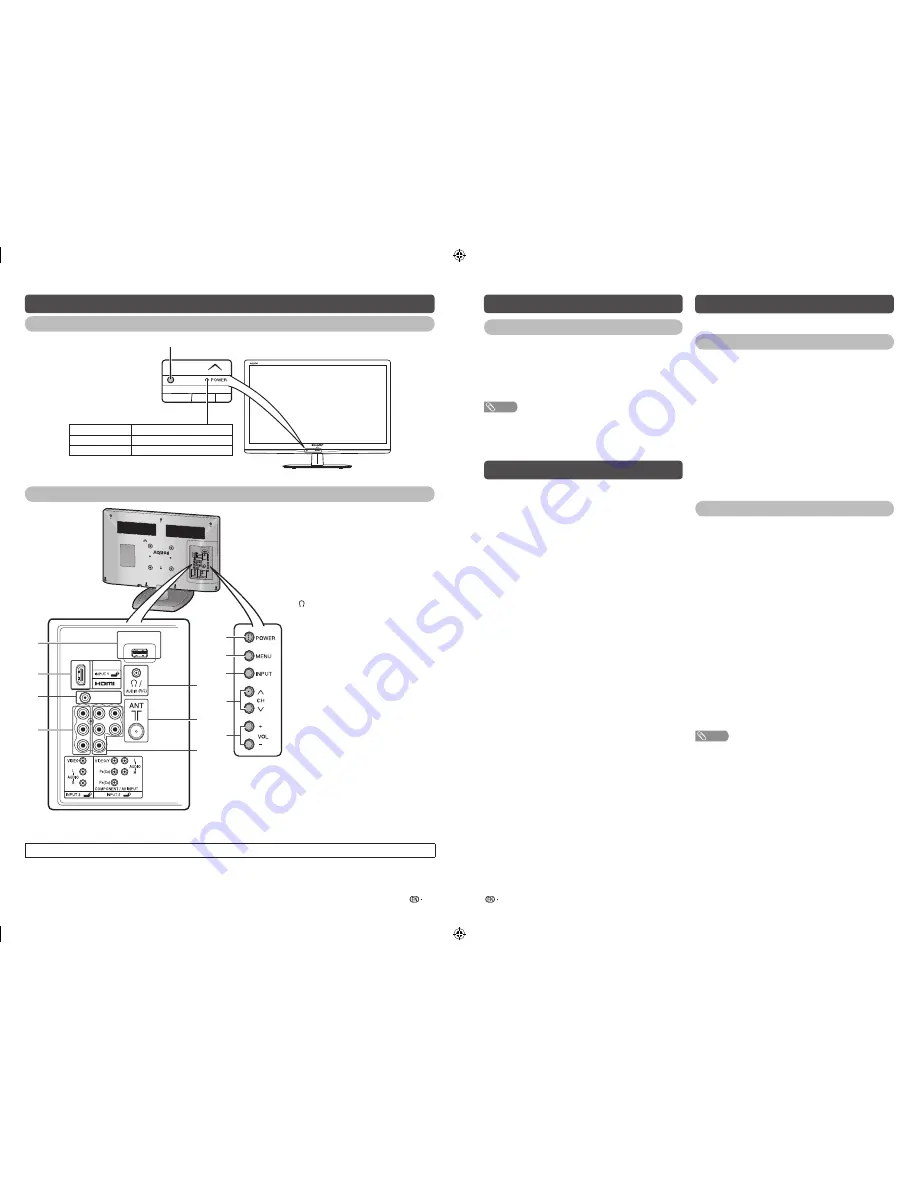
background image

7

8

Part names

TV (Front)

POWER indicator

Light off

Power off.

Lighted (Red)

The TV is in standby mode.

Lighted (Green)

The TV is on.

Remote control sensor

TV (Rear)

SERVICE ONLY

SERVICE

ONLY

12

9

1

2

3

4

5

7

6

10

11

8

1


POWER

 (On/Off) button

2


MENU

 button

3


INPUT

 button

4

  Channel up (

r

)/down (

s

) buttons

5

  Volume up (

e

)/down (

f

) buttons

SERVICE ONLY terminal*

7

  INPUT 1 (HDMI) terminal

8

  SERVICE ONLY terminal* 

INPUT 3 terminals

10 

/AUDIO output (R/L) terminal 

11

 Antenna input terminal

12

 INPUT 2 (COMPONENT/AV INPUT) 

terminals

*  Usually do not connect anything to this terminal as it is reserved only for service personnel.

• The illustrations in this operation manual are for explanation purposes and may vary slightly from the actual operations.

Turning the TV on/off

Turning on/off the power

• To turn on the power

 Press 

POWER

 on the TV or remote control. (After a few 

seconds, an image appears with sound.)

• To turn off the power

  Switch it off by pressing 

POWER

 on the TV or remote 

control.

NOTE 

• If you are not going to use this TV for a long period of time, 

be sure to remove the AC cord from the AC outlet.

• Minor power is consumed when the unit is in standby 

mode.

Auto Installation

1

When you turn on the TV for the fi rst time, Setup 
menu will appears and Language automatically 
been selected.

2

Press 

c

/

d

 to select desired language.

Programme Setup

Channels can be tuned automatically or manually.

Auto tuning

You can automatically tune by performing the 
procedure below.

1

Press 

MENU

 and the MENU screen displays.

2

Press 

c

/

d

 to select “Setup”. 

3

Press 

a

/

b

 to select “Auto tuning”, and then 

press 

ENTER

.

4

Press 

ENTER

 to select Start scan. The search 

will begin for all available stations.

5

When the search is completed, the TV will 
automatically appear the fi rst programme 
position.

Manual tuning

You can tune channels into desired channels.

1

Repeat steps 1 to 2 in 

Auto tuning

.

2

Press 

a

/

b

 to select “Manual tuning”, and then 

press 

ENTER

.

H

 CH (Channel)

Display channel that you selected.

H

 Colour system

Select the optimum colour system to receive. (Auto, 
PAL, SECAM, NTSC 3.58, NTSC 4.43)

H

 Sound system (Broadcasting system)

Select the optimum sound system (Broadcasting 
system) to receive. (B/G, I, D/K, M)

H

 Search

The next channel will be searched in order.

H

 Fine-tune

You can adjust the frequency to your desired position.

NOTE 

• Adjust while checking the background picture as a 

reference.

• Instead of pressing 

a

/

b

 to adjust the frequency, you 

can set by directly entering the frequency number of the 
channel with 

0 — 9

.

a

• 179.25 MHz: Press 

s

 7 

s

 9 

s

 2 

s

 5

.

• 49.25 MHz: Press 

s

 9 

s

 2 

s

 5 

s

 ENTER

.

LC-24LE150M_F906_EN.indd   4

LC-24LE150M_F906_EN.indd   4

6/11/2013   12:00:33 PM

6/11/2013   12:00:33 PM

Содержание Aquos LC-24LE150M

Страница 1: ... and openings since insufficient ventilation can cause overheating and or shorten the life of the product Do not place the product on a bed sofa rug or other similar surface since they can block ventilation openings This product is not designed for built in installation do not place the product in an enclosed place such as a bookcase or rack unless proper ventilation is provided or the manufacturer...

Страница 2: ...not attach or detach the stand without holding it Doing so can cause the stand to fall resulting in serious personal injuries as well as damage to the stand Antenna connection Connect antenna cable to the antenna terminal or If your outdoor antenna uses a 75 ohm coaxial cable with a standard DIN45325 plug IEC 169 2 plug it into the antenna jack at the rear of the set If your outdoor antenna uses a...

Страница 3: ... sound Press e again s Restores sound Mute will be cancelled after 30 minutes However the TV will not suddenly output loud sound as the volume level will be set to 0 automatically Increase the volume level by pressing VOL k 9 a b c d Cursor Select a desired item on the setting screen ENTER Execute a command 10 WIDE Change the wide image mode See page 12 11 ECO Reduce overall power consumption base...

Страница 4: ...appears and Language automatically been selected 2 Press c d to select desired language Programme Setup Channels can be tuned automatically or manually Auto tuning You can automatically tune by performing the procedure below 1 Press MENU and the MENU screen displays 2 Press c d to select Setup 3 Press a b to select Auto tuning and then press ENTER 4 Press ENTER to select Start scan The search will...

Страница 5: ... to clear Picture menu AV mode Backlight Contrast Brightness Colour Tint Sharpness Colour temp Standard High Enter 8 30 0 8 0 2 c db H Picture adjustments Selected item c button d button Backlight The screen dims The screen brightens Contrast For less contrast For more contrast Brightness For less brightness For more brightness Colour For less colour intensity For more colour intensity Tint Skin t...

Страница 6: ... may not be displayable depending on the input signal H Audio output select You can select which device is used for outputting audio Option Description Headphone Output audio through headphones Audio out Output audio through an A V receiver or surround audio controller NOTE If you select Headphone when a cable is inserted in the AUDIO output terminal the TV speakers are muted and all Audio menu it...

Страница 7: ...d Has the power been turned on See page 8 Unit cannot be operated External influences such as lightning static electricity etc may cause improper operation In this case operate the unit after first turning the power off the TV or unplugging the AC cord and re plugging it in after 1 or 2 minutes Remote control unit does not operate Are batteries inserted with polarity e f aligned See page 6 Are batte...

Страница 8: ...Memo LC 24LE150M_F906_EN indd 8 LC 24LE150M_F906_EN indd 8 6 11 2013 12 00 34 PM 6 11 2013 12 00 34 PM ...

Отзывы: