background image

GB 

-28

Commands

Appendix

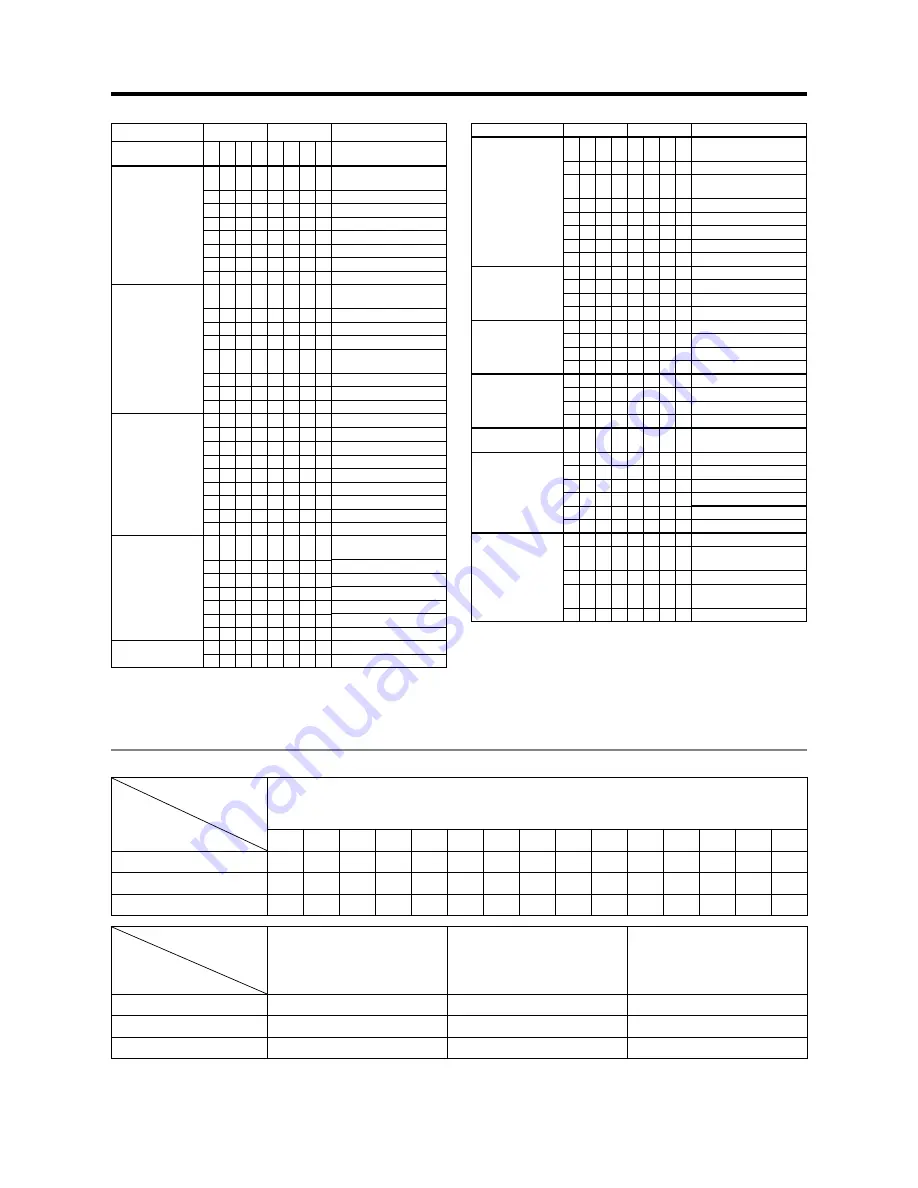
Rating table for Child Lock

Broadcasted  

rating

User- 

adjusted rating

AGE

4

5

6

7

8

9

10

11

12

13

14

15

16

17

18

Universal

Parental

X-rated

Broadcasted  

rating

User- 

adjusted rating

Universal

Parental

X-rated

Universal

Parental

X-rated

CONTROL ITEM

COMMAND PARAMETER CONTROL CONTENTS

POWER SETTING P O W R 0 _ _ _ POWER OFF 

(STANDBY)

INPUT 

SELECTION A

I T G D _ _ _ _ INPUT SWITCHING 

(TOGGLE)

I T V D _ _ _ _ TV (CHANNEL FIXED)

I D T V _ _ _ _ DTV (CHANNEL FIXED)

I A V D 1 _ _ _ EXT1

I A V D 2 _ _ _ EXT2

I A V D 3 _ _ _ EXT3

I A V D 4 _ _ _ PC

I A V D ? ? ? ? 1 to 4

CHANNEL

D C C H * * _ _ TV DIRECT CHANNEL 

(00 to 99)

D C C H ? ? ? ? 00 to 99

C H U P _ _ _ _ CHANNEL UP

C H D W _ _ _ _ CHANNEL DOWN
D T V D * * * _ DTV DIRECT CHANNEL 

(001 to 999*)

D T V D ? ? ? ? 001 to 999*

D T U P _ _ _ _ DTV CHANNEL UP

D T D W _ _ _ _ DTV CHANNEL DOWN

INPUT 

SELECTION B

I N P 1 0 _ _ _ EXT1 (CVBS)

I N P 1 1 _ _ _ EXT1 (RGB)

I N P 1 2 _ _ _ EXT1 (AUTO)

I N P 1 ? ? ? ? 0 to 2

I N P 2 0 _ _ _

EXT2 (Y/C)

I N P 2 1 _ _ _ EXT2 (CVBS)

I N P 2 ? ? ? ? 0 to 1

I N P 3 0 _ _ _ EXT3

I N P 4 0 _ _ _ PC

AV MODE 

SELECTION

A V M D 0 _ _ _ AV MODE SELECTION 

(TOGGLE)

A V M D 1 _ _ _ STANDARD

A V M D 2 _ _ _ SOFT

A V M D 3 _ _ _ ECO

A V M D 4 _ _ _ USER

A V M D 5 _ _ _

DYNAMIC

A V M D ? ? ? ? 1 to 5

VOLUME

V O L M * * _ _ VOLUME (0 -50)

V O L M ? ? ? ? 0 to 50

CONTROL ITEM

COMMAND PARAMETER CONTROL CONTENTS

POSITION

H P O S * * * _ H-POSITION PC (-30 

to +30)

H P O S ? ? ? ? PC (-30 to +30)
V P O S * * * _ V-POSITION PC (-10 

to +10)

V P O S ? ? ? ? PC (-10 to +10)

C L C K * * * _ CLOCK (0 to 180)

C L C K ? ? ? ? 0 to 180

P H S E * * _ _ PHASE (0 to 40)

P H S E ? ? ? ? 0 to 40

WIDE MODE

W I D E 0 _ _ _ WIDE MODE (Toggle)

W I D E 1 _ _ _ 4:3

W I D E 2 _ _ _ 16:9

W I D E ? ? ? ? 1 to 2

MUTE

M U T E 0 _ _ _ MUTE (TOGGLE)

M U T E 1 _ _ _ MUTE ON

M U T E 2 _ _ _ MUTE OFF

M U T E ? ? ? ? 1 to 2

SOUND WIDE

A C D V 0 _ _ _ SOUND WIDE (Toggle)

A C D V 1 _ _ _ SOUND WIDE ON

A C D V 2 _ _ _ SOUND WIDE OFF

A C D V ? ? ? ? 1 to 2

AUDIO CHANGE

A C H A _ _ _ _ SOUND SELECT (ST/

BILINGUAL/MONO)

SLEEP TIMER

O F T M 0 _ _ _ OFF

O F T M 1 _ _ _ 30 min

O F T M 2 _ _ _ 60 min

O F T M 3 _ _ _ 90 min

O F T M 4 _ _ _ 120 min

O F T M ? ? ? ? 0 to 120

TEXT

T E X T 0 _ _ _ TELETEXT OFF

T E X T 1 _ _ _ TELETEXT CHANGE 

(TOGGLE)

T E X T ? ? ? ? 0 to 1

D C P G * * * _ DIRECT PAGE JUMP 

(100 to 899)

D C P G ? ? ? ? 100 to 899

NOTE

If an underbar (_) appears in the parameter column, 

enter a space.

If an asterisk (*) appears, enter a value in the range 

indicated in brackets under CONTROL CONTENTS.

*  If on the “First installation (Country)” screen “Sweden” is 

selected, input a 4-digit number 0001 to 9999.

Содержание AQUOS LC-20SD5E

Страница 1: ... CRISTAUX LIQUIDES LCD TELEVISORE A COLORI LCD LCD KLEURENTELEVISIE TELEVISIÓN EN COLOR LCD OPERATION MANUAL BEDIENUNGSANLEITUNG MODE D EMPLOI MANUALE DI ISTRUZIONI GEBRUIKSAANWIJZING MANUAL DE MANEJO LC 20SD5E LC 20SD5S ENGLISH FRANÇAIS DEUTSCH ITALIANO NEDERLANDS ESPAÑOL ...

Страница 2: ... serious electric shock may occur To fit an appropriate plug to the mains lead follow the instructions below IMPORTANT The wires in the mains lead are coloured in accordance with the following code Blue Neutral Brown Live As the colours of the wires in the mains lead of this product may not correspond with the coloured markings identifying the terminals in your plug proceed as follows The wire whi...

Страница 3: ...ttings 11 Setup menu 12 Setup Settings 12 Programmes 13 Wide mode 14 Features menu 14 Features Settings 14 Child lock 15 Useful features 16 Still image 16 Using the Programme Table 16 Teletext function 16 DTV menu operations 17 DTV menu operation buttons 17 DTV On Screen Display 17 DTV common operations 17 About using the character set screen 18 Language Setup 18 Channel Organizer 18 Installation ...

Страница 4: ...bed sofa rug or other similar surface since they can block ventilation openings This product is not designed for built in installation do not place the product in an enclosed place such as a bookcase or rack unless proper ventilation is provided or the manufacturer s instructions are followed The LCD panel used in this product is made of glass Therefore it can break when the product is dropped or ...

Страница 5: ...the information that came with the system for instructions on how to use it to secure the LCD TV set Antenna terminal AC INPUT terminal 220 240 V Rear view Place the TV close to the AC outlet and keep the power plug within reach How to Fix the Cables Secure cables and cords with the supplied cable tie so that they do not get caught when mounting the cover Cable tie How to Prevent the LCD TV Set fr...

Страница 6: ...ries can cause a rash If you find any chemical leakage wipe thoroughly with a cloth The batteries supplied with this product may have a shorter life expectancy due to storage conditions If you will not be using the remote control unit for an extended period of time remove the batteries from it Using the remote control unit Use the remote control unit by pointing it towards the remote control senso...

Страница 7: ... 16 INPUT SOURCE Select an input source See below 17 SLEEP Set the sleep timer in units of 30 min up to max 2 hr 18 Display information Display various information channel number sleep timer etc See pages 24 and 25 19 DTV MENU DTV Display DTV Menu screen 20 MENU Display the MENU screen See page 9 21 Cursor Select a desired item on the setting screen OK Execute a command within the menu screen DTV ...

Страница 8: ...s advise against extended listening at high volume levels MAIN POWER The STANDBY ON indicator instantly changes from red to green and the LCD TV set is turned on To turn off the main power press again Operating the menu with the control panel See page 9 Button operations on the control panel correspond to the ones on the remote control as shown below Input OK on the remote control MENU MENU on the...

Страница 9: ...s a finer more detailed picture If both terminals are connected S VIDEO terminal takes a priority The PC input terminals are DDC1 2B compatible Refer to page 27 for a list of PC signals compatible with the TV Macintosh adaptor may be required for use for some Macintosh computers When connecting to a PC the correct input signal type is automatically detected S Video Audio Video cable S Video Cable ...

Страница 10: ...hing during the auto search The setup menu disappears and you can watch the programme on channel 1 NOTE With Automatic search of First installation digital broadcasts are scanned after scanning analogue broadcasts If you want to operate the digital mode first press END and then press DTV TV Follow the procedures in Installation on page 20 You can select a language from the Setup menu Select from 1...

Страница 11: ...ct a desired item on the screen or adjust a selected item OK Press to complete the setting END Press to close the menu screen On Screen Display Example Picture menu To adjust the picture settings Sound menu To adjust the audio settings Setup menu To set up TV channels select the language displayed on screen and other settings Features menu To customize various features Navigation buttons To naviga...

Страница 12: ...or AV source Selectable items button button Contrast For less contrast For more contrast Brightness For less brightness For more brightness Colour For less colour intensity For more colour intensity Tint Skin tones become purplish Skin tones become greenish Sharpness For less sharpness For more sharpness Adjustment items for PC source Selectable items Description Contrast To adjust the contrast of...

Страница 13: ...nd DYNAMIC The parameters chosen affect each of the input sources 2 Colour temp setting also can be made in PC mode Select Reset to reset each adjustment item in AV mode to the factory preset values Sound menu Sound adjustments Menu Operation B page 10 You can adjust the sound quality to your preference with the following settings Selectable items button button Treble For weaker treble For stronge...

Страница 14: ...onnections screen Select the appropriate signal type and colour standard for the signals from the video equipment connected to the EXT1 EXT2 or EXT3 terminal EXT1 EXT2 EXT3 Y C EXT3 CVBS Signal type 3 Press to select option Auto CVBS RGB Y C To select the signal type of external equipment Colour system Press to select option Auto PAL SECAM NTSC4 43 NTSC3 58 PAL60 Language The language for the on s...

Страница 15: ...ill go up down Press OK to exit the Move mode Erase Press to select the programme to be erased and press OK All the subsequent programmes move up NOTE Depending on the settings in the colour system of the channels switching between channels may be slow If you want to speed up channel switching switch Auto in Colour system to the current reception system PAL or SECAM Programmes This section describ...

Страница 16: ...setting begins Off Reset TV setting 3 Yes If you select Yes the TV turns off All parameters settings are reset to the factory settings and tuning data will be lost No 1 This item is visible only when TV is PC mode 2 The status display appears by pressing SLEEP 3 If you have defined a PIN on the Child lock screen the PIN input screen is displayed Input the four digit PIN 0 9 first See page 15 Wide ...

Страница 17: ...P I N 4 Press to select Yes and press OK The lock remains effective until No is selected 5 Press END to exit 1 2 To set a Child Lock for individual programmes 1 Perform steps 1 and 2 in 2 Setting a Child Lock to display the Child lock screen 2 Press to select For individual prog only and press OK F o r a l l p r o g r a m m e s F o r i n d i v i d u a l p r o g o n l y C h a n g e P I N C a n c e ...

Страница 18: ... available Turning on and off Teletext 1 Select a TV channel or external input source providing the Teletext programme 2 Press to display the Teletext Each time you press the screen switches as shown below TELETEXT If you select a programme with no Teletext signal No teletext transmission displays The same message displays during other modes if no Teletext signal is available Button functions Butt...

Страница 19: ...ce application Channel Organizer To configure various settings for each service These include Fav Favourite Lock Skip Go To Delete Rename Move Move To and View functions Installation To scan all services available in your area or to Rename Delete Rescan the selected carrier System Configuration To configure On Screen Display and Password Setup settings If the broadcast contains the Time zone regio...

Страница 20: ...age 12 Menu Language is automatically set to the one selected Language Setup Menu Language English Pref Audio Language English Pref Subtitle Language English Pref Digital Service Language English END Navigate OK Available language list Languages available only for Digital Service 3 Press to select a desired language for each item 4 Press END or OK NOTE See page 12 to change the language displayed ...

Страница 21: ...or setting the PIN Skip Services that are set to skip will not be picked up when pressing P 1 Press to select the desired service 2 Press 3 on the remote control An icon displays indicating the service to be skipped Pressing 3 will turn the skip icon on and off 3 Press DTV MENU NOTE To view services that are set to be skipped use 0 9 numeric buttons or select from the Channel List Go To Use this f...

Страница 22: ...quency kHz cannot be used When the Country is set to Sweden in the First installation Country When there is a Channel List in the data after Auto Scan or Manual Scan Channel Type Selection Menu will be displayed and available to set Channel List Type Select the Channel List Type by pressing and press OK Move Sort the order of the selected service by moving the service position 1 Press to select th...

Страница 23: ...e station that provides a set of individual services 1 Press to select Installation 2 Press to select Carrier Setup and then press OK 001 DVB T 16QAM 184500 03 01 002 DVB T 16QAM 506000 03 01 003 DVB T 64QAM 842000 05 00 FEC 7 8 FFT 2k Frequency kHz 506000 QAM 16 GI 1 32 S No Carrier Name Frequency TV Radio Carrier Setup END Navigate OK Rename Delete Rescan To rename the selected carrier Select th...

Страница 24: ...load Preparation Confirm and make a note of the current software version number as in step 2 of Software Version Manual upgrade 1 Press to select Technical Information 2 Press to select Software upgrade and then press OK The TV checks all carriers if there is a new software available for upgrade If upgrade via Over Air Download is available at the time A confirmation message appears asking you to ...

Страница 25: ...n press OK Detailed information on the selected item is displayed Inserting a CA card A single DVB Common Interface CI slot is provided to allow adoption of a Conditional Access CA system by means of a plug in CA module Scrambled Broadcasting service can be routed via the CA system To allow the use of smart card type CA system a Conditional Access Module CAM is required This should be obtained alo...

Страница 26: ...t currently on air and other than this will display Timer OK The TV will show the image in full screen Selecting an event that has not yet started will activate the EPG Timer mode instead NOTE Pressing opens the EPG Description screen that provides more information about the selected event Press OK or END to exit Using the EPG Timer When the Timer is set the TV automatically tunes to a preset TV e...

Страница 27: ... cannot hasten the start time from the original start time of the Event You cannot set with the same date and time of another Event Changing the time duration of the Event 1 Select the time duration of the event to change and press the BLUE Edit Duration 2 Change the time duration with and press OK Displaying the stored timer events 1 Press EPG twice You can confirm and edit the stored timer event...

Страница 28: ... when no other menu screen is displayed No Language Code Multi audio 001 ENG 002 SPA Audio mode Stereo END Navigate OK 2 Press to select the desired audio mode Left Right L R Stereo and then press to move down 3 Press to select the desired language available for the service and then press END NOTE Once you tune to another service or the power is turned off the setting returns to the parameter set ...

Страница 29: ...able optional AN A1RS RS 232C serial control cable cross type commercially available Communication procedure Send the control commands from the PC via the RS 232C connector The TV operates according to the received command and sends a response message to the PC Do not send multiple commands at the same time Wait until the PC receives the OK response before sending the next command Command format E...

Страница 30: ... V M D 2 _ _ _ SOFT A V M D 3 _ _ _ ECO A V M D 4 _ _ _ USER A V M D 5 _ _ _ DYNAMIC A V M D 1 to 5 VOLUME V O L M _ _ VOLUME 0 50 V O L M 0 to 50 CONTROL ITEM COMMAND PARAMETER CONTROL CONTENTS POSITION H P O S _ H POSITION PC 30 to 30 H P O S PC 30 to 30 V P O S _ V POSITION PC 10 to 10 V P O S PC 10 to 10 C L C K _ CLOCK 0 to 180 C L C K 0 to 180 P H S E _ _ PHASE 0 to 40 P H S E 0 to 40 WIDE M...

Страница 31: ...serted with polarity aligned See page 4 Are batteries worn out Replace with new batteries Are you using it under strong or fluorescent lighting Is a fluorescent light illuminating the remote control sensor Strange colour light colour or dark or colour misalignment Adjust the picture tone See page 10 Is the room too bright The picture may look dark in a room that is too bright Check the colour syst...

Страница 32: ... CATV Hyper band S1 S41ch TV Tuning System Auto Preset 99 ch Auto Label Auto Sort STEREO BILINGUAL NICAM A2 Brightness 430 cd m2 Backlight life 60 000 hours at Backlight Standard position Viewing angles H 170 V 170 Audio amplifier 2 W 2 Speaker 71 mm 30 mm Terminals Rear Antenna input UHF VHF 75Ω Din type Analogue Digital EXT1 RGB SCART AV input RGB input TV output EXT2 AV SCART AV input output Y ...

Страница 33: ...for Business Users 1 In the European Union If the product is used for business purposes and you want to discard it Please contact your SHARP dealer who will inform you about the take back of the product You might be charged for the costs arising from take back and recycling Small products and small amounts might be taken back by your local collection facilities For Spain Please contact the establi...

Страница 34: ...478 403 3 300 8 434 5 399 5 35 246 5 68 3 89 4 157 7 225 100 100 32 317 7 Unit mm ...

Страница 35: ...TRONICS Europe GmbH Sonnistraße 3 D 20097 Hamburg Deutschland Printed on environmentally friendly paper Auf ökologischem Papier gedruckt Imprimé sur papier écologique Stampato su carta ecologica Afgedrukt op ecologisch papier Impreso en papel ecológico J32C0101A SH 07 06 P SHARP ELECTRONICS Europe GmbH Sonnistraße 3 D 20097 Hamburg Deutschland ...

Отзывы: