13
LC-20E1U
LC-20E1UB/UW
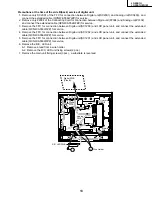
Precautions at the time of the side B(back) service of digital unit.
1. Remove only SC2001 of the FFC for connection between Digital unit(SC2001) and Analog unit(SC3403), and
connect the extended cable (QCNW-A556WJZZ) for service.
2. Remove only P2004 of the Connecting Cord for connection between Digita unit(P2004) and Analog unit(P3702),
and connect the extended cable (QCNW-A552WJZZ) for service.
3. Remove the FFC for connection between Digita unit(SC1203) and LCD panel unit, and connect the extended
cable (QCNW-A553WJZZ) for service.
4. Remove the FFC for connection between Digita unit(SC1202) and LCD panel unit, and connect the extended
cable (QCNW-A556WJZZ) for service.
5. Remove the FFC for connection between Digita unit(SC1201) and LCD panel unit, and connect the extended
cable (QCNW-A555WJZZ) for service.
6. Remove the R/C, LED unit.
6-1. Remove a lead from a wire holder.
6-2. Remove the R/C, LED unit fixing screws(2 pcs.).
7. Remove the main unit fixing screws(3 pcs.), a substrate is reversed.
P6705
P6705
P3703
SC1201
SC1202
SC1202
SC1202
SC1203
SC1203
P2004
SC2001
SC2001
SC3403
SC3403
P6706
P6706
P3704
P3602
P3602
P3602
P2003
P6705
SC1203
SC2001
SC3403
P6706
P3704
2
1
4 5
3
6-2
6-1
P3702
P3601
P3500
P3500
P3500
P3503
P3504
P3504
Inverter-A
PWB
Inverter-B
PWB
Wire Holder
Analog
PWB
Digital
Digital
PWB
PWB
Digital PWB
(Side B)
R/C, LED PWB
Digital
PWB
Содержание Aquos LC 20E1U
Страница 32: ...35 34 LC 20E1U LC 20E1UB UW 12 11 10 9 8 7 6 5 4 3 2 1 A B C D E F G H OVERALL WIRING DIAGRAM ...
Страница 34: ...37 6 5 4 3 2 1 A B C D E F G H LC 20E1U LC 20E1UB UW SCHEMATIC DIAGRAM ËR C LED and CONTROL Unit R C LED ...
Страница 35: ...39 38 LC 20E1U LC 20E1UB UW 12 11 10 9 8 7 6 5 4 3 2 1 A B C D E F G H Ë DIGITAL Unit 1 5 ...
Страница 36: ...41 40 LC 20E1U LC 20E1UB UW 12 11 10 9 8 7 6 5 4 3 2 1 A B C D E F G H Ë DIGITAL Unit 2 5 ...
Страница 37: ...43 42 LC 20E1U LC 20E1UB UW 12 11 10 9 8 7 6 5 4 3 2 1 A B C D E F G H Ë DIGITAL Unit 3 5 ...
Страница 38: ...45 44 LC 20E1U LC 20E1UB UW 12 11 10 9 8 7 6 5 4 3 2 1 A B C D E F G H Ë DIGITAL Unit 4 5 ...
Страница 39: ...47 46 LC 20E1U LC 20E1UB UW 12 11 10 9 8 7 6 5 4 3 2 1 A B C D E F G H Ë DIGITAL Unit 5 5 ...
Страница 40: ...49 48 LC 20E1U LC 20E1UB UW 12 11 10 9 8 7 6 5 4 3 2 1 A B C D E F G H Ë ANALOG Unit 1 2 ...
Страница 41: ...51 50 LC 20E1U LC 20E1UB UW 12 11 10 9 8 7 6 5 4 3 2 1 A B C D E F G H Ë ANALOG Unit 2 2 ...
Страница 42: ...52 6 5 4 3 2 1 A B C D E F G H LC 20E1U LC 20E1UB UW Ë INVERTER A Unit ...
Страница 43: ...53 6 5 4 3 2 1 A B C D E F G H LC 20E1U LC 20E1UB UW Ë INVERTER B Unit ...
Страница 44: ...54 6 5 4 3 2 1 A B C D E F G H LC 20E1U LC 20E1UB UW PRINTED WIRING BOARD ASSEMBLIES DIGITAL Unit Side A ...
Страница 46: ...56 6 5 4 3 2 1 A B C D E F G H LC 20E1U LC 20E1UB UW DIGITAL Unit Side B ...
Страница 49: ...59 6 5 4 3 2 1 A B C D E F G H LC 20E1U LC 20E1UB UW ANALOG Unit Side A ...
Страница 51: ...62 6 5 4 3 2 1 A B C D E F G H LC 20E1U LC 20E1UB UW INVERTER A Unit Side A ...
Страница 53: ...64 6 5 4 3 2 1 A B C D E F G H LC 20E1U LC 20E1UB UW INVERTER B Unit Side A ...


