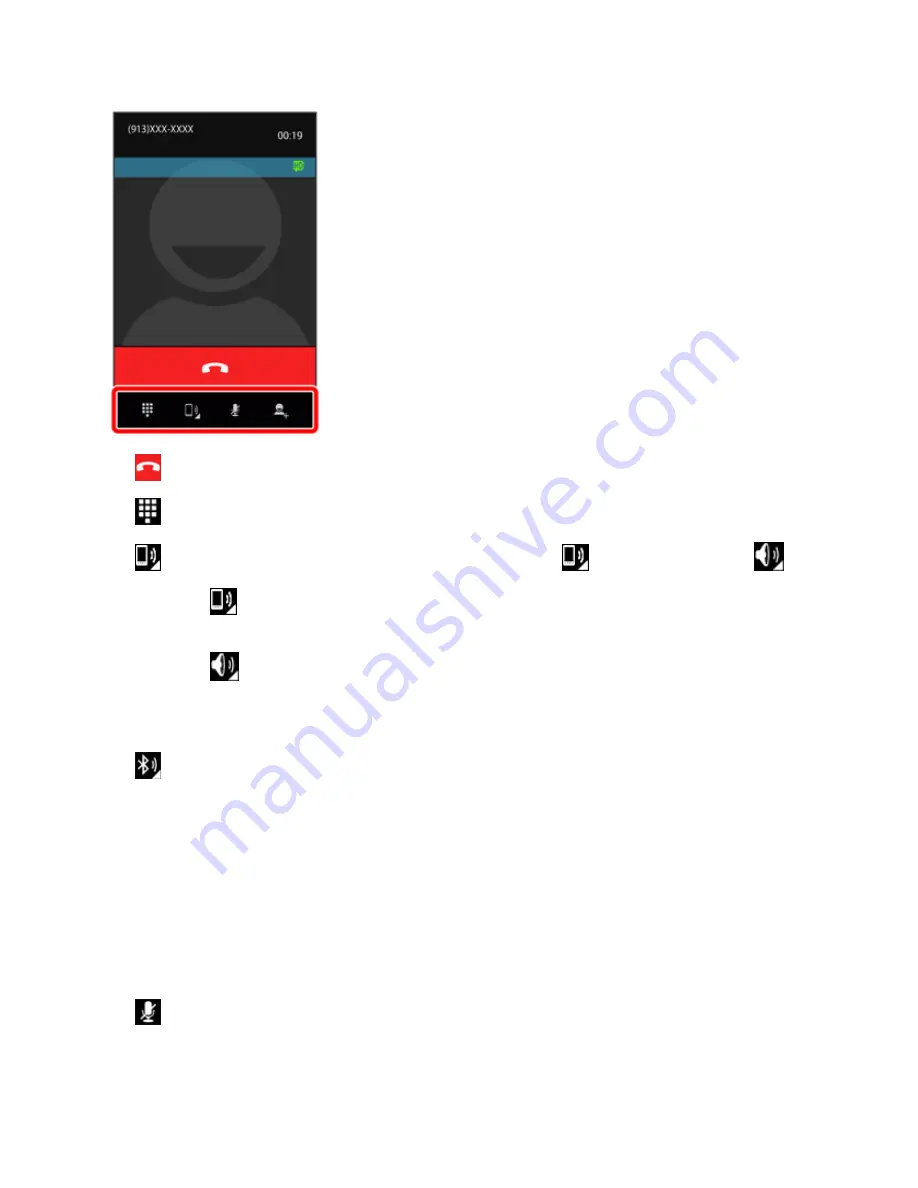
Phone App
104
n
End call:
End the current call.
n
Dialpad/Hide:
Toggle the appearance of the onscreen dialpad.
n
Receiver:
Route the phone’s audio through the receiver
or through the speaker
.
l
Touch
to route the phone’s audio through the speaker. (You can adjust the speaker
volume using the
Volume Up/Down
keys.)
l
Touch
again to use the phone’s receiver.
Warning:
Because of higher volume levels, do not place the phone near your ear during
speakerphone use.
n
Bluetooth:
Route the phone’s audio through a connected Bluetooth
®
headset, through the
speaker or through the receiver. Appears instead of the Speaker icon when your phone is
connected to a Bluetooth
®
headset.
l
Touch the Bluetooth icon for a menu to switch between
Speaker
,
Handset earpiece
(receiver), and
Bluetooth
.
Note:
The Headset button is activated to show the current call is routed to a connected Bluetooth
®
headset.
l
When Bluetooth
®
or the Bluetooth
®
headset is turned off, the call is routed through either the
receiver or speaker
n
Mute:
Mute the microphone during an active call. Touch again to unmute the microphone.
Note:
If Mute is activated, the speaker mode is deactivated.
Содержание AQUOS Crystal
Страница 1: ...Available applications and services are subject to change at any time ...
Страница 19: ...Get Started 10 2 Touch Storage 3 Touch Unmount SD card ...
Страница 22: ...Get Started 13 2 Touch Storage ...
Страница 23: ...Get Started 14 3 Touch Erase SD card 4 Touch Erase SD card ...
Страница 50: ...Basic Operations 41 2 Touch About phone ...
Страница 66: ...Basic Operations 57 2 Touch Google and then touch New 3 Enter your First name and Last name and then touch ...
Страница 77: ...Basic Operations 68 2 Touch ...
Страница 79: ...Basic Operations 70 2 Touch ...
Страница 81: ...Basic Operations 72 1 From home touch Play Store 2 Touch ...
Страница 83: ...Basic Operations 74 2 Touch ...
Страница 90: ...Basic Operations 81 3 Touch Software update to open the Sharp software update 4 Touch Yes ...
Страница 92: ...Basic Operations 83 2 Locate the software version read only field ...
Страница 105: ...Your Phone Interface 96 The new shortcut is added to the folder ...
Страница 150: ...Phone App 141 You will see the Import export contacts menu 3 Touch Export to storage ...
Страница 179: ...Smart Phone and Smart Contacts Apps 170 The contact s detailed listing appears 3 Touch Delete Contact ...
Страница 180: ...Smart Phone and Smart Contacts Apps 171 4 Touch OK The contact is deleted ...
Страница 198: ...Messaging and Internet 189 2 On the Messaging screen touch the conversation that you want to delete ...
Страница 217: ...Messaging and Internet 208 1 From home touch Settings Add account 2 Touch Google and then touch Existing ...
Страница 218: ...Messaging and Internet 209 3 Enter your Gmail username and password and then touch OK 4 Touch Not now ...
Страница 222: ...Messaging and Internet 213 The email inbox opens 2 Touch Settings ...
Страница 233: ...Messaging and Internet 224 2 Touch an account you want to delete 3 Touch Remove account ...
Страница 282: ...Useful Features 273 3 Type a name email number or circle or select a contact from the list ...
Страница 330: ...Connectivity 321 2 Touch Wi Fi The Wi Fi settings menu appears 3 Touch the Wi Fi slider to turn Wi Fi on ...
Страница 342: ...Connectivity 333 2 Touch Bluetooth The Bluetooth settings open 3 Touch the Bluetooth slider to turn Bluetooth on ...
Страница 348: ...Connectivity 339 3 Touch Share Bluetooth ...
Страница 351: ...Connectivity 342 The Nearby devices menu opens 2 Touch Enable wireless display Enabled when the check mark is entered ...
Страница 381: ...Settings 372 2 Touch VPN activated ...
Страница 403: ...Settings 394 2 Touch Security The Security settings menu opens 3 Touch Encrypt microSD ...
Страница 404: ...Settings 395 4 After an alert that all data will be erased appears touch OK ...
Страница 405: ...Settings 396 5 Touch Erase SD card 6 Enter a PIN or password you have set and then touch Next ...
Страница 408: ...Settings 399 2 Touch Security The Security settings menu opens 3 Touch Screen lock ...
Страница 422: ...Settings 413 2 Read the reset all information page and touch Reset phone ...


