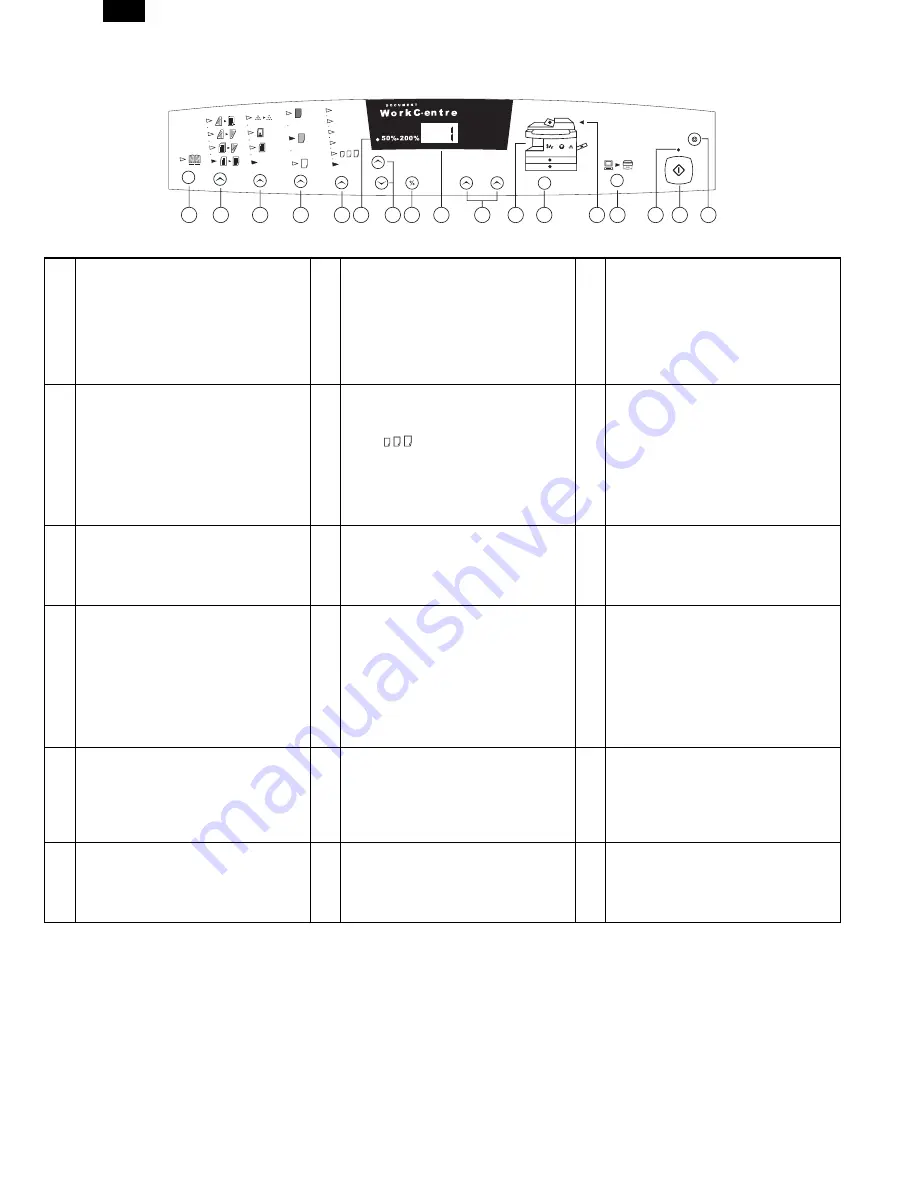
2. Control Panel
The control panel has keys and lights that are used to control and display the conditions of the WorkCentre.
1
Book Mode (XD104/124f only): Select
book mode when you want to make
copies from a bound document.
2
1-Sided/2-Sided Mode (XD155df only):
Use the 2-Sided copy feature to make
one or two-sided copies from one or
two-sided originals. Refer to the
Making Copies on the Automatic
Document Feeder section for detailed
information.
3
Image Quality Mode: The image quality
mode is used to maximize copy quality.
Auto- for originals with a colored
background or mixed text and graphics.
Text - for originals that contain mainly text.
Photo - for copying photographs.
Toner Save - decreases the overall
copy density.
4
Copy Contrast: Press the contrast keys
to lighten or darken copies while in the
Text, Photo, or Toner Save settings.
Refer to the Image Quality section for
detailed information.
5
Preset Reduction/Enlargement: Press
this key to select any of the preset
reductions or enlargements.
6
Percentage Indicator: The indicator will
light when any reduction or
enlargement setting is selected.
∗
The (customer
settable)
percentage has been set at the
factory for 50%. Refer to
Customizing Your WorkCentre for
information about changing this
percentage.
7
Variable Percentage: Press the down
key to decrease the percentage. Press
the up key to increase the percentage.
Any percentage from 50% to 200%
may be selected.
8
%: Press this key to display the
reduction/enlargement percentage
selected.
9
Display Window: Copy quantity,
reduction/enlargement settings, and
status codes appear in this area.
10
Quantity Keys: Select up to 100
copies. Press the 1 key to increase
the quantity by one. Press the 10 key
to increase the quantity by 10.
11
WorkCentre Diagram: Helps you locate
areas that require your attention. The
indicators will flash in the area
requiring attention. For additional
information refer to the Problem
Solving section.
12
Paper Supply Selection
(XD104/105f/120f/124f/155df only):
Press to change the selected paper
supply. The selected paper supply
location will be indicated by a green
light on the WorkCentre diagram.
∗
To display the number of copies
requested during the copy run press
the 10 key.
∗
Press the Clear key to clear the
selected quantity.
13
SPF/ADF Misfeed Indicator: This
indicator will light when a misfeed
occurs in the SPF or the ADF.
14
On-line/Off-line Key: Press this button
to alternate between On-line and Off-
line status. When the light is lit, the
printer is On-line.
15
Ready Indicator: When the light is ON
(not flashing), the WorkCentre is ready
to make copies. When the light is
flashing after the Start key is pressed,
the WorkCentre is warming up and the
copy cycle will begin automatically.
16
Start: Press this key to begin copying.
17
Clear/Stop: Press this key to stop the
WorkCentre while making copies or to
clear copy quantity. If the key is
pressed twice quickly, all programming
will be cleared.
∗
The display will change to 1 and
increases by 1 as each copy is
made.
78%
Auto
86%
10 0%
129%
200% Max
10
1
C
1
3
4
5
6
7
8
10
14
16
17
15
9
2
13
11
12
AL-1550
3 – 2
Содержание AL-1550
Страница 12: ... 10 ELECTRICAL SECTION 1 Block diagram A Overall block diagram AL 1550 10 1 ...
Страница 13: ...B Main PWB block diagram AL 1550 10 2 ...
Страница 16: ... 11 CIRCUIT DIAGRAM MCU 1 AL 1550 11 1 ...
Страница 17: ...MCU 2 AL 1550 11 2 ...
Страница 18: ...MCU 3 AL 1550 11 3 ...
Страница 19: ...MCU 4 AL 1550 11 4 ...
Страница 20: ...MCU 5 AL 1550 11 5 ...
Страница 21: ...MCU 6 AL 1550 11 6 ...
Страница 22: ...MCU 7 AL 1550 11 7 ...
Страница 23: ...OPU AL 1550 11 8 ...
Страница 24: ...ACTUAL WIRING DIAGRAM 1 AL 1550 11 9 ...
Страница 25: ...ACTUAL WIRING DIAGRAM 2 DSPF UNIT AL 1550 11 10 ...


