background image


4-15 


IEEE1394 Device 


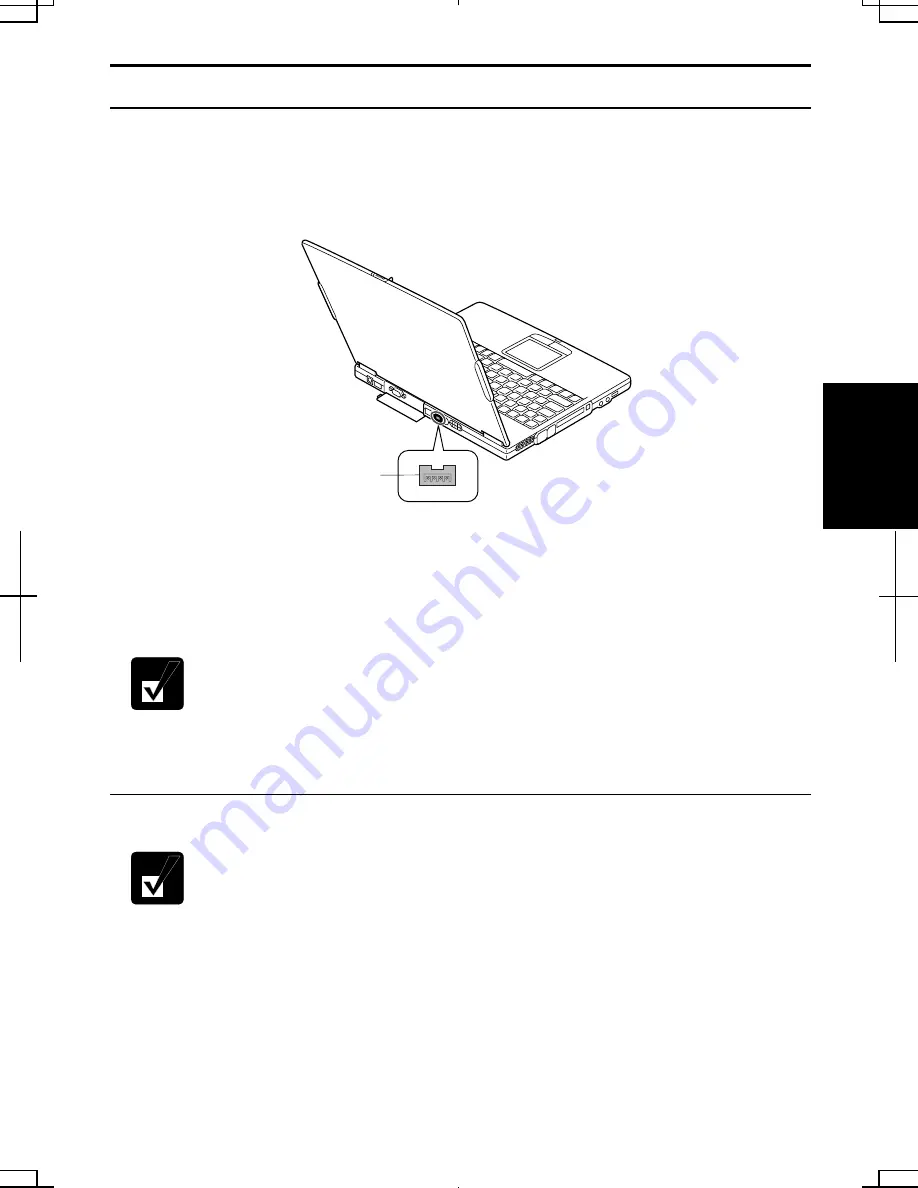
You can connect IEEE1394 devices to the IEEE1394 port on the rear side of your 
computer. The IEEE1394 is digital interface for handling digital video, digital audio 
and other data in two directions between devices, and for controlling other equipment. 


When two or more IEEE1394 compatible devices are connected to your computer in a 
daisy chain, operations and data transactions are possible with not only the equipment 
that is directly connected, but also with other devices via the directly connected 
device. 


• 

Confirm the IEEE1394 device you will connect is Windows XP 
compatible. 

• 

Use AC power for your computer and the IEEE1394 device especially 
when reading/writing the data. 

• 

Some IEEE1394 devices require that you install drivers before use. 


Connecting IEEE1394 Device 


• 

You need not turn off your computer before connecting the device. 

• 

Be sure to read the manuals of the IEEE1394 device before connecting 
it to your computer.  


1. 

Connect one end of the DV cable with the IEEE1394 connector of your 
computer.  


IEEE 1394 Connector 

Содержание Actius PC-AV18P

Страница 1: ...PC AV18P Series OPERATION MANUAL DIC13th 641 C100 M60 Y0 K0 DIC 582 Black C0 M0 Y0 PK100 P 5 3mm NOTEBOOK COMPUTER PC AV18P Series OPERATION MANUAL ...

Страница 2: ...g the equipment off and on the user is encouraged to try to correct the interference by one or more of the following measures Reorient or relocate the receiving antenna Increase the distance between the equipment and receiver Connect the equipment into an outlet on a circuit different from that to which the receiver is connected Consult the dealer or an experienced radio TV technician for help A s...

Страница 3: ...nce that temporary discontinuance of service may be required But if advance notice isn t practical the telephone company will notify the customer as soon as possible Also you will be advised of your right to file a complaint with the FCC if you believe it necessary The telephone company may make changes in its facilities equipment operations or procedures that could affect the operation of the equ...

Страница 4: ... To program this information refer to the manual of the communication software Warning This product utilizes tin lead solder and fluorescent lamp containing a small amount of mercury Disposal of these materials may be regulated due to environmental considerations For disposal or recycling information please contact your local authorities or the Electronics Industries Alliance www eiae org Copyrigh...

Страница 5: ... VORSICHT UM DIE STROMZUFUHR VOLLSTÄNDIG ZU UNTERBRECHEN DEN NETZSTECKER HERAUSZIEHEN UND DIE BATTERIE ÈNTFERNEN ATTENTION POUR UN ARRET TOTAL DU SYSTEME DECONNECTEZ LA PRISE DE COURANT SECTEUR ET LA BATTERIE VARNING FÖR TOTAL ELEKTRISK URKOPPLING KOPPLA UR KONTAKTEN OCH TA UR BATTERIET PRECAUCION PARA UNA COMPLETA DESCONEXION ELECTRICA DESENCHUFE LA CLAVIJA DE LA RED Y LA BATERIA ...

Страница 6: ...r computer from an extremely cold place to an extremely warm place A temperature difference of more than 10 C 18 F will cause condensation inside the unit which may cause damage Do not block or cover slots or openings on the cabinet They protect your computer from overheating Do not place your computer on an unstable or uneven work surface Care should be exercised when using on heat sensitive surf...

Страница 7: ...AME OR EQUIVALENT TYPE RECOMMENDED BY THE MANUFACTURER DISCARD USED BATTERIES ACCORDING TO THE MANUFACTURER S INSTRUCTIONS Handling Never put the battery pack in a fire as it could explode and cause injury Do not attempt to open or alter the battery pack Do not place the battery where it might get hotter than 60 C 140 F The battery pack must be kept from metal objects such as jewelry and liquids T...

Страница 8: ...orm There may be a remote risk of electric shock from lightning Do not use the telephone to report a gas leak in the vicinity of the leak Never install telephone wiring during a lightning storm Never install telephone jacks in wet locations unless the jack is specifically designed for wet locations Never touch uninsulated telephone wires or terminals unless the telephone line has been disconnected...

Страница 9: ...ct and any of its functions such as stolen credit card numbers the loss of or alteration of stored data etc Edition 1st Edition August 2003 Copyright 2003 SHARP Corporation This document contains or refers to proprietary information which is protected by copyright All rights are reserved Copying or other reproduction of this document is prohibited without the prior written permission of SHARP Corp...

Страница 10: ...ix All other brand and product names are trademarks or registered trademarks of their respective holders ...

Страница 11: ... reference please record the following information in the spaces provided below Model Number Serial Number Date of purchase Dealer s Name Place of purchase Password The serial number is printed on a sticker located on the bottom of your computer ...

Страница 12: ...dface Press Enter to continue When two or more keys are pressed simultaneously the key labels are separated by a plus sign Restart your computer by pressing Ctrl Alt Delete Sample Entries are shown in lower cases of different typeface c windows system Words Texts on Screen such as window titles or possible parameters are italicized Double click this icon to display the Power Options Properties win...

Страница 13: ...necting to AC Power Source 1 2 Setting Up Windows 1 4 Turning Off Your Computer 1 6 Basic Operations Choosing Power Source 2 1 Resetting System 2 3 Using Glide Pad 2 4 Using Keyboard 2 6 Using Optical Drive 2 7 Writing Data to CD R RW Disk 2 10 Watching DVD Video 2 11 Controlling Volume 2 15 Adjusting Display 2 16 Sharing Your Computer 2 19 Battery and Power Management Battery Pack 3 1 Optional Ad...

Страница 14: ...4 Device 4 15 Communication Functions Built in Modem 5 1 LAN Unit 5 4 Wireless LAN 5 7 Network Setup Utility 5 11 Setup Utility Running the Setup Utility 6 1 Main Menu 6 3 Advanced Menu 6 4 Security Menu 6 4 Boot Menu 6 6 Exit Menu 6 6 Appendixes Memory Module A 1 Installing Weight Saver A 4 Maintenance and Care A 6 Re installation Instructions A 11 Troubleshooting Index ...

Страница 15: ...tual appearance of your computer may be slightly different depending on the model Front LCD Screen 2 16 Keyboard 2 6 Glide Pad 2 4 Power Button 1 3 Battery Indicator 2 1 3 3 Power Indicator 2 1 Antenna Indicator Status Indicators A N Hard Disk Num Lock Caps Lock Scroll Lock Optical Drive Antennas ...

Страница 16: ...Audio Output Jack S PDIF Compliant 4 7 8 9 Microphone Jack 4 10 Ventilation Openings v USB Ports 4 3 11 14 Optical Drive 2 7 LAN Jack 5 5 IEEE1394 Connector 4 15 AC Adapter Jack 1 2 Security Slot A 9 External Monitor Port 4 6 Ventilation Openings v S Video Output Jack 2 13 ...

Страница 17: ...xvi Bottom Battery Pack 3 1 Speaker Reset Switch 2 3 ...

Страница 18: ... is powered with either the rechargeable battery pack or AC power source See the next chapter for more information on the power sources Before starting to use your computer for the first time follow these instructions 1 Place your computer with the bottom up on a stable work surface 2 Insert the battery pack into your computer by matching the projected parts of the battery pack to the notched part...

Страница 19: ...e plug when removing it from the wall outlet Never pull on the cord Never plug in and out the AC power cord with your wet hands When using your computer for the first time be sure to operate it on AC power On battery power instead you may not be able to complete the Windows setup if the battery does not have enough power 1 Plug the AC adapter cable to the AC adapter jack on the rear side of your c...

Страница 20: ...raise the cover 5 Press the power button to turn on your computer When you turn on your computer the power indicator turns green your computer goes through a self test to detect any problems and Windows setup process starts See the next page Display Cover Lock Lever Power Indicator Power Button ...

Страница 21: ...t connect any peripheral devices to your computer until the Windows setup is completed Otherwise your computer may malfunction If the display turns off some power management may function In this case press any key to resume your computer from the power management Refer to Power Management section of Chapter 3 If you cannot operate the keyboard or the glide pad press the power button for more than ...

Страница 22: ...views Category View and Classic View The Category View allows you to choose the category that may be related to what you want to do then choose your task by clicking it The Classic View gives you the icons representing their components or features Double click one of the icons to open its dialog box or window Some of the dialog boxes you will use often are Display Phone and Modem Options Mouse Pow...

Страница 23: ...n is selected in the pull down menu of When I press the power button on my computer Close the display cover to keep the screen and keyboard clean and protected If you have not saved the data a dialog box will appear asking whether you want to save it Do not turn off or reset your computer while the hard disk indicator optical drive indicator or the indicator on the optional external floppy disk dr...

Страница 24: ... computer You can also use an optional add on battery See Chapter 3 for the battery information About Power Indicators The following indicators show the power status of your computer Indicator Light Meaning Power On green Operating Blinking green In System Standby Off Powered off or in System Hibernate Battery On green Fully charged On orange Being charged Connected to AC Power Source Blinking ora...

Страница 25: ...the AC adapter provides power for operation and charges the battery pack The AC input voltage can range from 100 to 240 volts so that you can use your computer with the appropriate plug adapter The AC power cord included with your computer is appropriate for the voltage used in the area in which you purchased your computer If you attempt to connect your computer to a wall outlet in other areas che...

Страница 26: ...m is locked up because of a software problem you can reset or reboot the system by pressing the Ctrl Alt Del keys simultaneously and select Applications tab of Windows Task Manager dialog box Click the name of the program hanging up then End Task If this does not work select Users tab and click Disconnect or Logoff then Yes Power Switch You can turn off your computer by pressing the power button i...

Страница 27: ...ing Glide Pad Take a moment to become familiar with how the glide pad works Place Your Fingertip Place your left or right hand next to the glide pad resting your wrist naturally in a relaxed manner Place your thumb or a finger s on the glide pad Move Your Fingertip The rectangular surface of the glide pad acts like a miniature duplicate of the display As you slide your fingertip across the pad the...

Страница 28: ...ches its destination Or you can tap the pad twice instead of pressing the left button in the step 2 Scroll You can scroll through information in a list or in a document by using the glide pad To view information vertically place your finger on the most right part of the glide pad and slide your finger up and down To view horizontally place your finger on the bottom part of the glide pad and slide ...

Страница 29: ...parameters This combination is sometimes referred to as hot keys Fn F1 Turns the wireless LAN antenna on and off Fn F5 Rotates display mode between the LCD only an external monitor only and both when connecting an external monitor Fn F6 Decreases the LCD screen brightness Fn F7 Increases the LCD screen brightness Fn F11 Turns on and off the LCD screen Fn F12 Forces your computer into System standb...

Страница 30: ...8mW 784nm CD R RW 6mW 662nm DVD ROM CLASS1LASER PRODUCT LASER KLASSE1 Handling Disk Do not write on either side of the disk particularly the non label side Data is read written from onto the non label side Do not mark this surface Keep your disks away from direct sunlight heat and excessive moisture Always hold the disks by the edges Fingerprints dirt or water on the disks can cause noise or mistr...

Страница 31: ...cator is not lit on then press the eject button The drive tray will pop out 2 Gentry pull out the tray 3 Place your disk label side up onto the tray and slightly press the center of the disk until it is locked into place Optical Drive Indicator Eject Button ...

Страница 32: ...surface such as paper towels Instead use a cotton swab to gently wipe the lens Removing Disk 1 Make sure the optical drive indicator is not lit and press the eject button The optical drive tray will pop out Make sure the optical drive indicator is not lit or blinking before pressing the eject button 2 Gently pull out the tray 3 Remove the disk from the tray by holding its edge 4 Gently push the tr...

Страница 33: ...er See the online help of Drag n Drop CD DVD for the details To run the application click start All Programs Drag n Drop CD DVD Drag n Drop CD DVD Before writing to CD R RW follow the instructions below Connect the AC adapter If the battery is discharged writing process will stop and fail Disable the power management See Power Management of Chapter 3 Close all of the unnecessary or the automatic s...

Страница 34: ...played properly This product incorporates copyright protection technology that is protected by method claims of certain U S patents and other intellectual property rights owned by Macrovision Corporation and other rights owners Use of this copyright protection technology must be authorized by Macrovision Corporation and is intended for home and other limited viewing uses only unless otherwise auth...

Страница 35: ...de of the DVD video is different from that of your drive Confirm Region dialog box appears 2 The region code currently selected is checked in the left box Region code of your DVD video is checked in the right box If you want to change the drive code and play the DVD video click OK On some DVD videos plural region codes are selectable in the right box of Confirm Region dialog box Carefully choose a...

Страница 36: ...WinDVD for more details Displaying Video on TV Set You can connect a television set with S Video input to your computer and enjoy DVD video on a big display Before connecting the television set disconnect the external monitor Connect the television set to your computer directly Otherwise the screen may be distorted Connecting TV Set 1 Turn off your computer and the television set 2 Connect the tel...

Страница 37: ... computer Before disconnecting the television set be sure to turn off your computer and the television set After disconnecting the television set set back the display property Refer to Adjusting Display later in this chapter Enjoying Dolby Digital Audio Your computer is Dolby Digital compliant With Dolby Digital compliant audio equipment or headphones you will have an audio output similar to a big...

Страница 38: ...ull down menu 3 Click OFF button to enable this function It turns ON Refer to the online help of WinDVD for more information Controlling Volume You can adjust the output volume of your computer with one of the following volume controls that interact with each other With Volume Control Turn the volume control on the left side of your computer backward you to increase the volume Turn it toward you t...

Страница 39: ...ol Panel 2 Click Sounds Speech and Audio Devices then Sounds and Audio Devices If Classic view is selected double click Sounds and Audio Devices icon 3 In Sounds and Audio Devices Properties dialog box click Advanced of Device volume field 4 Slide the lever of the source that you want to adjust 5 Close the dialog box then click OK and close the Control Panel window If you control Wave Controlling ...

Страница 40: ...ors 5 Click OK then Yes Available Resolutions and Colors Resolution Number of Colors 800 x 600 64K 16M 2 1024 x 768 64K 16M 2 1280 x 1024 1 64K 16M 1600 x 1200 1 64K 16M 1 Can be chosen for an external monitor only when it is capable of the listed resolution modes Cannot be set when displaying on the LCD monitor only or on both of the LCD and the external monitor simultaneously 2 On the internal L...

Страница 41: ...Desktop tab 2 Select appropriate wallpaper listed in Background field 3 Click OK Setting Screen Saver 1 In the Display Properties dialog box select Screen Saver tab 2 Select an appropriate screen saver from the pull down menu in Screen saver field and set time when screen saver starts 3 Click OK To disable the screen saver select None from the Screen saver pull down menu ...

Страница 42: ... Panel window If more than one user account are set to your computer you must select which user account you will log in when you turn on your computer Log off Your Computer Log off is useful because you do not have to turn off your computer when you finish your task and pass your computer to another person There are two ways to log off your computer Switch User and Log Off If you select Switch Use...

Страница 43: ...User Accounts icon 3 Select the account you want to set a password to You will only have this option if you log onto your computer as a member of the Computer administrators group If you log on your computer with a limited user account go to the next step You cannot set a password to another user account 4 Select Create a password string If the password has been already set Create a password will ...

Страница 44: ...word 6 Type the new password again to confirm it 7 If necessary type a password hints word to remember the password you set 8 Click Change Password 9 If you are asked whether you want to make your files and folders private click Yes 10 Close the User Accounts dialog box then the Control Panel window Deleting Password 1 Follow the steps 1 2 on Setting Password section 2 Select the account you want ...

Страница 45: ...ove Password If you log on to your computer as a member of the Computer administrators group and want to delete the password of another user account just click Remove Password 5 Close the User Accounts dialog box then the Control Panel window ...

Страница 46: ...s active See the next section for power management To keep the battery life long Condition the battery pack if the actual remaining power in your battery is less than what Windows Power Meter indicates See Conditioning Battery Pack section in this chapter Turn off your computer when you are not using it The duration of the battery will depend on your computer usage Using applications which heavily...

Страница 47: ... after a long usage it may take longer to be fully charged Checking Battery Level You can check the battery level by placing the pointer on the battery icon powered on battery or AC plug icon powered on AC power and charging the battery pack on the taskbar or double clicking one of these icons or powered on AC power to open the Power Meter dialog box If the battery is fully charged remaining capac...

Страница 48: ... message will tell you when the battery drops to the specified level and your computer will go on System standby System hibernate or shut down automatically To set Windows battery alarm 1 In the Power Options Properties dialog box select Alarms tab 2 Set the battery level at which the alarms are activated We recommend you set Critical battery alarm to 5 or more and Low battery alarm to more than t...

Страница 49: ...fully charged again Do not turn on your computer while charging the battery pack Do not connect your computer to a wall outlet while discharging the battery The conditioning will be cancelled Repeated charging and discharging or long term storage of the battery pack cause battery deterioration In this case replace the battery pack with a new one Changing Battery Pack When repeatedly charged and di...

Страница 50: ...he left and hold it then pull out the battery pack 4 Insert a new battery pack into your computer by matching the projected parts of the battery with the notched parts on your computer 5 Press down the battery pack until you hear the clicking sound 6 Turn your computer over Battery Stopper Notched Part Battery Release Lever Projected Part ...

Страница 51: ...ttach any add on batteries but the optional ones CE BL30 Attaching Add on Battery Pack Follow the steps below 1 Turn off your computer and disconnect the AC adapter from your computer 2 Close the display cover and turn over your computer on a flat place 3 Open the cover of the add on battery pack socket on the bottom of your computer Cover ...

Страница 52: ...press down the battery pack 6 Slightly press the two levers of the battery pack inwards and hold them then press down the battery pack and release the levers Make sure the triangle logos on the battery pack go with the line marks of your computer Notched Part Projected Part Levers Triangle Logo Line Mark ...

Страница 53: ...er your computer on a stable surface 3 Slightly press the two levers of the battery pack inwards and hold them 4 Slightly lift up the front of the battery pack and release the levers Make sure to lift up the battery pack softly and slightly Lifting it up with excessive force may damage the projections of the battery 5 Push out the battery backward and remove it Levers ...

Страница 54: ... on Battery You can check the add on battery level with one of the following ways On Windows Refer to Checking Battery Level section in this chapter With battery level lamp When you press the battery level button the battery level lamps light up Conditioning Add on Battery Pack 1 Connect the add on battery pack 2 Refer to Conditioning Battery Pack in this chapter Cover Battery Level Button Battery...

Страница 55: ... view is selected double click Power Options icon Note that the power management may not seem to function when you are using an application program that accesses the hard disk periodically Stopping Power Supply to Hard Disk 1 In Power Options Properties dialog box select Power Schemes tab 2 Set Turn off hard disks to an appropriate value and click OK 3 Close the Control Panel window Stopping Power...

Страница 56: ...t performance state Home Office Desk Using Battery Performance state will be chosen based on CPU demand Using AC Power Performance state will be chosen based on CPU demand Portable Laptop Using Battery Performance state will be chosen based on CPU demand Using AC Power Performance state will be chosen based on CPU demand Presentation Using Battery Always runs at the lowest performance state Using ...

Страница 57: ...omponents Your system enters and resumes from System standby per the conditions mentioned later In System standby the power indicator blinks green To resume from System standby operate your computer again System hibernate saves the current condition of your computer in part of the hard disk and turns off your computer Your system enters and resumes from System hibernate per the conditions mentione...

Страница 58: ...s dialog box select Power Schemes tab 2 From the pull down menus in System standby or and System hibernate select the elapsed time before your computer automatically enters System standby hibernate 3 Click OK then close the Control Panel window Entering System Standby Hibernate Your computer enters System standby hibernate in each of the following cases You select Stand By or Hibernate which repla...

Страница 59: ...mputer 3 Click OK then close the Control Panel window If Ask me what to do is selected in the step 2 of You press the power button or You press Fn F12 the Turn off computer dialog box will appear when you press the power button or Fn F12 key combination You can select System standby or System hibernate at that timing The battery level is low The above functions if you set the alarm in Windows See ...

Страница 60: ...hown on the next page For the details refer to the section explaining each device or contact your dealer Be sure to turn off your computer and the peripheral devices before connecting them except when connecting inserting USB devices an IEEE1394 device a PC card etc Confirm the peripheral device you will connect is Windows XP compatible When you connect some of the devices you may have to turn on ...

Страница 61: ...4 2 4 Peripheral Connection Overview Video Equipment with S video USB Devices Headphone Audio Equipment Microphone External Monitor IEEE1394 Device PC Card ...

Страница 62: ...e floppy disk drive unit It may cause the drive to malfunction Connect the floppy disk drive unit cable to either of the USB ports on your computer Be sure to let the USB mark side up when connecting the cable to your computer Handling Floppy Disk Do not open the shutter and touch the disk inside otherwise you will not be able to read or write data from to the disk Do not place floppy disks near m...

Страница 63: ... force when inserting the floppy disk If you have difficulty inserting or removing disks seek the assistance of an authorized service technician Do not touch the disk while reading writing data It may cause malfunction of your computer and the drive Ejecting Floppy Disk Before ejecting the floppy disk make sure the indicator of the floppy disk drive unit is not lit Press the eject button firmly Th...

Страница 64: ...n the taskbar If you cannot find the icon click to show all kinds of icons 2 Click on Safely Remove Mitsumi USB Floppy Drive A string Safe To Remove Hardware dialog appears 3 Remove the unit from your computer External Display You can use an external monitor with your computer To display the same images on both displays simultaneously use the 1024x768 resolution Some monitors which are not compati...

Страница 65: ...ws of the cable if it has 4 Turn on the external monitor then your computer Disconnecting External Monitor 1 Turn off your computer and the external monitor 2 Loosen the screws of the monitor cable if it has and remove the cable from your computer and the monitor Displaying on External Monitor To display the image on an external monitor you may need to install the driver for the external monitor B...

Страница 66: ...or animation you may not be able to switch the display The external display should be capable of 1024x768 resolution or more when displaying simultaneously Otherwise it cannot display properly Audio System You can output sound to speakers audio equipment or a headphone and also input sound through a microphone Connecting Speakers You can connect stereo speakers with an amplifier to the audio outpu...

Страница 67: ...t Use AC adapter for your computer and the digital audio equipment Exit other application programs Disable Windows power management Do not enter System standby hibernate Do not operate your computer Use the digital audio equipment compliant with sampling rate of 48kHz Sound may not be recorded correctly if you use the synchronized recording system of the digital audio equipment S PDIF Compliant Au...

Страница 68: ...dows by sliding the volume lever appearing when clicking the speaker icon on the taskbar Connecting Headphone Use the headphone with an impedance of 8Ω or more 32Ω is recommended Audio Output Jack White L Red R Audio Output Jack Analog Audio Cable Stereo Mini Plug Stereo Mini Plug ...

Страница 69: ...he microphone jack Use an electret condenser microphone with an impedance of 2 2kΩ and an allowable voltage of 2V To record sound 1 Click start then point All Programs Accessories Entertainment 2 Click Sound Recorder 3 See Help for Sound Recorder for more information Microphone Jack Mini Plug ...

Страница 70: ... to your computer the appropriate driver is automatically installed If the driver is not installed correctly a message will appear in the lower right of the screen In this case install the driver by following the instructions on the screen To remove USB devices you may need to perform the following instructions before you remove them 1 Click Safely Remove Hardware icon on the taskbar If you cannot...

Страница 71: ...ess networking card Do not give force to the card Do not store or carry your computer with the card inserted When a new card is correctly inserted the appropriate driver is automatically installed If not installed correctly a message will appear on the lower right of the screen In this case install the PC card driver by following the instructions on the screen 1 Confirm the PC card eject button is...

Страница 72: ...g use Be sure to follow these instructions when ejecting a PC card Otherwise the system may not work properly 1 Click the Safely Remove Hardware icon on the taskbar If you cannot find the icon click to show all kinds of icons 2 Click on Safely remove xxxxx string xxxx is the name of your PC card then Safe To Remove Hardware dialog appears 3 Push the PC card eject button so that it will pop out fro...

Страница 73: ...for safekeeping Printer You can connect a USB printer to either of the USB ports Before using a USB printer read the printer manual and install the printer driver Note that some printers may not use Found New Hardware Wizard to install the printer driver You can connect the USB printer to your computer without turning off your computer USB Port USB Cable ...

Страница 74: ... only the equipment that is directly connected but also with other devices via the directly connected device Confirm the IEEE1394 device you will connect is Windows XP compatible Use AC power for your computer and the IEEE1394 device especially when reading writing the data Some IEEE1394 devices require that you install drivers before use Connecting IEEE1394 Device You need not turn off your compu...

Страница 75: ...ur data Disconnecting IEEE1394 Device 1 Click the Safely Remove Hardware icon on the taskbar If you cannot find the icon click to show all kinds of icon If the icon does not appear go to Step 3 2 If the name of your device appears click on Safely remove xxxxx string xxxxx is the name of your IEEE1394 device then Safe To Remove Hardware dialog appears If your IEEE1394 device name does not appear sk...

Страница 76: ...ular analog telephone lines The modem may be damaged when connected to a digital ISDN terminal or a digital PBX Use TA terminal adapter to connect the built in modem to a digital telephone line If an unusual device is attached to the line you are connecting to the modem may not function properly Remove the device or contact the dealer of the device Before connecting to a PBX consult the PBX mainte...

Страница 77: ...r you finish using the built in modem 3 Connect one end of the included modem cable to the modem jack and the other to the telephone line Be sure not to insert the modem cable into the LAN jack It may damage the LAN jack and the modem cable 4 Turn on your computer Connect the modem to the telephone line directly Do not use a distributor or allotter Modem Jack To Telephone Line Modem Cover ...

Страница 78: ...Rules tab for the information you set above Clicking Edit or New allows you to make a new location or change the settings Internet Connection Windows XP has a special Internet connection wizard to help you to connect to the Internet with ease 1 Click start Control Panel Network and Internet Connections then Network Connections If Classic view is selected double click Network Connections icon 2 In ...

Страница 79: ...he cables may be damaged Use a category 3 or a category 5 LAN cable when connecting to 10 BASE T LAN and the category 5 when connecting to 100 BASE TX LAN Connect Your Computer to LAN 1 Turn off your computer 2 Attach the provided core to one end of your LAN cable Insert the cable into the core and close the core until it clicks 3 Open the cover of the LAN jack on the left side of your computer To...

Страница 80: ...onnections If Classic view is selected double click Network Connections icon 3 Right click Local Area Connection 4 From the pop up menu select Properties 5 In the Local Area Connection Properties dialog box set the network setting according to the instruction of your network administrator Attach the provided core to your LAN cable to insure compliance with requirements of EMC regulations for compu...

Страница 81: ... System icon 3 Click Hardware tab then Device Manager button 4 Double click on Network Adapters string then Realtek RTL8139 xxxxx string 5 Click Advanced tab and select Link Speed Duplex Mode in Property list and select an appropriate value in Value pull down menu 6 Click OK and close the Device Manager window 7 Click OK and close the Control Panel window ...

Страница 82: ...ess network consists of a number of computers each equipped with wireless networking interface Each computer can communicate directly with other wireless enabled computers The range to give reliable performance and the quality of connection vary depending on the environment where you perform To communicate through the wireless LAN activate the integrated antennas with the following steps Activate ...

Страница 83: ...nection of Network Tasks 4 Double click on Internet Protocol TCP IP string in This connection uses the following items 5 In Internet Protocol TCP IP Properties dialog box select Use the following IP address and set a unique IP address to 192 168 1 2 through 192 168 1 254 and the Subnet mask to 255 255 255 0 then click OK The IP address of each computer should be unique The Default gateway can be b...

Страница 84: ...n the network name you want to access does not appear click Advanced tab then Refresh button of Available networks in Wireless Network Connection Properties dialog box then click OK 3 Click Wireless Network Connection icon on the taskbar 4 In Wireless Network Connection Status dialog box confirm your connection status The number of green signals shows the connection The more signals light on the b...

Страница 85: ...ollowing steps Note that some access points have the key index options 0 through 3 Refer to the table below for matching 1 Open the Wireless Network Connection Properties dialog box Refer to the steps in Communicating with Other Computer section 2 Select the network you want to access in Preferred networks section and click Properties button 3 Confirm the box of Data encryption WEP enabled is chec...

Страница 86: ...urrent environment and follow the instructions below 1 Click start All Programs SHARP Network Setup Utility SHARP Network Setup Utility 2 Click OK 3 Click Set select SHARP icon or Windows icon and then click Select icon button 4 Select an icon and click OK Type a network name then click OK The selected icon appears in the Network Setup Utility window It takes a moment to load the network settings ...

Страница 87: ...the settings Changing Network Settings To change the loaded network settings right click on the icon you want to change the settings in the Network Setup Utility window and click Edit settings in the pop up menu Then edit the settings Deleting Network To delete the loaded network settings right click on the icon you want to delete in the Network Setup Utility window and click Delete setting in the...

Страница 88: ... is saved in a special area called CMOS RAM which the system reads every time you turn on your computer Your computer is shipped from the factory with the appropriate setting of the Setup Utility Leave it as default in normal use Contents of Setup Utility The Setup Utility consists of five menu pages as follows Main Configures basic setting Advanced Configures device interface Security Sets passwo...

Страница 89: ...Do not close the display cover Changing the Setting of the Setup Utility To change the settings 1 Use or key to select the menu then press Enter 2 Use or key to select the item On item with mark press Enter to open its sub menu Press Esc to close the sub menu and return to the previous menu Most of the items without mark can be changed their values or status by pressing Enter when selected For dat...

Страница 90: ...keyboard will be numlocked if connected USB Emulation defines whether USB devices a keyboard a mouse or an external floppy disk drive can be used in DOS mode When it is set to Disabled you cannot boot your computer from a floppy disk Quick Boot defines whether the system skips the check of the internal memory while booting to shorten the boot time Quiet Boot defines whether the SHARP logo appears ...

Страница 91: ...hange the configuration Make sure to select a password you will never forget or write it down and protect it in a secure place Otherwise you will have to contact your dealer for assistance Password on boot defines whether you have to type the password for booting your computer Hard Disk boot Sector defines whether the boot sector of the hard disk is write protected When formatting the hard disk or...

Страница 92: ... characters and press Enter 3 Type the same password again and press Enter twice 4 Select Exit menu and confirm Exit Saving Changes is highlighted then press Enter 5 Confirm Yes is highlighted and press Enter The system restarts Changing Password 1 In the Security menu of the Setup Utility select Set Supervisor Password or Set User Password and press Enter 2 Type your current password and press En...

Страница 93: ...nes whether the system boots from other server via the LAN unit of your computer Wake On LAN defines whether the system boots up or resumes from System Hibernate when the LAN unit of your computer becomes active This setting functions only when your computer is connected to AC power Exit Menu Exit Saving Changes saves the settings you have changed and exits the Setup Utility Exit Discarding Change...

Страница 94: ...lectricity from your body by touching an unpainted metal area Avoid touching the integrated circuits on a memory module Handle all components by the edges Keep the memory module in the anti static wrapping until you are ready to install it 1 Turn off your computer and disconnect the AC adapter and remove the battery pack and peripheral devices See Chapter 3 for removing the battery Make sure to tu...

Страница 95: ... cover 4 Turn over the sheet and align the memory module as shown below matching the notched part of the module with the projected part of the memory socket of your computer Notched Part Projected Part 20 Memory Slot Cover Screws Memory Socket Memory Module Sheet ...

Страница 96: ...cted parts of the socket until you hear the clicking sound 6 Replace the sheet and memory slot cover matching the projected parts of the cover with the notched parts of your computer 7 Tighten the screws 8 Replace the battery pack turn over your computer and connect the AC adapter Notched Parts Projected Part Notched Parts Projected Parts ...

Страница 97: ...A 4 Appendixes See Chapter 3 for replacing the battery pack ...

Страница 98: ...w steps 6 9 of Installing Memory Module Installing Weight Saver You can change the optical drive unit for the weight saver to make your computer lighter With the weight saver installed instead of the optical drive unit you can get the better portability Always keep either of the optical drive unit or the weight saver installed into the optical drive bay Leaving the optical drive bay empty may dama...

Страница 99: ...it clicks Re installing Optical Drive Unit 1 Turn off your computer and disconnect the AC adapter from your computer Make sure to turn off your computer and remove the AC adapter Otherwise your computer may be damaged 2 Close the display cover and turn over your computer on a stable surface 3 Slide the optical drive stopper backward you and pull out the weight saver from your computer Optical Driv...

Страница 100: ...the information of the Setup Utility etc If you see the message Press F1 to resume F2 to Setup replace it with a Lithium CR2032 Battery on the market 1 Turn off your computer disconnect the AC adapter and remove the battery pack from your computer Make sure to turn off your computer and remove the AC adapter and the battery pack from your computer Otherwise your computer may malfunction 2 Loosen t...

Страница 101: ...ter may malfunction 4 Insert a new backup battery with the plus side printed a part number up Press two hooks of the box with the edge of the battery and hold it then press down the battery 5 Replace the cover on your computer matching the projected parts of the cover with the notched parts of your computer Hooks Notched Parts Projected Parts ...

Страница 102: ...ter 12 When the message Load default configuration now appears select Yes then press Enter 13 In the Exit menu select Exit Saving Changes then press Enter 14 When the message Save configuration changed and exit now appears select Yes then press Enter 15 Click start Control Panel 16 Click Date Time Language and Regional Options in Category view then click on Change the date and time string 17 Set d...

Страница 103: ...r to prevent theft Cleaning Computer Cabinet Apply a small amount of mild cleaning solution to a dry lint free cloth and wipe the cabinet with the cloth Never clean your computer while it is powered on Do not use alcohol benzene thinner or other strong chemical agents that may damage the cabinet Security Cable Security Slot ...

Страница 104: ... back up your data onto floppy disks optical disks or other external media Do not travel with any peripherals such as an external floppy disk drive unit connected Do not carry your computer powered on This may result in loss of data and or damage to the hard disk drive Do not carry your computer with a protruding PC card inserted in the PC card slot This may result in damage to your computer and o...

Страница 105: ...A 12 Appendixes ...

Страница 106: ... for disaster recovery purposes The Software is only authorized for distribution together with a specific computer This License authorizes you to use the Software for disaster recovery purposes only to restore the hard disk image contained on the CD to the computer with which the CD and Software were originally shipped 3 NONPERMITTED USES Without the express permission of PowerQuest you may not a ...

Страница 107: ...OF BUSINESS INFORMATION OR OTHER PECUNIARY LOSS EVEN IF POWERQUEST CORPORATION HAS BEEN ADVISED OF THE POSSIBILITY OF SUCH DAMAGES WHETHER SUCH LIABILITY IS BASED ON CONTRACT TORT WARRANTY OR ANY OTHER LEGAL OR EQUITABLE GROUNDS BECAUSE SOME STATES DO NOT ALLOW THE EXCLUSION OR LIMITATION OF LIABILITY FOR CONSEQUENTIAL OR INCIDENTAL DAMAGES THE ABOVE LIMITATION MAY NOT APPLY TO YOU 8 NO WAIVER Any...

Страница 108: ...n how to back up your data see the Windows Online Help Selecting the way to recover your system Your computer has two drives C and D in its hard disk when it was shipped from the factory You can select the way to recover your system Recovers C drive only Recommended This process will format C drive only and recover C drive to the same status as shipped from the factory Nothing will be done to D dr...

Страница 109: ...t then press Esc 9 In the Exit menu confirm Exit Saving Changes is highlighted and press Enter twice The system restarts 10 Read the message on the screen and select the way to recover your system then press Enter If you selected Formats hard disk and creates new partition go to the next step Otherwise go to Step 12 11 Select the volume of C drive and press Enter 12 Read the message and select Con...

Страница 110: ...menu select Load Setup Defaults then press Enter twice 17 In the Exit menu confirm Exit Saving Changes is highlighted and press Enter twice The system will restart again 18 Set up Windows XP by following the instructions on the screen When you finish the setup the recovery is completed Make sure to set date and time ...

Страница 111: ...A 18 Appendixes ...

Страница 112: ...ams are capable of generating errors and error messages If you encounter a software error try to determine if the error message is from your operating system or from an application program and refer to the appropriate manual for possible remedies You can also refer to the Windows manual or Windows help program to solve the problem To access the help program click start Help and Support It also giv...

Страница 113: ...e inserted a non bootable disk in the external floppy disk drive unit either a defective disk or one without an installed operating system Remove the disk Question Why can t I boot from the floppy disk Make sure that the external floppy disk drive unit is correctly connected to your computer Check whether the floppy disk set to the external floppy disk drive unit contains a system disk Check wheth...

Страница 114: ... it is correctly installed and has a charge remaining Make sure the LCD screen is selected as the display by pressing Fn F5 Check whether the display is on by pressing Fn F11 If you still have the problem after trying the above follow the steps in Why doesn t the keyboard or the glide pad function Question Why does the external monitor display nothing or the image on it distorted Confirm the monit...

Страница 115: ...800 by 600 pixels and Color quality to Medium 16bit Question Why can t I change the display with Fn F5 keys When playing the animation or game Fn F5 key combination may not work Close the currently running application When running DOS in the full screen mode Fn F5 key combination may not work Use Display Properties dialog box to change it When connecting to a TV set Fn F5 key combination does not ...

Страница 116: ...ame is correct The floppy disk may not be formatted or could be corrupted Format the disk or use another disk If you cannot write to a floppy disk the disk may be write protected Eject the disk and ensure that the write protect tab covers the detection hole If you cannot write to a floppy disk the disk may be full Use another disk Trouble with the Hard Disk Question Why can t I read or write data ...

Страница 117: ...he drive and file names are correct Confirm the disk is not stained or scratched Confirm the disk or files are supported Question Why doesn t a DVD video play smoothly Ensure to use AC power Power management may be working Disable it Question Why isn t the optical drive recognized If your computer is turned on with a certain DVD video inserted in the drive the drive may not be recognized In this c...

Страница 118: ...evice is attached to the line you are connecting to the modem may not function properly Remove the device or contact the dealer of the device If your computer is connected to a PBX consult the PBX maintenance staff or its service company If the electric characteristics of your PBX are different from those of a regular analog line the modem will not function properly If you connect the modem to a d...

Страница 119: ...rs 3 Right click Wireless Network Connection then click Disable 4 Right click Wireless Network Connection then click Enable When you have more than one available access points your computer may be connected to other than right one you want to access 1 Right click icon on the taskbar then click View Available Wireless Networks 2 Select the desired network in the Available networks list then click C...

Страница 120: ...omputer are set correctly Confirm the WEP key is correctly entered if the WEP security of other devices which you want to communicate with is enabled Trouble with Peripherals Question Why don t peripheral devices function Confirm they are correctly connected to your computer Confirm they are Windows XP compliant Confirm drivers necessary for the devices are installed Question Why can t I print Mak...

Страница 121: ...ry pack Question Why is the date and or time incorrect Correct the date and time in Windows Double click the time appearing on the taskbar and set them in Date and Time Properties dialog box Question Why can t I use a hardware device Make sure the hardware device is not crossed out with an X mark using the following procedure 1 Click start Control Panel Click Performance and Maintenance then Syste...

Страница 122: ...n Why can t I record the sound from the microphone Follow the instructions below 1 Double click the speaker symbol on the taskbar 2 Click Options and select Properties 3 Select Recording in Adjust volume and confirm Microphone is checked in Show the following volume controls then click OK 4 Confirm Select is checked in Microphone of Recording Control dialog box 5 Close the Recording Control dialog...

Страница 123: ...Troubleshooting T 12 ...

Страница 124: ...ry indication 3 3 C Cleaning computer A 9 CD handling 2 7 inserting 2 8 removing 2 9 troubleshooting T 5 CD R RW 2 10 D Display changing brightness 2 16 changing resolution 2 17 changing number of colors 2 17 switching the display 2 6 4 7 troubleshooting T 3 turning off 2 6 DVD ROM parental control 2 12 playing 2 13 region code 2 11 troubleshooting T 6 E External monitor connecting 4 6 disconnecti...

Страница 125: ...leshooting T 7 N Network setup utility changing 5 12 deleting 5 12 loading 5 11 switching 5 11 O Optical drive troubleshooting T 5 P Passwords changing 2 21 6 5 deleting 2 21 6 5 setting 2 20 6 5 PC cards ejecting 4 13 inserting 4 12 Peripherals audio equipment 4 8 connecting guidelines 4 1 external floppy disk drive 4 3 external monitor 4 5 headphones 4 9 IEEE 1394 device 4 15 microphone 4 10 PC ...

Страница 126: ...esuming from 3 12 supporting 3 13 System standby about 3 12 generating conditions 3 13 resuming from 3 12 T Television set 2 13 Troubleshooting common problems T 1 communications T 7 display T 3 external floppy disk drive T 5 hard disk drive T 5 keyboard or glide pad T 4 LAN T 7 optical drive T 5 peripherals T 9 U USB device 4 11 W Wallpaper 2 18 Weight saver A 4 WEP key 5 9 Windows XP first time ...

Страница 127: ...Index 2 Index ...

Страница 128: ...SHARP CORPORATION PC AV18P Series OPERATION MANUAL 118P 5 3m ...

Отзывы: