background image

3

26MR70

2

SAFETY NOTICE

Many  electr ical  and  mechanical  par ts  in  television
receivers  have  special  safety-related  characteristics.
These  characteristics  are  often  not  evident  from  visual
inspection,  nor  can  protection  afforded  by  them  be
necessarily  increased by  using replacement components
rated for higher voltage, wattage, etc.
Replacement  parts  which  have  these  special  safety
characteristics  are  identified  in  this  manual;  electrical
components having such features are identified by "

"

and  shaded  areas  in  the  Replacement  Parts  Lists  and
Schematic Diagrams.

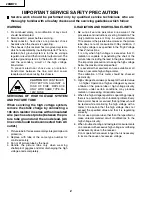
IMPORTANT SERVICE SAFETY PRECAUTION

(Continued)

1. Inspect all lead dress to make certain that leads are

not pinched or that hardware is not lodged between
the chassis and other metal parts in the receiver.

2. Inspect  all  protective  devices  such  as  non-metallic

control  knobs,  insulating  materials,  cabinet  backs,
adjustment  and  compar tment  covers  or  shields,
isolation  resistor-capacity  networks,  mechanical
insulators,  etc.

3. To  be  sure  that  no  shock  hazard  exists,  check  for

leakage  current  in  the  following  manner.
Plug  the  AC  cord  directly  into  a  120  volt  AC  outlet,
(Do  not  use  an  isolation  transformer  for  this  test).
Using  two  clip  leads,  connect  a  1.5k  ohm,  10  watt
resistor  paralleled by  a  0.15 F  capacitor in  series  with
all  exposed  metal  cabinet  parts  and  a  known  earth
ground, such  as  electrical conduit or  electrical ground
connected  to  earth  ground.
Use  an  AC  voltmeter  having  with  5000  ohm  per  volt,
or  higher,  sensitivity  to  measure  the  AC  voltage  drop
across the resistor.

For  continued  protection,  replacement  parts  must  be
identical to those used in the original circuit. The use of
substitute replacement parts which do not have the same
safety  character istics  as  the  factor y  recommended
replacement  parts  shown  in  this  service  manual,  may
create shock, fire, X-radiation or other hazards.

BEFORE RETURNING THE RECEIVER

(Fire & Shock Hazard)

Before  returning  the  receiver  to  the  user,  perform
the following safety checks.

Connect the resistor connection to all exposed metal
parts having a return to the chassis (antenna, metal
cabinet,  screw  heads,  knobs  and  control  shafts,
escutcheon,  etc.)  and  measure  the  AC  voltage  drop
across the resistor.
AII checks must be repeated with the AC line cord
plug  connection  reversed.  (If  necessar y,  a  non-
polarized  adapter  plug  must  be  used  only  for  the
purpose  of  completing  these  check.)
Any  current  measured  must  not  exceed  0.5  milliamp.
Any  measurements  not  within  the  limits  outlined
above  indicate  of  a  potential  shock  hazard  and
corrective  action  must  be  taken  before  returning  the
instrument  to  the  customer.

AC

VOLTMETER

1.5k ohm

10W

0.15 F

TEST PROBE

TO EXPOSED
METAL PARTS

CONNECT TO
KNOWN EARTH
GROUND

/////////////////////////////////////////////////////////////////////////////

/

/

2

/////////////////////////////////////////////////////////////////////////////

/

/

!

Содержание 26MR70

Страница 1: ...subject to change without notice CONTENTS MODEL ELECTRICAL SPECIFICATIONS POWER INPUT 120 V AC 60 Hz POWER RATING 100 W PICTURE SIZE 2 032cm2 315sq inch CONVERGENCE Magnetic SWEEP DEFLECTION Magnetic FOCUS Hi Bi Potential Electrostatic INTERMEDIATE FREQUENCIES Picture IF Carrier Frequency 45 75 MHz Sound IF Carrier Frequency 41 25 MHz Color Sub Carrier Frequency 42 17 MHz Nominal AUDIO POWER 1 5 W...

Страница 2: ...the high voltage anode completely X RADIATION AND HIGHVOLTAGE LIMITS 1 Be sure all service personnel are aware of the proceduresand instructions covering X radiation The only potential source of X ray in current solid state TV receivers is the picture tube However the picture tube does not emit measurable X Ray radiation if the high voltage is as specified in the High Voltage Check instructions It...

Страница 3: ...5 F capacitorin series with all exposed metal cabinet parts and a known earth ground such as electrical conduit or electrical ground connected to earth ground Use an AC voltmeter having with 5000 ohm per volt or higher sensitivity to measure the AC voltage drop across the resistor For continued protection replacement parts must be identical to those used in the original circuit The use of substitu...

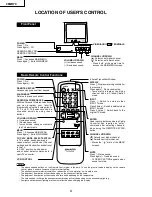
Страница 4: ... the strength of lighting used The degree of illumination will decrease with time and depending on the temperature The time needed to charge the phosphorescent display will vary depending on the surrounding lighting Sunlight and fluorescent lighting are the most effective when charging the display POWER Press On Press again Off REMOTE KEYPAD Accesses any channel from keypad FLASHBACK Returns to pr...

Страница 5: ...ation of the horizontal oscillator does not stop in step 5 the circuit must be repaired before the set is returned to the customer HIGH VOLTAGE CHECK High voltage is not adjustable but must be checked to verify that the receiver is operating within safe and efficient design limitations as specified checks should be as follows 1 Connect an accurate high voltage meter between ground and anode of pic...

Страница 6: ...eo adjustment menu to ensure customer control are in their proper reset position 2 Service number selection In the service mode you will see the window screen as window There are 4 adjustment categories DEF SIGNAL FEATURE FIX VALUE as show in Figure A Press CH UP DOWN button for selection and enter by VOL UP or VOL DOWN Press CH UP DOWN button to select the adjustment item and VOL UP DOWN to adjus...

Страница 7: ...9 F16 FLT SYS 00 07 01 01 F17 KILLER OP 00 07 02 02 F18 PRE SHOOT 00 03 00 00 F19 CORING 00 03 04 04 F20 DC REST 00 03 02 02 F21 BS START 00 03 01 01 F22 BS GAIN 00 03 01 01 F23 ABL START 00 07 00 00 F24 R B ANGLE 00 0F 08 08 F25 H BLK R 00 0F 03 03 F26 H BLK L 00 0F 00 00 SERVICE POSITION ADJUST ITEM DATA RANGE INITIAL VALUE Hex Table A Below are the ranges and initial values for each adjustment ...

Страница 8: ...02 VIDEO LEVEL 00 07 03 S03 Y MUTE 00 03 00 01 Y MUTE 02 V STOP Y MUTE 03 Activate color killer circuit S04 SUB BIAS 00 FF 30 Must be 30 S05 R BIAS 00 FF 00 S06 G BIAS 00 FF 00 S07 B BIAS 00 7F 00 S08 R DRIVE 00 7F 53 S09 B DRIVE 00 7F 53 S10 CONTRAST 00 7F 5A S11 TINT 00 7F 40 S12 COLOR 00 7F 40 S13 BRIGHTNESS 00 7F 40 SERVICE POSITION ADJUST ITEM DATA RANGE INITIAL VALUE ADJUSTMENT CONTENTS Note...

Страница 9: ...evel 00 2 35 Vdc GND 4 Select the service adjustment S03 and set the data value to 01 to turn off the luminance signal Y mute 5 Select the service adjustment S13 and adjust the data value to obtain 2 35 volts as shown in Figure B 6 Adjust the master screen control until the raster darkens to the point where raster is barely seen 7 Adjust the service adjustment S05 red S06 green S07 blue to obtain ...

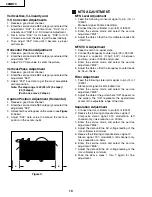
Страница 10: ...ltmeter is minimum 5 Receive the following composite stereo signal 2 Stereo signal 30 modulation left channel only noise reduction on 3kHz 6 Enter the service mode and select the service adjustment M05 7 Adjust the data until the AC voltage reading of the rms voltmeter is minimum 8 Take the above steps 1 thru 7 again for fine adjustment Vertical Size V Linearity and V S Correction Adjustments 1 Re...

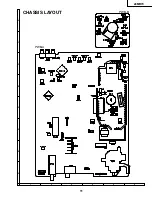
Страница 11: ...11 6 5 4 3 2 1 A B C D E F G H 26MR70 CHASSIS LAYOUT PWB A PWB B ...

Страница 12: ...12 6 5 4 3 2 1 A B C D E F G H 26MR70 BLOCK DIAGRAM ...

Страница 13: ...mal picture unless otherwise indicated 2 All voltages measured with 1000µ V B W or Color signal WAVEFORM MEASUREMENTCONDITIONS 1 Photographs taken on a standard gated color bar signal the tint setting adjusted for proper color The wave shapes at the red green and blue cathodes of the picture tube depend on the tint color level and picture control 2 indicates waveform check points See chart wavefor...

Страница 14: ...15 26MR70 14 12 11 10 9 8 7 6 5 4 3 2 1 A B C D E F G H SCHEMATIC DIAGRAM MAIN 1 Unit ...

Страница 15: ...17 26MR70 16 12 11 10 9 8 7 6 5 4 3 2 1 A B C D E F G H SCHEMATIC DIAGRAM MAIN 2 Unit ...

Страница 16: ...18 6 5 4 3 2 1 A B C D E F G H 26MR70 SCHEMATIC DIAGRAM CRT Unit ...

Страница 17: ...19 6 5 4 3 2 1 A B C D E F G H 26MR70 PRINTED WIRING BOARD ASSEMBLIES PWB B CRT Unit Wiring Side ...

Страница 18: ...20 6 5 4 3 2 1 A B C D E F G H 26MR70 PWB A MAIN Unit Wiring Side ...

Страница 19: ...21 6 5 4 3 2 1 A B C D E F G H 26MR70 PWB A MAIN Unit Chip Parts Side ...

Страница 20: ...TION in USA Contact your nearest SHARP Parts Distributor to order For location of SHARP Parts Distributor Please call Toll Free 1 800 BE SHARP MARK SPARE PARTS DELIVERY SECTION MARK X RAY RELATED PARTS PWB A DUNTKA462WEV6 MAIN Unit PWB B DUNTK9510WEV1 CRT Unit PWB A DUNTKA462WEV6 MAIN UNIT TUNER NOTE THE PARTS HERES SHOWN ARE SUPPLIED AS AN ASSEMBL Y BUT NOT INDEPENEDENTL Y TU51 VTUVTST5UF740 X Tu...

Страница 21: ...02 RH DX0154CEZZ J Diode AC or RH DX0490CEZZ or RH DX0279CEZZ D703 RH DX0154CEZZ J Diode AC or RH DX0490CEZZ or RH DX0279CEZZ D704 RH DX0154CEZZ J Diode AC or RH DX0490CEZZ or RH DX0279CEZZ D707 VHD1SS119 1 J Diode AB or VHD1SS244 1 D708 VHD1SS119 1 J Diode AB or VHD1SS244 1 D709 RH DX0229CEZZ J Diode AF D712 VHDD1NS4 1 J Diode AE or RH DX0302CEZZ or RH DX0468CEZZ or RH DX0513CEZZ or RH DX0487CEZZ...

Страница 22: ...0 RC FZ1018CEZZ X 12600p 1 8kV Plastic AG C612 VCFPVC2DB514J X 0 51 200V M Poly AF C632 VCKYCY1EB153K J 0 015 25V Ceramic AA C633 VCEA0A1AW337M X 330 10V EL AE C634 VCKYCY1HF103Z J 0 01 50V Ceramic AA C635 VCEA0A1HW105M J 1 0 50V EL AB C637 VCEA0A1CW476M J 47 16V EL AB C652 VCEA0A1HW475M J 4 7 50V EL AB C653 VCEA0A1HW105M J 1 0 50V EL AB C654 VCFYSA1HB184J J 0 18 50V Mylar AB C662 VCEA0A1CW477M J ...

Страница 23: ... M Ox AA R212 VRS CY1JF000J J 0 1 16W M Ox AA R220 VRS CY1JF331J J 330 1 16W M Ox AA R301 VRS CY1JF102J J 1 0k 1 16W M Ox AA R302 VRS CY1JF152J J 1 5k 1 16W M Ox AA R304 VRS CY1JF102J J 1 0k 1 16W M Ox AA R305 VRS CY1JF152J J 1 5k 1 16W M Ox AA R306 VRS CY1JF333J J 33k 1 16W M Ox AA R308 VRS CY1JF101J J 100 1 16W M Ox AA R354 VRS CY1JF103J J 10k 1 16W M Ox AA R355 VRS CY1JF000J J 0 1 16W M Ox AA R...

Страница 24: ...J J 100 1 8W Carbon AB R2047 VRS CY1JF221J J 220 1 16W M Ox AA R2048 VRS CY1JF562J J 5 6k 1 16W M Ox AA R2049 VRD RA2BE333J J 33k 1 8W Carbon AA R2060 VRS CY1JF221J J 220 1 16W M Ox AA R2061 VRS CY1JF562J J 5 6k 1 16W M Ox AA R2062 VRS CY1JF183J J 18k 1 16W M Ox AA R2063 VRS CY1JF222J J 2 2k 1 16W M Ox AA R2064 VRD RA2BE391J J 390 1 8W Carbon AA R2065 VRS CY1JF000J J 0 1 16W M Ox AA R2067 VRS CY1J...

Страница 25: ...Q856 VS2SC3789 2E J 2SC3789 AF or VS2SC3619LB Q881 VS2SA1266 Y 1 J 2SA1266 Y AA DIODES D881 VHD1SS119 1 J Diode AB D882 VHD1SS119 1 J Diode AB D884 VHD1SS119 1 J Diode AB COIL L851 VP MK820K0000 J Peaking 82µH AB CAPACITORS EL Electrolytic C851 VCCSPA1HL391J J 390p 50V Ceramic AA C852 VCCSPA1HL331J J 330p 50V Ceramic AA C853 VCCSPA1HL391J J 390p 50V Ceramic AA C854 RC KZ0024CEZZ J 0 001 2kV Cerami...

Страница 26: ...X Operation Manual AG SUPPLIED ACCESSORIES 1 CCABA0120WEH1 X Front Cabinet Ass y BB 1 1 Not Available Front Cabinet 1 2 GCOVA0109GJKA X Cover for R C AF 1 3 HBDGB1008MESB X Badge SHARP AG 1 4 JBTN 0109GJKB X Button Power AE 1 5 JBTN 0110GJKB X Button Vol up down AE CH up down 2 GCABB0114GJKA X Rear Cabinet AZ CABINET PARTS CABINET PARTS LOCATION 1 1 1 2 1 4 1 2 1 5 1 3 SPAKC0223GJZZ Packing Case S...

Страница 27: ...RK Not replacement items FRONT Buffer Material Polyethylene Sheet Polyethylene Bag Operation Manual Infrared R C Unit Batteries REAR Use tape to fix the top side of packing case Use 12 staples to fix the bottom side of packing case Bar Code Label ...

Страница 28: ...eval system or transmitted in any form or by any means electronic mechanical photocopying recording or otherwise without prior written permission of the publisher SHARP ELECTRONICA MEXICO S A DE C V Blvd SHARP No 3510 Parque Industrial Rosarito Playas de Rosarito B C 22710 D JAPAN P SEMEX TQ1104 S Jun 2001 Printed in Japan MI KG ...

Отзывы: