background image

Version  13.03.2015  

Page

10


3.6.


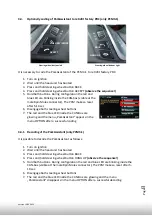
Coding  and  decoding  of  rear-­‐view  camera  (only  Porsche  Cayenne  with  PCM3)  

The  rear-­‐view  camera  coding  and  decoding  can  be  done  by  loose  white  cable  in  connection  

with  dip  3  of  CAN-­‐box  RLC-­‐TV521.  

1. Turn  on  ignition

2. Wait  until  the  head-­‐unit  has  booted

3. Set  dip  3  of  CAN-­‐box  (depending  on  the  desired  coding/decoding)

4. Put  +12V  for  5  sec.  to  the  white  cable

5. During  configuration  the  red  and  blue  LED  are  blinking  short  inside  the  CAN-­‐box

(visible  at  the  male  8pin  Molex  connector).  The  PCM

makes  a  reset  after  5-­‐10  sec.

6. The  red  and  the  blue  LED  inside  the  CAN-­‐Box  are

glowing  and  the  menu  „Rear-­‐view  camera“  appears  in

the  menu  OPTION  after  a  successful  coding  (or

disappears  after  successful  decoding)

Note:

  After  a  coding  or  decoding  another  coding  isn’t  possible  within  the  next  60  seconds!  

4. Activation  of  the  video-­‐in-­‐motion  function

With  dip1  to  ON  the  video-­‐in-­‐motion  function  is  activated  permanently  without  disturbing  

the  navigation  performance.  

Dip  

Function  

ON  

OFF  

Dip  3  

Rear-­‐view  camera   Coding   Decoding  

Содержание E09PO28000

Страница 1: ...tion systems Only for vehicles WITHOUT factory rear view camera Product features Plug and play interface Integrated into the vehicle infotainment Rear view camera input coding Rear view camera power 1...

Страница 2: ...6 Coding and decoding of rear view camera only Cayenne with PCM3 4 Activation of the video in motion function 5 Specifications 6 Technical support Legal Information By law watching moving pictures whi...

Страница 3: ...contents 1 2 Check compatibility of vehicle and accessories CANP box HW_____ SW_____ Harness Take down the SW version and HW version of the interface boxes and store this manual for support purposes R...

Страница 4: ...n Dip 5 no function Dip 6 no function CAN bus termination 1 4 Pin assignments Pin assignment factory connector No liability for vehicle wire colors and pin definition Possible changes by the vehicle m...

Страница 5: ...Version 13 03 2015 Page 4 2 Connection schema...

Страница 6: ...ttery with a resistor lead Place of installation is on rear of the head unit 3 1 Interconnecting CAN Box harness and factory navigation monitor Connect female 8pin Molex connector of harness RLC POR03...

Страница 7: ...the rear view camera to the female RCA connector of harness RLC POR03 Connect the green cable of harness RLC POR03 to the camera power supply 12V max 400mA The green cable is high when reverse gear i...

Страница 8: ...and the menu Rear view camera appears in the menu OPTION after a successful coding 3 3 1 Decoding of the rear view camera only PCM3 1 It is possible to decode the coding of the rear view camera input...

Страница 9: ...are glowing and the menu ParkAssistant appears in the menu OPTION after a successful coding 3 4 1 Decoding of the ParkAssistant only PCM3 1 It is possible to decode the ParkAssistant as follows 1 Turn...

Страница 10: ...cable 5 During configuration the red and blue LED are blinking short inside the CAN box visible at the male 8pin Molex connector The PCM makes a reset after 5 10 sec 6 The red and the blue LED inside...

Страница 11: ...blue LED are blinking short inside the CAN box visible at the male 8pin Molex connector The PCM makes a reset after 5 10 sec 6 The red and the blue LED inside the CAN Box are glowing and the menu Rea...

Отзывы: