background image

INTRODUCTION

Welcome to the Serpent owners network! By buying 

the Cobra GT, you have become part of the fast growing 

baseof Serpent drivers around the world, active in 

most classes of rc car racing. Serpent racers share 

their knowledge and experiences on the tracks and on 

the internet, so join in!


The Serpent Cobra GT is a high-end racing car, for 

competition purposes. The Serpent Cobra GT offers 

state  of  the  art  specifications  and  leads  the  way  in 

1/8 scale gas on-road chassis design, using all the 

knowledge our designers have gathered from racing 

on-road cars for over 35 years, into this design too.

Continuously pushing the performance envelope. 

Designed, tested and raced by Billy Easton and Michael 

Salven, World Champions.

All information about the Serpent Cobra GT is accessible 

from the Serpent Cobra GT  product page which can be 

found on Serpent.com and can be accessed  by simply 

typing serpent.com/600046 into your web browsers 

address bar. From the Serpent Cobra GT product page 

you  will  find  the  very  latest  information  about    your 

car: reports by team drivers and other experts, tips 

and tricks, setups, image gallery  and downloadable 

files  including  the  latest  version  of  the  instruction 

manual  is available as downloadable PDF-files.

Enjoy assembly, preperations and racing !

Team Serpent

INSTRUCTIONS

Serpent’s long tradition of excellence extends to the 

instruction manuals, and this instruction manual 

is no exception. The easy-to-follow layout is richly 

illustrated with 3D-rendered full-color images to make 

your building experience quick and easy. Following the 

instructions will result in a well-built, high-performance 

race-car that will soon be able to unleash its full 

potential at the racetrack.

INSTRUCTIONS, hOw TO USe 

The kit includes bags, with bagnumbers, which 

refer to the same step in the manual. Open only the 

indicated bag(s) per step and finish that part of the 

assembly. Remaining parts will be needed lateron in 

the assembly process.

SeTUP

In certain assembly steps you need to make basic

adjustments, which will give you a good initial setup 

for your Serpent Cobra GT. Fine-tuning the initial setup 

is an essential part of building a high-performance 

racecar like your Serpent Cobra GT.

eXPLODeD VIewS AND PARTS LIST

The exploded views and parts lists for the Serpent 

Cobra GT are presented in the Reference Guide section 

in the back of this manual. The exploded views show 

all the parts of a particular assembly step along with 

the Serpent part number. The parts lists indicate the 

part number andname of each part for easy reference 

when ordering.

CUSTOmeR SeRVICe

Serpent has made a strong effort to make this manual 

as complete and clear as possible. Additional info may 

be published in our website: www.serpent.com or you 

may ask your dealer or the Serpent distributor for 

advice, or email Serpent direct: [email protected]

The Serpent Facebook, Twitter and Youtube pages give 
additional means of support and communications. 

SAfeTy

Read and take note of the ‘Read this First section’ 

before proceeding to assemble the car-kit. This car-kit 

is intended for persons aged 16 or older.

Read this first!

- This is a highly technical hobby product, intended to be used in a safe 

racing environment. This car is capable of speeds in excess of 80 km/h 

or 50mph. Please follow these guidelines when building and operating 

this model.

- Parental guidance is required when the builder/user of this car is 

under 16.

- Follow the building instructions. If in doubt, contact your dealer or 

importer.

- Be sure to use the proper tools when assembling the car. Always 

exercise caution when using electric tools, knives and other sharp 

objects.

- Be careful when using liquids like lubrication oil, fuel or glue. Do not 

swallow.

- Follow the manufacturer’s instruction in case you experience irritation 

after using the product.

- Be careful when operating the car. Stay away from any rotating parts 

such as wheels, gears and transmission. Stay away from motor, engine 

and exhaust pipe system or speedo during and immediately after use, 

as these parts may be very hot. We advise to use protective hand 

cloves.

- Only operate this car in a safe environment, like a special racing track 

or a closed parking lot. Avoid using this car on public roads, crowded 

places or near infants.

- Before operating this car, always check the mechanical status of the 

car. Also check that the transmitter and receiver frequencies correspond 

and are not used by any other racer at the same time. Check that the 

batteries of the transmitter and receiver- are fully charged.

- After use, always check all the mechanics of the car. We advise to 

clean the car immediately after use, and inspect the parts for wear or 

fractures.

Replace when necessary. Do not use water, methanol, thinner or other 

solvents to clean the car.

- Empty the fuel tank (depending on model) if needed and disconnect 

the

receiver battery.

- Store the car in a dry and heated place to avoid corrosion of metal 

parts.

- Avoid using this car in wet conditions as the water will cause corrosion 

on

the metal parts and bearings and these parts will cease to function 

properly.

If driven in the wet, ensure that all the electric equipment is 

waterproofed

and after use, that all moving parts are dried immediately.

CONTENTS

DIffeReNTIAL  ASSemBLy   

                           4

GeARBOX  ASSemBLy     

                         5

ReAR ASSemBLy                                     7

fRONT ASSemBLy 


             12 

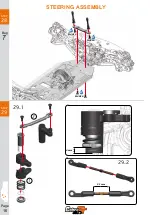
STeeRING ASSemBLy   

              16

CLUTCh ASSemBLy                                  19

RADIO ASSemBLy                                          20

ShOCKS ASSemBLy  


24

fINAL 

ASSemBLy 

  28

Ref 

GUIDe 

   31

Содержание Cobra GT 3.0

Страница 1: ...INSTRUCTION MANUAL REFERENCE GUIDE...

Страница 2: ...s made a strong effort to make this manual as complete and clear as possible Additional info may be published in our website www serpent com or you may ask your dealer or the Serpent distributor for a...

Страница 3: ...another Group of items within lines should be assembled first Direction the item should be moved Glue one item to another Press Insert one item into another Connect one item to another Gap between two...

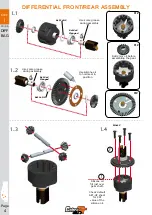
Страница 4: ...2 2 1 TIP TIP TIP Add 2mm oil before assembling the gear Silicone oil fill just over gear shaft Check default SET UP sheet for CST value of the silicone oil 1 1 1 2 1 3 1 4 Use some grease during asse...

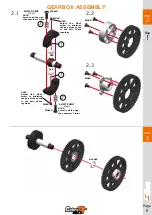
Страница 5: ...all the way then unscrew 3 turns SHIFT POINT SCREW NOTE Screw in all the way then unscrew 3 turns 2 1 NOTE Adjust the M3x3 screw to minimize the gap of the shoes to the bell Check regularly NOTE Adjus...

Страница 6: ...Page 6 STEP 4 STEP 5 8x14x4 Flanged 8x14x4 Flanged 8x11x0 2 M5X4 M5X4 M3x16 Flanged Thin Thick 1 2 3 5 1 5 2 M4X10...

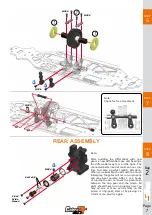
Страница 7: ...ed parts need at least an hour run time to create a perfect match Attention When you assemble the diff with too much initial play the gears will not run in properly and may wear quickly After 1 or 2 h...

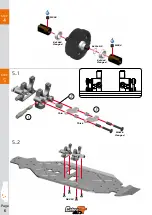
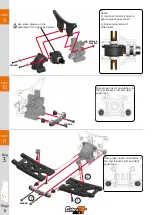
Страница 8: ...ims to adjust proper gear mesh 2 Notice orientation of differential Note proper insert orientation in the rear bracket left and right equal type Note proper insert orientation in the rear bracket left...

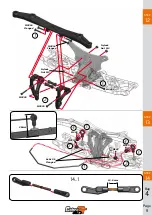
Страница 9: ...Page 9 STEP 13 STEP 14 STEP 12 M3X20 M3X20 M3X25 M3X16 Flanged M3X16 Flanged Nylock Nut M3 Nylock Nut M3 1 2 3 13 5 mm M3X3 M3X3 M3X3 M3X3 5x8x2 5 Flanged 1 2 2 3 3 4 4 14 1 Bag 4 35mm...

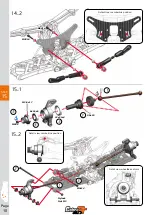
Страница 10: ...e 10 STEP 15 M3X14 M3X14 Default rear camberlink position M5X4 M2 5x17 2 5x15 8x16x5 15x21x4 1 1 2 2 3 3 4 5 15 1 15 2 14 2 M3x14 Nylock Nut M3 Detail view wheelbase shims Detail view camberlink posit...

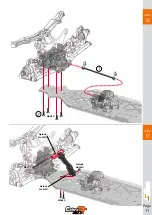
Страница 11: ...Page 11 STEP 16 STEP 17 M4X12 M3x12 M3x22 1 2 Nylock Nut M3 Nylock Nut M3 Nylock Nut M3...

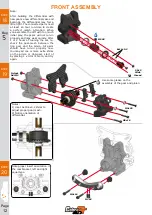
Страница 12: ...run in properly and may wear quickly After 1 or 2 hours of running the car re check the gear mesh between the ring gear and the pinion All parts should have run in properly now You may ad one or more...

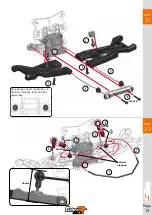
Страница 13: ...Page 13 STEP 21 STEP 22 M3x16 1 1 2 2 3 3 4 M3X3 M3X3 M3X3 M3X3 5x8x2 5 Flanged 1 2 2 3 3 4 4 Note proper insert orientation in the front bracket left and right equal type 35mm...

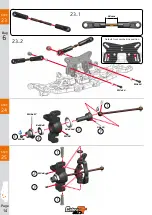
Страница 14: ...Page 14 STEP 23 STEP 24 STEP 25 M3x14 M3x14 18 mm 23 1 23 2 M5X4 M3x6 M3X4 M2 5x17 2 5x15 8x16x5 15x21x4 1 2 3 4 5 1 1 2 2 Bag 6 Default front camberlink position...

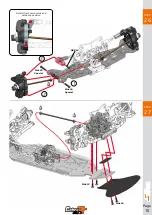
Страница 15: ...Page 15 STEP 26 STEP 27 M4x18 Special M4x18 Special M4x12 M4x16 M3X14 1 2 3 Default front camberlink and wishbone position...

Страница 16: ...Page 16 STEP 28 STEP 29 M4X10 M4X10 M4X10 21 mm 29 1 29 2 4mm 1 2 Bag 7 STEERING ASSEMBLY...

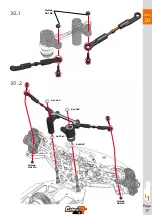
Страница 17: ...Page 17 STEP 30 Nylock Nut M3 Nylock Nut M3 Nylock Nut M3 6x10x3 6x10x3 6x10x3 6x10x3 30 1 30 2...

Страница 18: ...Page 18 STEP 31 STEP 32 Nylock Nut M3 Nylock Nut M3 Nylock Nut M3 M3X8 M3X12 M3X12 M3X12 1 1 3 2...

Страница 19: ...Page 19 STEP 33 STEP 34 33 1 33 2 M3x10 M4x6 M3x10 M3x10 5x8x0 3 5x8x0 1 5x10x4 5x10x4 M5X12 Flanged NOT INCLUDED CLUTCH BAG CLUTCH ASSEMBLY...

Страница 20: ...has 23 24 or 25 and use the right inserts Note orientation of the servolever Use enough servo spacerstogetclearance at the bottom of the servo M3x16 Flanged M3x16 Flanged M3x12 Flanged M3x16 Flanged...

Страница 21: ...Page 21 STEP 37 STEP 38 M2x10 5x8x2 5 5x8x2 5 M3x20 1...

Страница 22: ...Page 22 STEP 39 STEP 40 NOT INCLUDED NOT INCLUDED M3x8 M3x8 M3x8 M3x3 M3x3 M3x3 1 2 3...

Страница 23: ...Page 23 STEP 41 STEP 42 M4x12 M4x12 M4x12 M4x12 M3x3...

Страница 24: ...t M3 Apply silicone oil to assemble the o rings SHOCKS ASSEMBLY 44 3 Apply silicone oil to assemble the shockshaft 1 2 44 4 1 2 Insert the o ring inside the spring nut Assemble the spring nut Check ho...

Страница 25: ...re fully extended Fill up with sillicone oil Wait for air bubbles to escape Check default SET UP sheet for CST value of silicone oil Close top step by step only 3 4 Push membrane into the shock top 1...

Страница 26: ...Page 26 M3x20 M3x8 M3x8 M3x10 M3x10 Nylock nut M4 Flanged M3x20 M3x16 M3x16 STEP 45 STEP 46 Bag 9 Default front shocks position Front brackets long...

Страница 27: ...Page 27 STEP 47 STEP 48 M3x20 M3x20 Nylock nut M4 Flanged M3x16 M3x16 M3x8 M3x8 M3x10 M3x10 Default rear shocks position Rear brackets short...

Страница 28: ...Page 28 STEP 49 STEP 50 M3x12 M3x12 M4x10 M4x4 M3x12 Flanged M3x12 Flanged 49 1 49 2 1 1 2 1 4 3 2 2 NOT INCLUDED NOT INCLUDED FINAL ASSEMBLY...

Страница 29: ...Page 29 STEP 51 STEP 52 2x14 2x14 2x14 M3x10 M2x10 M2x10 M2x10 M3x22 M3x12 M3x12 Nylock Nut M3 Nylock Nut M3 Nylock Nut M3 2 2 2 2 3 3 3 1 1 1 1 3 Bag 10...

Страница 30: ...Page 30 STEP 54 STEP 53 2x14 M2x10 M2x10 2x14 2 2 2 3 3 1 1 WHEELS AND TYRES NOT INCLUDED...

Страница 31: ...1 Contents DIFFERENTIAL ASSEMBLY 32 GEARBOX ASSEMBLY 32 SHOCKS ASSEMBLY 33 CENTER ASSEMBLY 33 FRONT ASSEMBLY 34 REAR ASSEMBLY 35 STEERING ASSEMBLY 36 RADIO ASSEMBLY 37 FINAL I 38 FINAL II 39 REFERENCE...

Страница 32: ...0425 600421 600210 600627 600209 600627 600210 600147 600480 1394 GEARBOX ASSEMBLY 600501 Complete FR RR 44T diff 110122 110122 903633 56T 903636 61T 903634 57T 903637 62T 903635 58T 903638 63T 903630...

Страница 33: ...600145 600180 600592 600118 600118 600184 600113 600591 600111 600159 600158 600234 600235 600112 600118 CENTER ASSEMBLY SHOCKS ASSEMBLY 600595 Shockset fr rr 811GT 2 600597 Spring Fr Rr Red 811GT 18...

Страница 34: ...0263 110142 600132 1312 110146 110146 600583 600583 1312 600192 600193 110148 600641 110212 1396 600701 1337 600131 600185 600188 600131 110111 600474 600365 600174 600131 110138 600192 600130 110144...

Страница 35: ...6 110103 600183 600135 600326 600225 600108 600193 600174 600131 600704 1337 110115 600478 600102 600197 110111 110216 600236 600190 110148 600641 1396 110212 110137 110137 600481 600190 600481 600678...

Страница 36: ...402 600122 110402 110104 110127 110402 110402 CLUTCH ASSEMBLY CLUTCH GEARS 903640 Centax gear pinion alu 18T XLI 903641 Centax gear pinion alu 19T XLI 903642 Centax gear pinion alu 20T XLI 903643 Cent...

Страница 37: ...227 600359 600359 110116 600359 600359 600359 110124 600362 110116 600131 600333 600362 600120 1494 600361 600333 804181 600362 600127 600127 110124 600131 600178 110105 110105 110116 110105 110172 11...

Страница 38: ...109 600411 600166 600100 110118 600702 600702 600703 110104 110104 600263 600263 110140 110140 110140 110102 110127 110140 110187 110187 110187 600184 600118 600118 600118 600179 110405 110405 600179...

Страница 39: ...127 110129 600581 600581 600581 600614 600582 110141 110188 110188 110188 110188 110402 600581 600581 600581 600581 600581 600581 600581 110219 110219 110219 110219 110219 600581 110402 600263 600222...

Страница 40: ...Page 41 TEAM SERPENT NETWORK website and blog COBRA GT SPARE PARTS COBRA GT OPTIONAL PARTS SERPENT TOOLS SERPENT MERCHANDISING social media...

Страница 41: ...www serpent com info serpent com Cobra GT 3 0 manual v1...

Отзывы: