


12
©
All rights reserved. All trademarks are property of their respective owners.
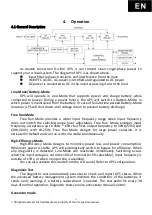
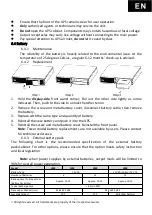
Cold Start function
When the main power is not connected to UPS, it is capable of starting with
battery power for users’ needs. Simply start the UPS as the instruction below.
Note: To avoid accidental battery discharge, cold start function is not available
until the initial connection to the main power.
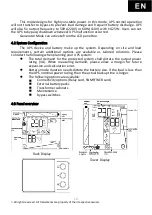
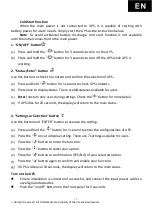
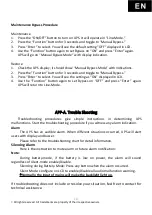
1. “ON/OFF” button
(a)
Press and hold the “
” button for 3 seconds to turn on the UPS.
(b)
Press and hold the “
” button for 3 seconds to turn off the UPS while UPS is
working.
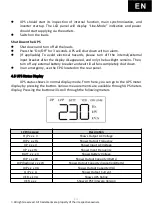
2. “Status/Enter” button
Use this button to check the content and confirm the selection of UPS.
(a)
Press and hold “ ” button for 1 second to check UPS contents.
(b)
Press once to display status. There are 10 statuses available for users.
(c)
Enter function only uses during settings. Check the” “ button for more detail.
(d)
If UPS idles for 20 seconds, the display will return to the main status.
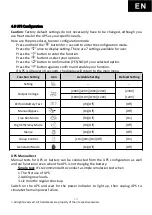
3. “Settings or Selection” button
Use this button and “ENTER” button to execute the setting.
(a)
Press and hold the “ ” button for 1 second to enter the configurations of UPS.
(b)
Press the “ ” once to display setting. There are 7 settings available for users.
(c)
Press the “ ” button to enter the function.
(d)
Press the “ ” button to select your option.
(e)
Press the “ ” button to confirmation (YES/NO) of your selected option.
(f)
Press the “ ” button again to confirm and enable your function.
(g)
If UPS is idle over 10 seconds, the display will return to the main status.
Turn on the UPS
Ensure installation is correct and successful, and connect the input power cable to
a well-grounded outlet.
Push the “on/off” bottom on the front panel for 3 seconds.
Содержание SNT-1000
Страница 4: ...Copyright POWERCOM CO Ltd 4 Powercom Co Ltd Sentinel 1 2...
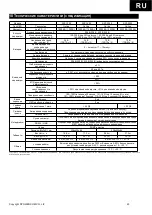
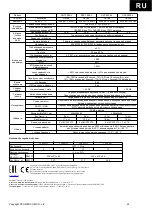
Страница 5: ...Copyright POWERCOM CO Ltd 5 40 C 3 5 25 ANSI NFPA 70 26 AWG I 0 15150 69...
Страница 6: ...Copyright POWERCOM CO Ltd 6...
Страница 7: ...Copyright POWERCOM CO Ltd 7 1 1000 3000 2 2 1 1...
Страница 8: ...Copyright POWERCOM CO Ltd 8 RS 232 USB 1 bypass 1 10 15 2 3 3 0 25 50 60 7 2 30 24...
Страница 10: ...Copyright POWERCOM CO Ltd 10 10 0 40 20 4 15 C 25 C 6 8 8 15 30 6 30 45 3 5 5 1 4 25 6 12 15 C 25 C 100 50...
Страница 11: ...Copyright POWERCOM CO Ltd 11 5 2 2 1 2 2 2 2 1 2 1 2...
Страница 12: ...Copyright POWERCOM CO Ltd 12 5 3 8 3 6 3 Plug Play 5 4 4...
Страница 15: ...Copyright POWERCOM CO Ltd 15 7 2 1 3 5 2 20 3 2 10 6 7 3...
Страница 16: ...Copyright POWERCOM CO Ltd 16 7 0 24 25 49 50 74 75 100 0 24 25 49 50 74 75 100...
Страница 18: ...Copyright POWERCOM CO Ltd 18 7 4 8...
Страница 19: ...Copyright POWERCOM CO Ltd 19 9...
Страница 22: ...Copyright POWERCOM CO Ltd 22 9 24 30 9 1 POWERCOM 10 kVA On line 4 kVA Powercom On line 4 kVA POWERCOM...
Страница 25: ...U P S On Line SNT 1000 SNT 1500 SNT 2000 SNT 3000 SNT 1000L SNT 1500L SNT 2000L SNT 3000L USER MANUAL...
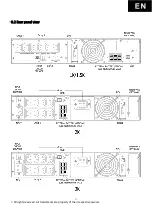
Страница 31: ...6 All rights reserved All trademarks are property of their respective owners 3 2 Rear panel view...


