- 7 -
09/2020
Copyright © 2020, Fast ČR, a.s.
EN
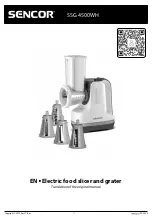
Electric food slicer and
grater
User's manual
BEFORE FIRST USE
■
Prior to using this appliance, please read the user's manual thoroughly, even in cases,
when one has already familiarised themselves with previous use of similar types of
appliances. Only use the appliance in the manner described in this user’s manual.
Keep this user's manual in a safe place where it can be easily retrieved for future use.
In the event that you hand this appliance over to somebody else, make sure to also
include this user's manual.
■
We recommend saving the original cardboard box, packaging material, purchase
receipt and responsibility statement of the vendor or warranty card for at least the
duration of the legal liability for unsatisfactory performance or quality. In the event
of transportation, we recommend that you pack the appliance in the original box
from the manufacturer.
■
Carefully unpack the appliance and take care not to throw away any part of the
packaging before you find all the parts of the appliance.
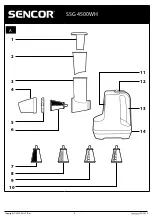
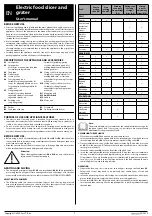
DESCRIPTION OF THE APPLIANCE AND ACCESSORIES
A1
Small pusher
A2
Large pusher
Also serves as an auxiliary feed tube
for smaller-size ingredients
A3
Feed tube
A4
Outlet spout
A5
Locking collar
A6
Coarse grating cone
Suitable for grating vegetables for
soups, for preparing hash-browns or
for grating fruits and vegetables for
salads, etc.
A7
Fine grating cone
Suitable for making fruit and
vegetable salads or cheese and
vegetable spreads, etc.
A8
Grinding cone
(very fine grating)
Suitable for grinding/grating
coconut, almonds, nuts and for
making breadcrumbs from hard
baked goods, etc.
A9
Slicing cone for long straight slices
Suitable for slicing potatoes for
making fried chips, or fruit and
vegetables for garnishing of various
meals, etc.
A10
Slicing cone for thick wavy slices
Suitable for slicing fruit and
vegetables for garnishing various
meals, etc.
A11
Mounting hole
A12 On/Off switch
A13
Handle
A14
Motor unit
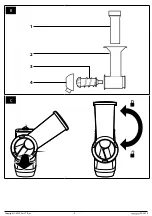
B1
Pusher
B2
Feed tube with tray
B3
Screw bolt
B4
Outlet spout with former
PURPOSE OF USE AND APPLIANCE FEATURES
■
The electric food slicer and grater is intended for processing standard types of
vegetables, fruit and other foods in the household. When using the ice cream set, it
is able to also process frozen fruit, vegetables or yoghurt.
■
Do not use the electric food slicer and grater for mincing meat, crushing bones,
for processing nut shells or hard fruit stones contained for example in mangoes or
avocados, frozen or other very hard ingredients such as coffee beans, nutmeg, etc.
BEFORE FIRST USE
■
Before using it, wash all removable parts (
A1
to
A10
, and
B1
to
B4
) that come into
contact with food in hot water using a small amount of kitchen detergent, then rinse
with clean water and wipe dry.
■
Wipe the outer surface of the motor unit using a soft sponge dipped in warm water
with a small amount of kitchen detergent and wipe it dry.
Attention:
When cleaning the attachments
A6
to
A10
, be very careful not to
injure yourself on their sharp edges.
GRATING AND SLICING
■
The slicing and grating set (parts
A1
-
A5
and attachments
A6
-
A10
) are intended for
processing almost all types of fruits and vegetables, and other types of foods, that
are normally used in households, see table in chapter SELECTING ATTACHMENTS.
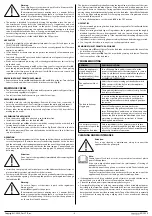
SELECTING ATTACHMENTS
■
The following table lists the most common types of food that can be processed
using this appliance. However, you can also use it for other types of food, for which
it generally applies that it can be cut using a kitchen knife.
Food
Coarse
grating
cone (A6)
Fine
grating
cone(A7)
Grinding
cone (very
fine grating)
(A8)
Slicing cone
for long
straight
slices (A9)
Slicing
cone for
thick wavy
slices(A10)
FRUIT
Apples
Peaches and
nectarines
(without
stones)
Apricots
(without
stones)
Pears
Strawberries
Coconut
VEGETABLES
Carrot
Zucchini
Cucumbers
Celery
Potatoes
Onion
Radish
Red and
white
cabbage
Rutabaga
Capsicum
OTHER FOODS
Hard cheese
Chocolate
Nuts (without
shells) and
almonds
Hard baked
goods
Note:
The provided table only recommends the suitable attachment type for
the given type of food. If necessary, it is possible to use your preferred
attachment for the given type of food.
ASSEMBLING THE APPLIANCE
■
Place the motor unit
A14
on an even dry and stable surface.
■
Select an attachment that is appropriate for the intended type of work and insert it
into the large feed tube
A3
. Secure it in place using the locking collar
A5
.
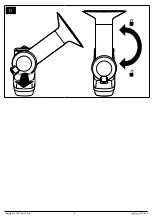
■
Once assembled in this way, tilt the feed tube clockwise (fig.
C
and slide it into the
hole
A11
in the motor unit) Then turn the feed tube anticlockwise so that it slides
into its place in the hole.
■
Insert the outlet spout
A4
on to the front side of the feed tube.
■
Insert the small pusher
A1
into the large pusher
A2
. A pusher that is assembled in
this way is suitable for larger-sized ingredients (e.g. potatoes) or for larger amounts
of ingredients. If you are intending to process smaller-sized ingredients (cucumber,
carrot, etc.), it is possible to insert the large pusher into the feed tube and then use
the small pusher to push in the ingredients.
OPERATION
■
Prepare the food and cut it into pieces that will pass through the feed tube
A2
.
Kernels and stones may need to be removed from certain types of fruit and
vegetables.
■
Insert the power plug into an electrical power socket. Underneath the outlet spout,
place a suitable container, which will catch the processed ingredients.
■
Set the switch
A12
to the ON position and start to gradually insert the ingredients
into the feed tube opening. Use the supplied pusher to push ingredients through
the feed tube.

