background image


MAINTENANCE 


Cleaning 


ALWAYS 

lock off power before cleaning, lubricating, maintaining, removal of 

any guard, and after shredding operation is complete. 


Daily cleaning: (After each 8 hours of operation) 


o


Remove top guard 


o


Remove paper buildup from cutters and combers (compressed air 

(maximum 40 PSI) or vacuum may be used) 


o


Visually inspect cutters for damage 

o


Replace all guards 

o


Remove side guard 

o


Remove paper buildup from crusher area and belt pulley area 

o


Replace all guards 

o


Empty tray (lower front of cabinet) 


Weekly cleaning: (After each 40 hours of operation) 


o


Repeat all daily cleaning steps 

o


Remove side guards and end guards 

o


Remove paper buildup from base 


o


Wipe entire machine clean being careful to observe any evidence of oil 

leaks. Should leakage be observed, request the attention of the 

appropriate maintenance personnel 


o


Check for loose hardware on the reducer collars, the crusher paddles, 

etc 


o


Remove all tools, rags, solvents from machine 

o


Replace all guards 


12 

Содержание 800-1000 Series

Страница 1: ...ual SEM Model 800 1000 MAN 025 Rev 1 Created 3 25 20 ECN 00517 For service parts and customer support contact us SECURITY ENGINEERED MACHINERY 5 Walkup Drive Westborough MA 01581 service semshred com 1 508 366 1488 www semshred com ...

Страница 2: ...ached Output Conveyor Optional 6 Electrical Installation 7 Safety Warnings 8 Start up Procedure 10 Paper Jams 11 Shut down Procedure 11 Cleaning Maintenance 12 Lubrication 13 Conveyor Belt Adjustment 14 Drive Belt Adjustment 16 Chain Sag 17 Torque Limiter 18 Trouble Shooting 26 2 ...

Страница 3: ...Illustration Index Fig Subject Page 1 Shredder Operation 19 2 Chain Lubrication 20 3 Reducer Lubrication 21 4 Conveyor Belt Take up 22 5 Chain Sag 23 6 Torque Limiter 24 7 Drive Belt Adjustment 25 3 ...

Страница 4: ...arts List Sub Assembly Page Input Conveyor 29 Crusher Assembly 30 Drive Package 31 Cutter Assembly 32 Automatic Cutter Lubrication Optional 33 Attached Output Conveyor Optional 34 Electrical Diagram 35 4 ...

Страница 5: ...ig 3 page 21 Add oil if necessary See lubrication section on page 13 o After inspection reinstall all guards including feed table and discharge hoop A bag must be installed in the hoop before starting to shred o If an optional discharge conveyor was ordered with your machine then you must install it before beginning to shred Be sure belt is tracking properly after installation see page 14 NOTE Thi...

Страница 6: ...r belt around drive pulley under cutter head and pull belt together A second person may be necessary to bring both ends together When both ends are put together take extra care to ensure that staples are centered with belt The edges of the belt should be aligned if NOT move belt ends over one staple and re check alignment When aligned properly put connecting pin supplied through staple lacing Clip...

Страница 7: ...ppropriate wire size and current protection to accommodate current requirements as shown on nameplate Plug in power cable Clear all personnel from machine area Ensure machine is clean and no tools rags or debris have been left on conveyor belt or near cutters or drive mechanism Turn building service drop power on Check voltage at installed receptacle Ensure area is clear Turn key switch on Jog rev...

Страница 8: ...uding those personnel working second or third shift 6 ALWAYS have a standard break in time for a new operator A minimum of two hours suggested 7 ALWAYS wear safety glasses when operating shredder 8 ALWAYS lock out power at disconnect when shredder is not in use when servicing shredder or when performing routine shredder maintenance including cleaning 9 NEVER operate this or any other machine while...

Страница 9: ...me to a complete stop 15 NEVER allow other personnel within ten feet of this machine while in operation 16 NEVER remove guards perform maintenance or clear jam up debris without first locking out power disconnect 17 NEVER allow horseplay around machine 18 NEVER remove paper from cutter heads while power is on 19 NEVER attempt to remove paper from input conveyor after paper has begun to move toward...

Страница 10: ...oaking the material to be shredded unnecessarily To stop machine at any time depress the red Stop pushbutton For emergency situations the Stop pushbutton may be depressed at any time For normal stop situations wait for input conveyor to empty itself and the output chute or optional output conveyor to discharge all shredded material before depressing Stop button Begin feeding material to be shredde...

Страница 11: ...ing material Re start machine in the forward direction to resume operation NOTE This machine has been engineered to allow paper to be fed with paper clips staples fasteners credit cards aluminum offset plates and similar materials without harm to the machine SHUT DOWN PROCEDURE Allow input conveyor and output chute or optional output conveyor to clear all material before shut down Depress red Stop...

Страница 12: ...uard o Remove paper buildup from crusher area and belt pulley area o Replace all guards o Empty tray lower front of cabinet Weekly cleaning After each 40 hours of operation o Repeat all daily cleaning steps o Remove side guards and end guards o Remove paper buildup from base o Wipe entire machine clean being careful to observe any evidence of oil leaks Should leakage be observed request the attent...

Страница 13: ...listed below o Remove top guards o Apply light machine oil to cutters o Replace all guards Weekly lubrication After each 40 hours of operation o Repeat steps from daily lubrication o Remove guards o Apply oil to drive chains see fig 2 page 20 Use chain and cable lubricant o Replace all guards o Fill auto cutter lube reservoir with SAE 20W Non Detergent oil For machines equipped with auto cutter lu...

Страница 14: ...efill to proper level using a high grade petroleum base rust and oxidation inhibited gear oil SAE 40W AMOCO Industrial Oil No 150 or equivalent CAUTION Too much oil will cause over heating and too little oil will result in gear failure Check oil level monthly Also under extreme operating conditions such as rapid rise or fall of temperatures dust dirt chemical particles chemical fumes or oil temper...

Страница 15: ...nsion o Ensure all personnel are clear and that no tools are on machine or input conveyor o Turn power on o Run machine in Forward o Stop machine and turn power off o Adjust alignment by tightening take up bolt on side of conveyor where belt is rubbing side frame Tighten only one quarter turn at a time o Tighten jam nuts o Replace all guards o Turn power on o Run machine forward for five minutes I...

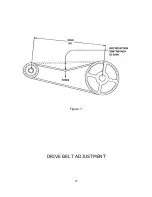
Страница 16: ...pection on a periodic basis Tension only when slipping Never apply belt dressing as this will damage the belt and cause early failure o Adjust tensioning by measuring the distance between sheaves center to center At the midpoint between centers apply a force perpendicular to the span large enough to deflect the belt 1 64 for each inch of span length For example the deflection of a 100 inch span wo...

Страница 17: ...enters and are not equipped with either take ups or adjusting features Chain sag is permissible within the limits shown on fig 6 page 24 Chain sag distances may be measured by placing a straight edge across the two sprockets being checked o Lock power off o Remove access guard o Check chain sag according to figure 5 page 23 o Loosen two bolts on idler sprocket and slide toward the chain only enoug...

Страница 18: ...uildup and other conditions such as bearing failures and proper belt alignment Should adjustment be required the following procedure is recommended o Tighten hex nut to a finger tight position see fig 6 page 24 o An additional half turn will closely approximate the factory setting o An additional 1 2 3 turns will result in the maximum torquesetting o Should sprocket replacement be necessary sprock...

Страница 19: ...Figure 1 SHREDDER OPERATION 19 ...

Страница 20: ...Figure 2 CHAIN LUBRICATION 20 ...

Страница 21: ...Figure 3 REDUCER LUBRICATION PN TA5215H40 21 ...

Страница 22: ...Figure 4 CONVEYOR BELT TAKE UP 22 ...

Страница 23: ...Figure 5 CHAIN SAG 23 ...

Страница 24: ...20 Teeth 2 1 103469 Sprocket Crusher Shaft 24 Teeth 3 2 103515 Fiber Disc 4 1 103517 Spring Washer 5 1 GL 303642 Adjusting Nut 6 1 103514 Bushing 7 1 101307 Set Screw 8 1 GL 325112 Steel Hub 9 1 GL 100812 Lock Washer 10 2 GL 303445 Pressure Plate 11 103508 Complete Torque Limiter Less Sprocket 24 ...

Страница 25: ...Figure 7 DRIVE BELT ADJUSTMENT 25 ...

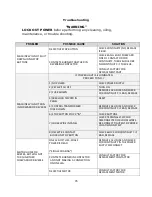
Страница 26: ...WN REMOVE EACH FUSE AND CHECK FOR CONTINUITY IF BAD REPLACE 4 OVERLOAD TRIPPED IN PANEL RESET 5 CONTROL TRANSFORMER FUSE BLOWN REMOVE EACH FUSE AND CHECK FOR CONTINUITY IF BAD REPLACE 6 STOP BUTTON STUCK IN CHECK BUTTONS 7 LOOSE WIRE IN PANEL CHECK TERMINAL STRIP FOR DISCONNECTED OR LOOSE WIRES RE CONNECT TIGHTEN TO PROPER LOCATION ON STRIP 8 DEFECTIVE CONTACT BLOCK ON STOP BUTTON CHECK BLOCK FOR ...

Страница 27: ... IN FORWARD BUT WILL RUN IN REVERSE DEFECTIVE FORWARD BUTTON CHECK CONTACT BLOCK FOR CONTINUITY IF BAD REPLACE DISCONNECTED WIRE ON FORWARD BUTTON CHECK AND RE CONNECT DISCONNECTED WIRE ON CURRENT RELAY CHECK AND RE CONNECT CURRENT REALLY STUCK OPEN CLEAN RELAY FREE CENTER SPOOL CHECK CONTINUITY IF BAD CONSULT FACTORY FOR REPLACEMENT RELAY MACHINE WILL NOT RUN IN REVERSE BUT WILL RUN IN FORWARD DE...

Страница 28: ...USTMENTS MOTOR RUNS BUT CUTTERS ARE NOT TURNING DRIVE BELTS LOOSE TIGHTEN DRIVE BELTS DRIVE BELTS COME OFF CHECK PULLEY ALIGNMENT BROKEN DRIVE BELTS INSTALL NEW BELTS AND RETIGHTEN CONSULT FACTORY FOR REPLACEMENT PARTS INPUT BELT NOT TURNING INPUT BELT LOOSE TIGHTEN INPUT BELT BROKEN INPUT DRIVE CHAIN CHECK INPUT CONVEYOR FOR ALIGNMENT BEARING FAILURE PAPER BUILD UP AND SPROCKET ALIGNMENT TORQUE L...

Страница 29: ...n 1 2 33527 Take up rod 2 2 10049 Take up angle 3 1 111882 Tail pulley 4 1 Tail pulley shaft 5 1 In feed belt 6 2 124170 Flange bearing 7 1 111883 Drive pulley 8 1 15885 57 In feed drive shaft 9 1 18641 53 In feed bed 10 1 15885 11 Side plate 29 ...

Страница 30: ... Req d Part No Description 1 1 15001 Crusher Shaft 2 15 101014 HHCS 1 4 20 x 1 L Grade 5 3 3 10039 Retainer 4 3 10038 Paddle 5 1 15003 Paddle Weldment 6 15 101225 Nut NYLOC HEX 1 4 20 7 2 102002 Bearing 8 2 15601 Spacer 30 ...

Страница 31: ...89 SHEAVE 6 3 OD 3 1 103152 BUSHING 1 5 8 4 1 110687 BELT 5 1 110690 SHEAVE 8 5 OD 6 1 110686 BUSHING SF 1 5 16 7 1 110685 OUTBOARD BEARING 8 1 110693 REDUCER 9 1 110692 REDUCER BUSHING 10 2 110016 SPUR GEAR 11 1 30428 BACK OIL COVER 12 1 109057 SIGHT GAUGE 13 1 30462 OIL PAN BOTTOM 14 1 30425 FRONT OIL COVER 31 ...

Страница 32: ...BER 5 1 32166 WEAR PLATE FIXED 6 1 32165 WEAR PLATE ADJUSTABLE 7 94 30558 SPACER 8 4 30559 OUTSIDE SPACER 9 49 30492 5 16 CUTTER 10 4 30490 TIE BARS 11 24 18641 52 TOP COMBER 12 23 18641 51 BOTTOM COMBER 13 1 15885 11 SIDE PLATE 14 1 33577 BEARING BLOCK WELDMENT 15 1 CUTTER KEY UPPER 16 1 CUTTER KEY LOWER 17 2 30556 SPUR GEAR KEY 32 ...

Страница 33: ...FEMALE ADAPTER 12 4 111109 HOSE CLAMP SIZE 5 8 O D 13 1 105047 1 2 CPVC TO 1 2 NPT MALE 14 1 105041 BULK HEAD FITTING 15 2 105040 BARBED FITTING 1 2 I D TUBING TO 1 2 16 2 105055 BARBED FITTING 1 2 I D X 1 2 NPT 90O 17 1 105038 LUBE PUMP 1 4 HP 48 FR 18 2 105026 1 2 CPVC PIPE PLUG 19 1 105025 1 2 CPVC TEE 20 1 111108 1 2 CPVC 45O STREET ELBOW 21 1 16706 SPRAYER PIPE 1 32 HOLES 22 3 FT 105039 HOSE ...

Страница 34: ...ONVEYOR BED UPPER 9 22924 53 ATTACHED OUTPUT CONVEYOR BED LOWER 10 20242 74 ATTACHED OUTPUT CONVEYOR BED UNDER CUTTERS 11 22924 50 ATTACHED OUTPUT CONVEYOR SIDE FRAME LOWER 12 22924 51 ATTACHED OUTPUT CONVEYOR SIDE FRAME UPPER 13 111883 ATTACHED OUTPUT CONVEYOR DRIVE PULLEY 14 20242 56 ATTACHED OUTPUT CONVEYOR PULLEY SHAFT 15 111235 16 ATTACHED OUTPUT CONVEYOR RETURN ROLLER 16 20242 75 ATTACHED OU...

Страница 35: ......

Отзывы: