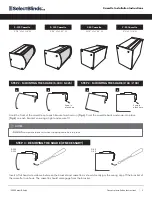
Open Roll Installation Instructions
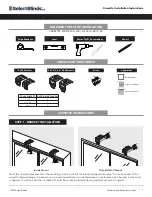
STEP 2 - BRACKET INSTALLATION
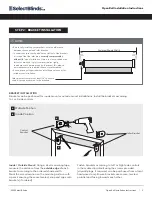
BRACKET INSTALLATION
Brackets can be positioned for inside mount or outside mount installations. Install the brackets according
to L or R side controls.
Inside / Outside Mount:
Using a steel measuring tape,
measure the distance from the
outside edge
of each
bracket according to the ordered shade width.
Mark the screw location on the mounting surface with
a pencil ensuring these are leveled, snap end caps onto
brackets (if ordered).
Fasten brackets according to Left or Right side controls
in the marked locations using the screws provided
(drywall plugs, if required, can be purchased from a local
hardware store). Ensure brackets are secure, leveled,
parallel and facing towards each other.
Control
Bracket
Idler Bracket
• Before fully installing your brackets, note the difference
between the control and idler brackets.
• In order to ensure the shade does not fall out of the brackets,
it is critical that the idler pin is
securely compressed by
at least 1/4”
upon installation. If pin is too loose, shade may
fall out of brackets. If pin is compressed too tightly,
shade may not operate properly. To prevent this, please
ensure brackets are installed the exact width ordered.
• End caps are not required when installing a valance or for
inside mount installation.
NOTES
Ordered Shade Width
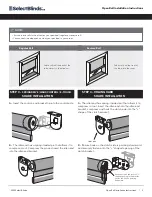
Idler pin must compress at least 1/4” to ensure
shade is properly secured in the brackets.
Inside Position
Outside Position
A
A
B
B
2
©2022 Select Blinds
Open Roll Installation Instructions |


