background image

Open Roll Installation Instructions

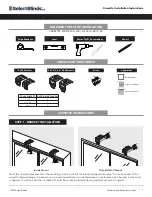
OPEN ROLL, MODELS Z-125 | Z-150

Tape Measure

Power Drill / Screwdriver

Pencil

Level

Screws

End Caps

Shade Brackets

Idler-end 

Bracket

Control-end 

Bracket

Roller Shade

Idler side

Control Side

Valance

If Ordered

If Ordered

*Note: Valance Returns are 

optional

Bracket

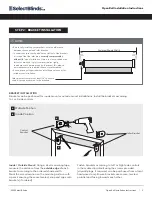
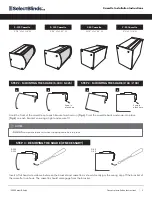
STEP 1 - VALANCE INSTALLATION

 (

If Ordered

)

B -

 For OUTSIDE mount, 

mark the location

 of the 

shade mounting brackets with a pencil (see step 2), 

and measure 1/2” from the top of the bracket to note 

the location of the Valance bracket. Valance brackets 

should be installed 5”-8” from each end of the valance. 

Additional bracket(s) may be necessary and should 

be evenly spaced between the two ends brackets if 

required.

A -

 For INSIDE mount, divide valance width into 

thirds and mark 2 screw holes on the underside 

of the valance. Drill through cover to secure the 

valance in place.

REQUIRED TOOLS FOR INSTALLATION

COMES WITH YOUR ORDER

ROLLER SHADE INSTRUCTIONS

NOTES

5”-8”

1/3

distance

1/3

distance

5”-8”

1/2”

x2

• 

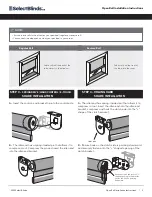
Valance must be installed as a first step before the Roller Shade. If you didn’t order a Valance proceed to Step 2.

Shade Brackets

Idler-end 

Bracket

Clutch-end 

Bracket

ChainGuard

SpringDrive | WandControl | E-Touch

1

©2022 Select Blinds

Open Roll Installation Instructions     |

Содержание OPEN ROLL Z-125

Страница 1: ...e brackets should be installed 5 8 from each end of the valance Additional bracket s may be necessary and should be evenly spaced between the two ends brackets if required A For INSIDE mount divide valance width into thirds and mark 2 screw holes on the underside of the valance Drill through cover to secure the valance in place REQUIRED TOOLS FOR INSTALLATION COMES WITH YOUR ORDER ROLLER SHADE INS...

Страница 2: ...dware store Ensure brackets are secure leveled parallel and facing towards each other Control Bracket Idler Bracket Before fully installing your brackets note the difference between the control and idler brackets In order to ensure the shade does not fall out of the brackets it is critical that the idler pin is securely compressed by at least 1 4 upon installation If pin is too loose shade may fal...

Страница 3: ...ure fabric rolls in the direction you specified regular or reverse roll Your control side depends on what you specified in your order A The idler end has spring loaded pin that allows it to compress in out Insert the idler end into the idler end bracket compress and hook the clutch side into the shape of the clutch bracket Idler side STEP 3 CHAINGUARD SHADE INSTALLATION B Ensure hook on the clutch...

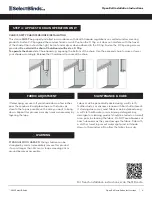
Страница 4: ... allow the fabric to air dry STRANGULATION HAZARD Young children can be strangled by cords Immediately remove this product if a cord longer than 22cm or a loop exceeding 44cm around becomes accessible WARNING For french installation instructions scan the QR code This device MUST be properly installed in accordance with Health Canada regulations on corded window covering products Fasten P Clip agai...

Страница 5: ...ll plugs if required can be purchased from a local hardware store Ensure each bracket is level and in alignment with one another Brackets should be securely placed allowing slight movement to adjust REQUIRED TOOLS FOR INSTALLATION COMES WITH YOUR ORDER CASSETTE INSTRUCTIONS Inside Mount Outside Wall Mount CASSETTE MODELS S 300 S 325 V 80 V 90 Sheer Horizontal Roller Shades High Lite Shades Shade W...

Страница 6: ...it Insert a flat head screwdriver between the bracket and cassette as shown Gently pry the spring clip off the bracket of the cassette to unhook The cassette should disengage from the bracket Snap in place here Snap in place here A A B B 2 7 8 H x 3 1 8 W 3 1 8 H x 3 1 2 W 3 3 8 H x 3 1 8 W 5 H x 3 7 16 W S 325 Cassette S 300 Cassette V 80 Cassette V 90 Cassette S 300 S 325 V 80 V 90 DO NOT manipu...

Страница 7: ...e plastic clips under the bottom bar and operate the shade up down until it rolls straight then lock the weight bar back into place STRANGULATION HAZARD Young children can be strangled by cords Immediately remove this product if a cord longer than 22cm or a loop exceeding 44cm around becomes accessible MAINTENANCE CARE WARNING For french installation instructions scan the QR code This device MUST ...

Страница 8: ...e gradually and evenly do not quickly force the shade up or down o Shade MUST be operated from the centre of the bottom rail to avoid telescoping and damaging the fabric If applicable please ensure the bottom rail handle is positioned in the centre of the shade o For High Lite Shades pull the bottom rail straight down ensuring it is not tilted forward Rotating the bottom rail may cause the fabric ...

Страница 9: ...nts Hold UP button for 2 sec to automatically raise shade 2 Tap DOWN button to move the shade down in small increments Hold DOWN button for 2 sec to automatically lower shade 3 Press STOP to stop your shade while in motion 4 Set Middle Stop Position a Move the shade to desired middle stop position b Press and hold the PROGRAM UP buttons for 3 seconds until motor beeps 4x c To change middle stop po...

Страница 10: ...4 ...

Страница 11: ...5 ...

Страница 12: ...e in hand the home WiFi password It will be necessary to connect the Smart Controller to the Internet Note Some Android users won t be connected quickly to the hotspot If it is the case please wait about 10 seconds before returning to the app During this time your device may notify you that the hotspot does not have Internet access and will prompt you whether you want to remain connect ed You need...

Отзывы: