1
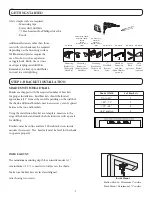
A few simple tools are required:
- Measuring tape
- Power drill, drill bits
-
1
⁄
4
” Hex head and/or Phillips driver bit
- Pencil
GETTING STARTED
IMPORTANT:
The remote control has
not
been linked to the shades. Install
all shades prior to linking the remote. The lower and upper limits have been set
at the factory.
Additional fasteners other than those sent with your shade may be required
depending on the mounting surface. Wallboard and plaster require the use of
anchors such as expansion or toggle bolts. Brick, tile or stone need special plugs
and drill bits. Remember to always pre-drill holes in wood to avoid splitting.
1
1
⁄
4
”
Hex Head
Bracket
Screw
Head rail
Extension
and Sidemount
Bracket
(optional)
Spacer
Block
(optional)
Mounting
Bracket
Hold
Down
Bracket
(optional)
PN: CS5402
PN: 20201012
PN: CS1000
PN: CS2000
Mounting
Brackets for
Shades without
head rail
PN: CS1101
PN: CS5002(W or BLK)
CS5008 (W or BLK)
CS5529
CS5530
Depends on size of
shade
Charger
PN: CS5199
Содержание CORD LOOP
Страница 1: ...CORDLESS Installation Care Instructions 152740 1 9 2018 Roller Shades ...
Страница 16: ...MOTORIZED SHADE With rechargeable motor Installation Care Instructions 152709I 5 1 2019 Roller Shades ...
Страница 26: ...1 2 3 4 5 Channel Display Stop Favorite Down Channel Channel FRONT C L Confirm Limit BACK Up 5 Channel Remote ...


