2
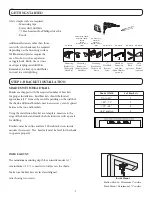
EXTENSION BRACKETS (OPTIONAL)
Optional extension brackets are used to project the back of the
shade up to 2
1
⁄
2
”
from the mounting surface.
Attach the mounting bracket to the extension bracket with the
nut and bolt provided.
SIDE MOUNT (OPTIONAL)
Measure from window sill up to desired mounting position on
each side of the window frame. Mark position.
Mount side mount brackets on each side of window frame as
shown. Make sure to confirm the head rail will sit perfectly
level.
Once side mount brackets are installed and properly
positioned, attach the mounting brackets using the nuts and
bolts provided.
Side Mount
Minimum 2” surface height
Minimum 1
1
⁄
8
” surface depth
Outside Mount with Extension Brackets
Minimum 2” surface
SPACER BLOCKS (OPTIONAL)
Each spacer block projects brackets
3
⁄
8
”
away from mounting
surface.
Make sure the brackets are level and aligned.
Attach each bracket using two screws. Screws should be long
enough to secure the bracket to the mounting surface.
Outside Mount with Spacer Blocks
2”
2
1
⁄
2
”
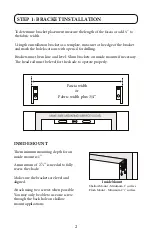
OUTSIDE MOUNT
The minimum mounting height for outside mounted shades is
1
”
.
Make sure the brackets are level and aligned.
Attach each bracket using two screws.
Outside Mount
Minimum 1” surface
1
”
2”
1
1
⁄
8
”
Содержание CORD LOOP
Страница 1: ...CORDLESS Installation Care Instructions 152740 1 9 2018 Roller Shades ...
Страница 16: ...MOTORIZED SHADE With rechargeable motor Installation Care Instructions 152709I 5 1 2019 Roller Shades ...
Страница 26: ...1 2 3 4 5 Channel Display Stop Favorite Down Channel Channel FRONT C L Confirm Limit BACK Up 5 Channel Remote ...


