background image

77

04/2020

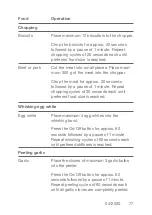
Food

Operation

Chopping
Biscuits

Place maximum 12 biscuits into the chopper.
Chop the biscuits for approx. 20 seconds 

followed by a pause of 1 minute. Repeat 

chopping cycles of 20 seconds each until 

preferred food size is reached.

Beef or pork

Cut the meat into small pieces. Place maxi-

mum 350 g of the meat into the chopper.
Chop the meat for approx. 30 seconds 

followed by a pause of 1 minute. Repeat 

chopping cycles of 30 seconds each until 

preferred food size is reached.

Whisking egg white
Egg white 

Place maximum 4 egg whites into the 

 whisking  bowl.
Press the On/Off button for approx. 60 

seconds followed by a pause of 1 minute. 

Repeat whisking cycles of 60 seconds each 

until preferred stiffness is reached.

Peeling garlic
Garlic

Place the cloves of maximum 3 garlic bulbs 

into the peeler.
Press the On/Off button for approx. 60 

seconds followed by a pause of 1 minute. 

 Repeat peeling cycles of 60 seconds each 

until all garlic cloves are completely peeled.

Содержание MC 371

Страница 1: ...1 KABELLOSER MULTIFUNKTIONSZERKLEINERER MIT INTEGRIERTEM AUFLADBAREM AKKU Für einen bestimmungsgemäßen und sicheren Gebrauch des Gerätes lesen Sie bitte diese Anleitung aufmerksam durch MIT INTEGRIERTEM AUFLADBAREM AKKU 04 2020 ...

Страница 2: ...t zum ersten Mal benutzen Verwahren Sie diese Bedienungsanleitung zur zukünftigen Verwendung an einem sicheren Ort Falls Sie das Gerät weitergeben müssen Sie diese Bedienungsanleitung ebenfalls mit übergeben Diese Bedienungsanleitung ist auch in einem elektronischen Format zum Herunterladen verfügbar www jaxmotech de downloads Oder kontaktieren Sie uns Gerne senden wir Ihnen die Bedienungsanleitun...

Страница 3: ...NIGUNG UND PFLEGE 37 7 STÖRUNG UND BEHEBUNG 39 8 TECHNISCHE DATEN 43 9 ENTSORGUNG 44 10 HERSTELLERGARANTIE 46 EN EG DECLARATION OF CONFORMITY 49 1 SAFETY INSTRUCTIONS 50 2 CONTENT 65 3 EQUIPMENT 66 4 PREPARING THE DEVICE 67 5 OPERATION 70 6 CLEANING AND MAINTENANCE 78 7 TROUBLE SHOOTING 80 8 TECHNICAL DATA 84 9 DISPOSAL 85 10 MANUFACTURER WARRANTY 87 ...

Страница 4: ...gen vorzunehmen die keinen Einfluss auf die Funktionsweise des Gerätes haben Das von Ihnen gekaufte Gerät wurde möglicherweise inzwi schenverbessert und weist somit vielleicht Unterschiede zur Bedienungsanleitung auf Dennoch sind die Funktionen und Betriebsbedingungen identisch so dass Sie die Bedienungs anleitung im vollen Umfang nutzen können Technische Änderungen bzw Druckfehler bleiben vorbeha...

Страница 5: ...er Gesundheit und zu Schäden an Ihrem Gerät führen Bestimmungsgemäßer Gebrauch Der kabellose Multifunktionszerkleinerer Modell MC 371 der Marke SEG ist ausschließlich zum Zerkleinern von Spei sen in haushaltsüblichen Mengen zum Quirlen von Eiweiß sowie zum Knoblauch schälen bestimmt Das Gerät dient als Zerkleinerer Eiweißquirl Knoblauchschäler Das Gerät ist ausschließlich zur privaten Nutzung und ...

Страница 6: ...stückspensionen Das Gerät ist ausschließlich zum Betrieb innerhalb geschlossener Räume be stimmt Dieses Gerät darf nicht beim Camping und in öffentlichen Verkehrsmit teln betrieben werden Betreiben Sie das Gerät ausschließlich im Sinne seiner bestimmungsmäßigen Verwendung Bei bestimmungswidrigem Gebrauch kann die Sicherheit und Funktionalität des Gerä tes nicht mehr gewährleistet werden und es erl...

Страница 7: ... auf eine Gefahrensituation die wenn sie nicht abgewendet wird eine mögliche bevorstehende Gefährdung für Leben und Gesundheit zur Folge hat VORSICHT verweist auf eine Gefahrensituation die wenn sie nicht abgewendet wird zu mittelschweren oder kleinen Verletzungen führen kann HINWEIS verweist auf eine Gefahrensituation die wenn sie nicht abgewendet wird eine mögliche Beschädigung des Gerätes zur F...

Страница 8: ...e Überprüfung bereits vorhandener wie auch neuer Anschlüsse erfolgen Sämtliche Ar beiten die zum Anschluss des Gerätes an die Stromversorgung notwendig sind dür fen nur von einer qualifizierten Fachkraft Elektrotechniker in durchgeführt werden WARNUNG STROMSCHLAGGEFAHR Fehlerhafte Elektroinstallation oder zu hohe Netzspannung können zu elektri schem Stromschlag führen WARNUNG Erlauben Sie niemande...

Страница 9: ...e daraus resultierenden Gefahren verstehen Kinder dürfen nicht mit dem Gerät spielen Reinigung und Wartung durch den Benut zer dürfen nicht durch Kinder vorgenom men werden es sei denn sie sind 8 Jahre oder älter und werden beaufsichtigt Das Gerät und seine Anschlussleistungen sind von Kindern jünger als 8 Jahre fernzu halten Das Gerät ist kein Kinderspielzeug GEFAHR Laden Sie das Gerät nur mit de...

Страница 10: ...t nicht wenn die Kunststoffbauteile Risse oder Sprün ge haben oder sich verformt haben Ziehen Sie im Gefahrenfall oder bei einem Defekt unverzüglich den Netz stecker aus der Steckdose Dieses Gerät enthält einen Akku der nur von einem qualifizierten Fachmann ausgetauscht werden kann Öffnen Sie das Gerät nicht um den Akku zu erset zen wenn sie ihn nicht mehr aufladen können oder er schnell entlädt K...

Страница 11: ...chutz gegen Gefahrenquellen unerlässlich sind Ersetzen Sie beschädigte Bauteile nur durch passende Originalersatzteile Öffnen Sie niemals das Gehäuse Wenn das Netzanschlusskabel beschä digt ist darf es ausschließlich nur vom Hersteller oder durch einem vom Her steller autorisierten Kundendienst oder einer qualifizierten Fachkraft Elektro techniker in ausgetauscht werden um Gefährdungen zu vermeide...

Страница 12: ... so fort Kontakt zu Ihrem Kundendienst auf Achten Sie beim Entpacken unbedingt darauf dass die Bestandteile der Verpa ckung Polyäthylen Tüten Polystyren Stücke nicht in die Reichweite von Kin dern gelangen ERSTICKUNGSGEFAHR Schließen Sie das Gerät zum Aufladen nicht an die Stromversorgung an bevor Sie alle Verpackungsbestandteile und Transportsicherungen vollständig ent fernt haben Laden Sie das G...

Страница 13: ... ent sprechend ordnungsgemäß geerdete und ausschließlich dem Gerät zugewiese ne Schutzkontaktsteckdose Die Steck dose muss mit einer 10 A Sicherung oder höher abgesichert sein Anderenfalls kann es zu gefährlichen Unfällen oder einer Beschädigung des Gerätes kommen Der Netzstecker und die Schutzkontakt dose müssen nach der Installation des Gerätes jederzeit gut zugänglich sein Achten Sie darauf das...

Страница 14: ...hen Versorgung müssen den auf dem Typen schild angegebenen Werten entsprechen Ihr Hausstromkreis muss mit einem Sicherungsautomaten zur Notabschal tung des Gerätes ausgestattet sein Nehmen Sie keine Veränderungen an dem Gerät vor STROMSCHLAGGEFAHR Um das Gerät komplett vom Stromnetz zu trennen muss das Netzanschlusska bel aus der Steckdose gezogen werden Ziehen Sie niemals am Netzanschluss kabel w...

Страница 15: ...chä digen Wir empfehlen Ihnen das Gerät während Gewittern nicht aufzuladen bzw vom Stromnetz zu trennen Vor allen Wartungs und Reinigungs arbeiten sowie vor dem Austausch von Zubehörteilen trennen Sie das Gerät von der Stromversorgung Tauchen Sie das Gerät niemals in Was ser oder andere Flüssigkeiten reinigen Sie es nicht unter fließendem Wasser STROMSCHLAGGEFAHR Fassen Sie den Netzstecker niemals...

Страница 16: ... Waschbecken fallen kann Sollte das Gerät ins Wasser fallen greifen Sie niemals nach dem Produkt Ziehen Sie sofort den Netzstecker Sollten Sie das Gerät über einen länge ren Zeitraum nicht nutzen empfehlen wir Ihnen den Adapter vom Stromnetz zu trennen sobald das Gerät vollständig geladen ist Achten Sie darauf dass das Gerät und das Netzanschlusskabel nicht mit Hitze quellen z B Kochplatten Gasfla...

Страница 17: ...er Nässe Extremtemperaturen direkte Sonneneinstrahlung offenes Feuer VORSICHT Merken Sie sich die Positionen aller Teile des Gerätes wenn Sie es auspacken für den Fall es noch einmal einpacken und transportieren zu müssen Benutzen Sie das Gerät nicht bevor alle dazugehörenden Teile sich ordnungsge mäß an ihren dafür vorgesehenen Stel len befinden Lassen Sie das Netzanschlusskabel nicht herunterhän...

Страница 18: ...ung vorzubeugen siehe Kapitel 6 REINIGUNG UND PFLEGE Die Verwendung falscher Reinigungs mittel birgt Gesundheitsrisiken Verwen den Sie ausschließlich die in dieser Bedienungsanleitung beschriebenen Reinigungsmittel und utensilien zur Reinigung Ihres Geräts HINWEIS BRANDGEFAHR Stellen Sie das Gerät auf eine trockene ebene rutschfeste hitzebeständige Oberfläche die nicht mit dem unteren Gummiring re...

Страница 19: ...che oder in der Nähe von starken Hitzequellen auf Der kabellose Multifunktionszerkleinerer ist nicht dazu bestimmt mit einer exter nen Zeitschaltuhr oder einem separaten Fernwirksystem betrieben zu werden Lassen Sie das Gerät während des Betriebes nicht unbeaufsichtigt Bei Rauchentwicklung das Gerät sofort ausschalten und vom Stromkreis trennen WARNUNG VERLETZUNGSGEFAHR Vermeiden Sie Berührungen m...

Страница 20: ...e hen entnehmen Sie den verwendeten Einsatz aus dem Gefäß Die Schutzabdeckung über der Glas schüssel kann erst geöffnet werden nachdem der Klingeneinsatz den voll ständigen Ruhezustand erreicht hat Das Gerät kann während des Ladevor ganges nicht betrieben werden Das Zerkleinern von Speisen ist aus schließlich mit dem mitgelieferten Zube hör erlaubt Vor dem Auswechseln von Zubehör oder Zusatzteilen...

Страница 21: ...e das Gerät nie ohne Zube hör Schalten Sie das Gerät nur an wenn das gewünschte Zubehörteil im Gefäß eingesetzt wurde WARNUNG BESCHÄDIGUNGSGEFAHR Betreiben Sie das Gerät niemals ohne Lebensmittel Überfüllen Sie die Glasschüssel nicht Versuchen Sie niemals den Verriege lungsmechanismus der Schutzabde ckung zu manipulieren Geben sie das Produkt keinesfalls in die Spülmaschine Sie würden es dadurch z...

Страница 22: ...Kabelloser Multifunktionszerkleinerer inklusive Motorteil Schutzabdeckung Glasschüssel Unterteil Netzteil zum Aufladen Zubehör Klingeneinsatz mit 4 Edelstahl Klingen zum Zerkleinern Quirleinsatz für Eiweiß Knoblauchschäler Deckel für Glasschüssel zur Aufbewahrung von Lebensmitteln 2 Bedienungsanleitung mit Garantie ...

Страница 23: ...n Aus Taste 2 Geschwindigkeitsstufen 2 Motorteil 3 Schutzabdeckung 4 Klingeneinsatz zum Zerkleinern 5 Knoblauchschäler 6 Quirleinsatz für Eiweiß 7 Glasschüssel 8 Unterteil 9 Deckel für Glasschüssel zur Aufbewahrung von Lebensmitteln 7 3 4 5 6 2 9 8 1 ...

Страница 24: ...ätes ob das Netzanschlusskabel oder das Gerät selbst keine Beschä digungen aufweisen 4 Prüfen Sie den Lieferumfang auf Vollständigkeit siehe Kapitel 2 LIEFERUMFANG 5 Stellen Sie sicher dass das Gerät vom Stromnetz getrennt ist 4 2 Wahl des Standortes Stellen die das Gerät an einer geeigneten Stelle auf Zum Aufladen in der Nähe einer Schutzkontaktsteckdose mit Mindestabsicherung von 10 A waagerecht...

Страница 25: ...s Zubehörs greifen 2 Reinigen Sie den kabellosen Multifunktionszerkleinerer sowie das Zubehör mit warmem Wasser und handelsüb lichen Spülmittel 3 Wischen Sie anschließend alles mit einem weichen an gefeuchteten Tuch aus 4 Die Glasschüssel 7 kann zur Reinigung in die Spülma schine gestellt werden 5 Schutzabdeckung 3 Knoblauchschäler 5 Quirleinsatz 6 und Deckel für die Glasschüssel zur Aufbewahrung ...

Страница 26: ...Hilfe des mitgelieferten Netzteiles vollständig aufgeladen werden 2 Schließen Sie das Gerät mit dem Netzstecker an die Stromversorgung an 3 Das Gerät beginnt den Ladevorgang 4 Während des Ladevorganges leuchtet die LED Anzeige abwechselnd von unten nach oben 5 Der Ladevorgang dauert ca 2 5 Stunden HINWEIS Das Gerät kann während des Lade vorganges nicht betrieben werden 6 Sobald das Gerät vollständ...

Страница 27: ... die Schutzabdeckung 3 mit der Glasschüssel 7 verbinden und das Motorteil 2 akkurat an die Schutzabdeckung der Glasschüssel 7 anbringen HINWEIS Entriegelung des Schutzschalters Das Gerät ist mit einem Schutzschalter ausgestattet Um den kabellosen Multi funktionszerkleinerer bedienen zu kön nen drücken Sie den Ein Aus Taste 1 für 1 Sekunde Der kabellose Multifunktionszerkleinerer ist nun einsatzber...

Страница 28: ...abellose Multifunktionszerkleinerer ist nun einsatzbereit HINWEIS Achten Sie vor der Montage und vor der Bedienung darauf dass der Akku geladen ist und der Netzstecker von der Stromversorgung getrennt ist 5 1 Zerkleinern Mit dem Klingeneinsatz 4 können Sie Rohkost Salat Obst Gemüse Fleisch Nüsse Kekse Brot und vieles mehr zer kleinern 1 Vor dem Zerkleinern halbieren bzw vierteln oder schnei den Si...

Страница 29: ...asschüssel 7 5 Setzen Sie das Motorteil 2 auf die entsprechende Position der Schutzabdeckung 3 indem Sie die Aussparungen am Motorteil 2 den Erhebungen in der Schutzabdeckung 3 anpassen Verbinden Sie nun das Motorteil 2 mit der Schutzabdeckung 3 gemäß der Verriegelungsmarkierun gen bis es einrastet Montage siehe Abbildung 1 6 Drücken Sie die Ein Aus Taste 1 um die Lebensmittel zu zerkleinern Es st...

Страница 30: ...ED Lampe 7 Während das Gerät im Einsatz ist wird der Akkuladestand durch das LED Licht angezeigt 8 Bei reduzierter Leistungsfähigkeit leuchtet das LED Licht auf um die schwache Akkuleistung anzuzeigen Bitte laden Sie den Akku wieder auf 9 Wenn die Lebensmittel die gewünschte Größe erreicht haben beenden Sie den Betrieb Stellen Sie zunächst sicher dass sich der Klingeneinsatz 4 nicht mehr dreht und...

Страница 31: ...uf die Glasschüssel 7 4 Setzen Sie das Motorteil 2 auf die entsprechende Positi on der Schutzabdeckung 3 indem Sie die Aussparungen am Motorteil 2 den Erhebungen in der Schutzabdeckung 3 anpassen Verbinden Sie nun das Motorteil 2 mit der Schutzabdeckung 3 gemäß der Verriegelungsmarkierun gen bis es einrastet Montage siehe Abbildung 2 5 Drücken Sie die Ein Aus Taste 1 für ca 60 Sekunden um das Eiwe...

Страница 32: ...er Spachtel zu verwenden Abbildung 2 Montage Demontage Quirleinsatz für Eiweiß 6 5 3 Knoblauch schälen 1 Stellen Sie die Glasschüssel 7 ohne Schutzabdeckung 3 auf eine ebene und hitzebeständige Fläche und setzen Sie den Knoblauchschäler 5 auf den Stift für den Einsatz am Boden der Glasschüssel 2 Geben Sie einzelne Knoblauchzehen mit Schale in die Glasschüssel 7 3 Setzen Sie die Schutzabdeckung 3 a...

Страница 33: ...startet 6 Wenn der Knoblauch vollständig geschält ist beenden Sie den Betrieb Stellen Sie zunächst sicher dass sich der Knoblauchschäler 5 nicht mehr dreht und sich im Ruhe zustand befindet 7 Anschließend können Sie das Motorteil 2 von der Schutzabdeckung 3 entfernen Danach entfernen Sie die Schutzabdeckung 3 und entnehmen den Knoblauchschäler 5 aus der Glasschüssel 7 Demontage siehe Abbildung 3 8...

Страница 34: ...hließend in den Zerkleinerer Zerkleinern Sie das Brot für etwa 20 Sekun den und machen Sie danach eine Pause von 1 Minute Sollte der gewünschte Lebens mittelzustand noch nicht erreicht sein bitte weitere Zyklen von jeweils 20 Sekunden durchführen Früchte Gemüse Zwiebeln Knoblauch Roh gekocht oder aus der Konserve Schneiden Sie die Früchte bzw das Ge müse vorab in kleine Stücke und geben maximal 12...

Страница 35: ...reicht sein bitte weitere Zyklen von jeweils 20 Sekunden durchführen Nüsse Geben Sie maximal 120 g Nüsse in den Zerkleinerer Zerkleinern Sie die Nüsse etwa 30 Sekun den und machen Sie danach eine Pause von 1 Minute Sollte der gewünschte Lebens mittelzustand noch nicht erreicht sein bitte weitere Zyklen von jeweils 30 Sekunden durchführen Kekse Geben Sie maximal 12 Kekse in den Zer kleinerer Zerkle...

Страница 36: ...ß quirlen Eiweiß Geben Sie maximal Eiweiß von 4 Eiern in den Quirl Drücken Sie die Ein Aus Taste für 60 Sekun den und machen Sie danach eine Pause von 1 Minute Sollte das Eiweiß die gewünschte Festigkeit nicht erreicht haben bitte weitere Zyklen von jeweils 60 Sekunden durchführen Knoblauch schälen Knoblauch Geben Sie maximal die Zehen von 3 Knob lauchknollen in den Knoblauchschäler Drücken Sie di...

Страница 37: ...führt Reinigen Sie den kabellosen Multifunktionszerkleinerer daher regelmäßig und entfernen Sie sämtliche Speisenreste Keine aggressiven abrasiven Reiniger oder scharfen Metall schaber für die Reinigung des Gerätes benutzen da sie die Oberflächen zerkratzen und zerstören können Außenflächen Die Außenflächen mit einem feuchten Tuch und mildem Spül mittel reinigen Zubehör Die Glasschüssel 7 ist spülm...

Страница 38: ...den Klingeneinsatz vorsichtig mit einer Bürste in klarem Wasser um Schnittwunden vorzubeugen Das Motorteil 2 darf nicht in Wasser eingetaucht werden HINWEIS Sollten einzelne Bestandteile zu sehr mit Lebensmitteln verdreckt sein empfehlen wir diese vorher einzuweichen Lebensmittel mit intensiver Eigenfarbe wie Karotten oder Rote Beete können die Kunststoffteile dauerhaft verfärben Reini gen Sie das...

Страница 39: ...ll oder bei einem Defekt unverzüglich den Netz stecker aus der Steckdose Versuchen Sie niemals selbst das Gerät zu reparieren Falls Ihr Gerät nicht ordnungsgemäß funktioniert kontaktie ren Sie den Händler bei dem Sie das Gerät erworben haben Wenn das Netzanschlusskabel beschä digt ist darf es ausschließlich nur vom Hersteller oder einem vom Hersteller autorisierten Kundendienst oder einer qualifiz...

Страница 40: ...Garantieanspruch erlischt Problem Mögliche Ursache Maßnahme Akku lädt nicht Netzstecker ist nicht richtig an die Strom versorgung ange schlossen Stecken Sie den Netz stecker in eine Schutz kontaktdose Die Sicherung ist durchgebrannt oder die Stromunter brechung ist aktiv Sicherung ersetzen oder Stromunterbrechung zurücksetzen Steckdose ist defekt Überprüfen Sie die Steckdose indem Sie ein anderes ...

Страница 41: ... bis es einrastet Gerät wurde länger als 30 Sekunden in einem Zyklus be trieben Lassen Sie das Gerät mind 1 Min vollständig abkühlen bevor Sie den nächsten Zyklus starten Zubehör dreht sich schwer oder langsam Akku ist schwach Laden Sie den Akku Siehe Kapitel 4 4 LADEN DES GERÄTES Hindernis in der Glasschüssel Entfernen Sie das Hindernis Einsatz sitzt nicht richtig Setzen Sie den Einsatz akkurat a...

Страница 42: ...ß ist nicht steif Glasschüssel ist überfüllt Reduzieren Sie die Füll menge Siehe Kapitel 5 4 LEITFADEN Quirlprozess zu kurz Wiederholen Sie den Zyklus so lange bis das Eiweiß steif ist Siehe Kapitel 5 4 LEITFA DEN Knoblauch zehen sind nicht komplett geschält Glasschüssel ist überfüllt Verkleinern Sie die Füll menge Siehe Kapitel 5 4 LEITFADEN Schälprozess zu kurz Wiederholen Sie den Zyklus so lang...

Страница 43: ...han Baolijin Electronic Co Ltd Modell Nr BLJ15L130100P V Input 100 240V 50 60Hz 0 5A Output DC 13V 1000mA Hauptgerät DC 12V 200W Akku Kapazität Lithium Ion Akku mit 2000 mAh Leistung 200 Watt Fassungsvermögen Glasschüssel 1 Liter Produktabmessungen 150 x 150 x 229 mm L x B x H Nettogewicht 1800 g Technische Änderungen vorbehalten ...

Страница 44: ... Nahrungskette und schädigen Ihre Gesundheit und Ihr Wohlbefinden Bevor Sie ein beliebiges Altgerät entsorgen machen Sie dieses vorher unbedingt funktionsuntüchtig Das bedeutet immer den Netzstecker ziehen und danach das Anschluss kabel am Gerät abschneiden und direkt mit dem Netzstecker entfernen und entsorgen Die im Gerät verwendeten Materialien sind recyclebar und mit entsprechenden Information...

Страница 45: ...ushaltsabfall behandelt werden sondern müssen an einer entsprechend eingerichteten Annahmestelle für das Recycling solcher Geräte abgegeben werden Die kommunalen Entsorgungsbe triebe haben hierzu Sammelstellen eingerichtet an denen private Haushalte ihre Altgeräte kostenfrei abgeben können Bitte informieren Sie sich bei Ihrer Gemeinde bzw den kommunalen Entsorgungsbetrieben über die regionalen Mög...

Страница 46: ...unsachgemäße Verwendung oder Wartung ent standen sind Von der Garantie ausgenommen sind leicht zerbrechliche Teile wie z B Glas Kunststoff oder Leuchtmittel Die Garantie erlischt wenn das Gerät von Ihnen oder einem nicht von uns autorisierten Dritten geöffnet und oder Ver änderungen an dem Gerät vorgenommen worden sind Bei bestimmungswidrigem Gebrauch kann die Sicherheit und Funktionalität des Ger...

Страница 47: ... Gerät erworben haben in Verbindung zu setzen Sollte eine Reparatur erforderlich sein erreichen Sie unsere Hotline unter folgender Servicenummer 49 0 6831 505 9897 Technischer Service Sertronics GmbH Ostring 60 D 66740 Saarlouis Tel 49 0 6831 505 9897 Montags Freitags von 08 00 20 00 Uhr Fax 49 0 6831 4880 820 E Mail service ww jaxmotech de ...

Страница 48: ...ed device Please read the entire instruction manual in particular the safety instructions before using the device for the first time Keep this manual in a safe place for future reference If you pass on the device you must also hand over this instruction manual This manual can be obtained in an electronic format Please download at www jaxmotech com downloads Or contact us to obtain the manual in PD...

Страница 49: ...e right to make such changes that do not affect the operation of the device The device you purchased may have been me anwhile improved and may therefore differ from the manual Nevertheless the functions and operating conditions are identical for you to use the manual entirely All technical changes or modifications as well as printing errors are expressively reserved The GS symbol stands for tested...

Страница 50: ...your health and damage to your device Intended Use The wireless multifunctional chopper model MC 371 by SEG is exclusively intended to chop food in common house hold quantities to whisk egg white and to peel garlic The device serves as a chop per egg white whisk and garlic peeler The device is for private use only and not intended for commercial use e g in large kitchens This device is intended fo...

Страница 51: ...her accommodations Bed and Breakfast The device is intended for indoor use only This device may not be used at camping or in public transport Operate the device only in the sense of its intended use In the event of improper use the safety and functionality of the device can no longer be guaranteed and any warranty claim expires ...

Страница 52: ...a possible threat to life and health ATTENTION refers to a dangerous situation which can result if not averted into medium or small injuries NOTE refers to a dangerous situation which can result if not averted into a possible damage of the device In any case check the technical environ ment of the device Are all cables or wires connected with your device in order Or are they outdated and cannot wi...

Страница 53: ...aulty electrical installation or excessive mains voltage may lead to electric shock WARNING Do not allow anyone who is unfamiliar with the instruction manual to use the device This device may be used by children of 8 years and older as well as by persons with reduced physical sensory or mental abilities or lack of experience and knowledge if they are supervised or instructed in the safe use of the...

Страница 54: ...ER Charge the device only with the adapter delivered with the product During the charging process the device will become warm This is a normal process Never connect the device to the power supply to charge the device if the power cord or the adapter are visibly damaged If the device has visible damage on the housing or on covers remove the adap ter from the mains socket Do not operate the product ...

Страница 55: ...re or discharges fast Contact the dealer where you have purchased the device Never try to repair the device yourself If your device does not work properly contact the dealer where you purchased the device In case of repair ensure that only parts will be used which comply with the original device data The device houses electric and mechanical parts which are an essential protection against all kind...

Страница 56: ...r by another adapter as this may cause danger for the user Never operate a defective device Never operate a device that has fallen down DANGER If a system part is damaged avoid open flames and sources of ignition Contact your customer service immediately When unpacking the device make sure that the components of the packaging polyethylene bags polystyrene pieces should not be within the reach of c...

Страница 57: ... multiple sockets or extension cords to connect the device to the power supply You need a power socket that is proper ly grounded and exclusively assigned to the device The socket must be fused with a 10 A fuse or higher Failure to do so may result in dangerous accidents or equipment damage The mains plug and the earthed socket must always be easily accessible after the device has been installed M...

Страница 58: ...uit must be equipped with a circuit breaker for emergency shutdown of the device Do not undertake any changes to the device RISK OF ELECTRIC SHOCK To disconnect the device completely from the power supply the power cord must be unplugged from the socket Never pull the power cord if you want to pull the plug out of the socket always grasp the plug Never use the power cord as a carrying handle Even ...

Страница 59: ...re cleaning the device the product should be disconnected from the power supply Never immerse the appliance into water or other liquids Do not clean it under running water RISK OF ELECTRIC SHOCK Never touch the mains plug with wet hands Do not charge and operate the device outdoors Do not place the device in a place where it comes into contact with water rain RISK OF ELECTRIC SHOCK Should any liqu...

Страница 60: ...d that you disconnect the device from the power supply once it is fully charged Make sure that the device and the power cord do not come into contact with heat sources e g hot plates gas flames Do not operate the device in proximity to explosive and or flammable fumes Do not operate the device in proximity to flammable material Do not expose the device to extreme conditions such as High humidity o...

Страница 61: ...wer cord hang down TRIPPING HAZARD WARNING Lack of hygiene may result in germs in the device Clean the wireless multifunctional chop per and the provided accessories regu larly and remove food residues to pre vent germ formation and damage of the surface see chapter 6 CLEANING AND MAINTENANCE The use of improper detergents poses a health risk Use only the cleaning sup plies and utensils described ...

Страница 62: ...a protection mat Do not place the device onto the edge of a table to avoid falling down Ensure the device has a stable location Do not place the device onto a hot surface or near strong heat sources The wireless multifunctional chopper is not intended to be operated by an exter nal timer or by a separate remote control During operation do not leave the device unattended In case smoke is detected i...

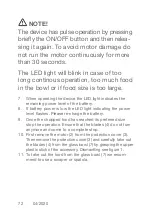
Страница 63: ...l accessories have come to a complete stop remove the used insert from the bowl The protection cover over the glass bowl can only be opened once the blades have come to a complete stop The device cannot be operated during the charging process Food chopping is only allowed with the provided accessories The device must be turned off before exchanging accessories or additional parts which move in ope...

Страница 64: ...t accessories Turn on the device only if the required accessory has been inser ted into the bowl WARNING DANGER OF DAMAGE Never operate the device without food Do not overfill the glass bowl Never modify the locking mechanism of the protection cover Never place the device into the dish washer This would destroy the item ...

Страница 65: ...rts as follows 1 Wireless multifunctional chopper with Motor Protection cover Glass bowl Bottom part Charging adapter Accessories 4 stainless steel blades for chopping Egg white whisk Garlic peeler Lid for glass bowl to store food 2 Instruction Manual with warranty ...

Страница 66: ... Device Components 1 On Off button 2 speed levels 2 Motor 3 Protection cover 4 Stainless steel blades for chopping 5 Garlic peeler 6 Egg white whisk 7 Glass bowl 8 Bottom part 9 Lid for glass bowl to store food 7 3 4 5 6 2 9 8 1 ...

Страница 67: ...eck if content comprises all equipment parts see chap ter 2 CONTENT 5 Make sure that the device is disconnected from the power supply 4 2 Selection of suitable location Set up the device in a suitable place for charging purpose place near a safety socket with 10 A minimum protection horizontal and vibration free heat resistant surface does not react with the rubber ring of bottom part with a minim...

Страница 68: ... bowl to store food 9 must be cleaned manually to avoid that the surfaces become blunt 6 Also the blades 4 must be cleaned manually to avoid that the blades become blunt WARNING RISK OF INJURY Clean the blades carefully with a brush in clear water to avoid cuts 7 Never immerse the motor 2 into water or other liquids 8 Dry thoroughly the wireless multifunctional chopper and its provided accessories...

Страница 69: ... the LED light indicating the power level flashes Please re charge the battery 4 5 Assembly 1 Assemble the device by connecting the protection cover 3 with the glass bowl 7 and attaching the motor 2 accurately to the protection cover of the glass bowl 3 NOTE Unlatch the safety switch The device is equipped with a safety switch To operate the wireless multifunc tional chopper press the On Off butto...

Страница 70: ...mbling and operating the device ensure that the integrated battery is fully charged and that the device is disconnected from the power supply 5 1 Chopping Raw and cooked vegetables salad fruit meat nuts biscuits bread and more can be chopped with the blades 4 1 Before chopping large pieces of food cut it into half or quarter pieces or into slices 2 Place the glass bowl 7 without protection cover 3...

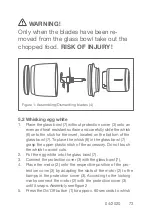
Страница 71: ... bowl 7 5 Place the motor 2 onto the respective position of the protection cover 3 by adapting the slots of the motor 2 to the bumps in the protection cover 3 According to the locking marks connect the motor 2 with the protection cover 3 until it snaps Assembly see figure 1 6 Press the On Off button 1 to chop the food Please select desired speed level Be advised that the device starts with a short...

Страница 72: ... level of the battery 8 If battery power is low the LED light indicating the power level flashes Please re charge the battery 9 Once the chopped food has reached its preferred size stop the operation Ensure that the blades 4 do not turn anymore and come to a complete stop 10 First remove the motor 2 from the protection cover 3 Then remove the protection cover 3 and carefully take out the blades 4 ...

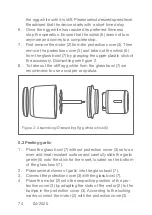
Страница 73: ...the glass bowl 7 To place the whisk 6 in the glass bowl 7 grasp the upper plastic stick of the accessory Do not touch the whisk to avoid cuts 2 Put the egg white into the glass bowl 7 3 Connect the protection cover 3 with the glass bowl 7 4 Place the motor 2 onto the respective position of the pro tection cover 3 by adapting the slots of the motor 2 to the bumps in the protection cover 3 According...

Страница 74: ... take out the stiff egg white from the glass bowl 7 we recommend to use a scraper or spatula Figure 2 Assembling Dismantling Egg white whisk 6 5 3 Peeling garlic 1 Place the glass bowl 7 without protection cover 3 onto an even and heat resistant surface and carefully slide the garlic peeler 5 onto the stick for the insert located on the bottom of the glass bowl 7 2 Place several cloves of garlic i...

Страница 75: ...t remove the motor 2 from the protection cover 3 Then remove the protection cover 3 and take out the garlic pee ler 5 from the glass bowl 7 Dismantling see figure 3 8 To take out the peeled garlic cloves from the glass bowl 7 we recommend to use a scraper or spatula Figure 3 Assembling Dismantling Garlic peeler 5 5 4 Guideline The table below gives you an overview how to chop food whisk egg white ...

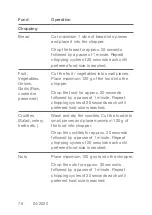
Страница 76: ...ood for approx 20 seconds followed by a pause of 1 minute Repeat chopping cycles of 20 seconds each until preferred food size is reached Crudités Salad celery herbs etc Wash and dry the crudités Cut the food into small pieces and place maximum 120 g of the food into chopper Chop the crudités for approx 20 seconds followed by a pause of 1 minute Repeat chopping cycles of 20 seconds each until prefe...

Страница 77: ... a pause of 1 minute Repeat chopping cycles of 30 seconds each until preferred food size is reached Whisking egg white Egg white Place maximum 4 egg whites into the whisking bowl Press the On Off button for approx 60 seconds followed by a pause of 1 minute Repeat whisking cycles of 60 seconds each until preferred stiffness is reached Peeling garlic Garlic Place the cloves of maximum 3 garlic bulbs...

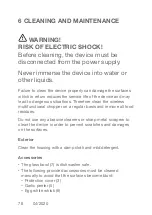
Страница 78: ...o dangerous situations Therefore clean the wireless multifunctional chopper on a regular basis and remove all food residues Do not use any abrasive cleaners or sharp metal scrapers to clean the device in order to prevent scratches and damages on the surfaces Exterior Clean the housing with a damp cloth and mild detergent Accessories The glass bowl 7 is dishwasher safe The following provided access...

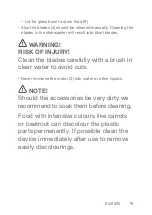
Страница 79: ...lean the blades carefully with a brush in clear water to avoid cuts Never immerse the motor 2 into water or other liquids NOTE Should the accessories be very dirty we recommend to soak them before cleaning Food with intensive colours like carrots or beetroot can discolour the plastic parts permanently If possible clean the device immediately after use to remove easily discolourings ...

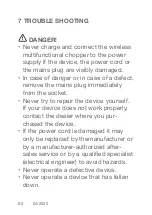
Страница 80: ...he mains plug immediately from the socket Never try to repair the device yourself If your device does not work properly contact the dealer where you pur chased the device If the power cord is damaged it may only be replaced by themanufacturer or by a manufacturer authorized after sales service or by a qualified specialist electrical engineer to avoid hazards Never operate a defective device Never ...

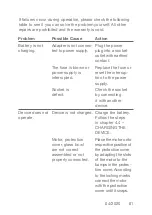
Страница 81: ...Device is not charged Charge the batte ry Follow the steps in chapter 4 4 CHARGING THE DEVICE Motor protection cover glass bowl are not correct assembled or not properly connected Place the motor onto respective position of the protection cover by adapting the slots of the motor to the bumps in the protec tion cover According to the locking marks connect the motor with the protection cover until i...

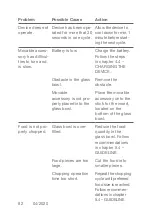
Страница 82: ...tacle in the glass bowl Remove the obstacle Movable accessory is not pro perly placed into the glass bowl Place the movable accessory onto the stick for the insert located on the bottom of the glass bowl Food is not pro perly chopped Glass bowl is over filled Reduce the food quantity in the glass bowl Follow recommendations in chapter 5 4 GUIDELINE Food pieces are too large Cut the food into small...

Страница 83: ...the whis king cycle until preferred stiffness is reached Follow recommendations in chapter 5 4 GUIDELINE Garlic cloves are not properly peeled Glass bowl is over filled Reduce the number of garlic cloves Follow recommen dations in chapter 5 4 GUIDELINE Peeling operation time too short Repeat the whis king cycle until until all garlic cloves are completely peeled Follow recommen dations in chapter ...

Страница 84: ...olijin Electronic Co Ltd Model No BLJ15L130100P V Input 100 240V 50 60Hz 0 5A Output DC 13V 1000mA Main unit DC 12V 200W Integrated Battery Lithium Ion battery with 2000 mAh capacity Power 200 Watt Volume Glass Bowl 1 litre Product dimensions 150 x 150 x 229 mm L x W x H Net weight 1800 g Technical modifications subject to change ...

Страница 85: ... food chain and endanger your health and well being Before you dispose any old device you must first disable it Before disposing unplug the power plug and cut off the power cable on the device The materials in the device being recyclable are provided with appropriate information You contribute significantly to the protection of our environment by properly disposing your old devices or its material...

Страница 86: ... be regarded as normal household garbage but must be returned to a designated collection center determined to recycle these devices Available disposal possibilities can be enquired with your local authorities Batteries are no household garbage EU law demands a mandatory separate disposal of any battery no matter if they contain harmful substances or not According to the legislation of the European...

Страница 87: ...opened by you or by a third party not authorized by us and or modifications have been made to the device In the event of improper use the safety and func tionality of the de vice can no longer be guaranteed and any warranty claim expires Any use other than that described in this manual is inad missible and leads to loss of warranty and disclaimer Printing errors and changes to the device the opera...

Страница 88: ...Jaxmotech GmbH Ostring 60 D 66740 Saarlouis Service Hotline 49 0 6831 505 9897 E mail service jaxmotech de www jaxmotech de 04 2020 ...

Отзывы: