background image

19

Technical Support

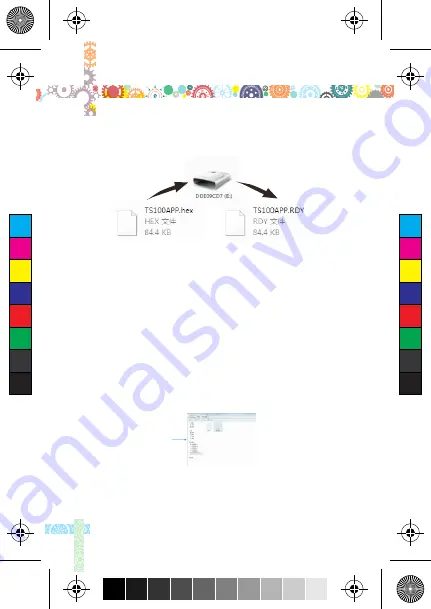
7.3 Firmware Update

 7.4 Boot Screen Customization

Pick the image (96*
16 pixel )you like and 
save it as BMP format 
in single color bitmap

Paste the file of the 
customized image into 
the Mini Soldering 
Iron USB drive, ch-
ange the file name 
to "LOGOIN"

Note: The Boot screen logo should be the customized logo you 
select once the LOGOIN.BMP is saved in the USB drive. The
boot screen will display default logo if the "LOGON.BMP" is 
not saved in the USB drive.

1. For firmware upgrade, please visit: 
    

seeed.cc/mini-soldering-iron

2. Hold Button A while connecting Mini Soldering Iron to your 
computer with a USB cable, screen will display "DFU1.0" after 
connecting successfully. The virtual drive will be shown in your 
computer( 8 digit serial number) once the device enters the 
DFU Mode.
3. Copy the .hex firmware to the root category, once the file 
extension .hex becomes to .rdy disconnect the USB and the 
firmware upgrade is completed.

C

M

Y

CM

MY

CY

CMY

K

tiny电烙铁 使用说明.pdf   22   2015/12/7   10:07:00

Содержание Mini Soldering iron

Страница 1: ...on Manual Version 1 1 For your own safety please read the manual before installing the device The current version of this instruction manual is APPV2 70 C M Y CM MY CY CMY K tiny电烙铁 使用说明 pdf 1 2015 12 7 10 06 56 ...

Страница 2: ...C M Y CM MY CY CMY K tiny电烙铁 使用说明 pdf 2 2015 12 7 10 06 56 ...

Страница 3: ...CAUTION Failure to comply with the CAUTION may cause damage to the product or other objects Please pay attention to the Annotations Operation notes and Additional information Overview P3 Power Adaptor Selection P5 Operation P6 P14 P16 Trouble Shooting Guide P18 P20 Soldering Iron Tip C M Y CM MY CY CMY K tiny电烙铁 使用说明 pdf 3 2015 12 7 10 06 56 ...

Страница 4: ...or explosive materials Keeping the surface of the equipment clean and dry 1 2 Working Condition Working Condition Temperature Humidity In operation state from 0 to 50 In idle state from 20 to 60 In operation state from 40 to 50 0 to 60 RH In operation state from 0 to 40 10 to 90 RH In idle state high temperature from 40 to 60 5 to 60 RH In idle state low temperature from 0 to 40 5 to 90 RH C M Y C...

Страница 5: ...nents The temperature of control knob will reach 50 60 after 40 minute continuous use over 350 A small chain of smoke may come out due to the high temperature when use for the first time Do not attempt to repair the Mini Soldering Iron or the warranty will be invalidated 1 5 Liability Statement The user ought to undertake the responsibilities if any special indirect consequential incidental or sec...

Страница 6: ...02 Button A 03 Button B 04 Set screw 05 Power port 06 Micro USB 07 DC5525 12 24V port 08 Solder iron tip connection port 09 solder iron connection side 10 Solder iron heating element 1 4 2 3 8 7 6 10 9 5 C M Y CM MY CY CMY K tiny电烙铁 使用说明 pdf 6 2015 12 7 10 06 57 ...

Страница 7: ...ating Part Length 96mm Diameter 16 5mm Length 33mm Diameter 5 5mm 2 3 Operation Specifications Power 65W Temperature range 100 400 max Temperature stability 2 Operation temperature under heat environment Soldering tip resistance value to the ground C M Y CM MY CY CMY K tiny电烙铁 使用说明 pdf 7 2015 12 7 10 06 57 ...

Страница 8: ...ering iron Please choose the certificated standard adapters only 12V 16V 19V 24V 17W 30W 40W 65W 40s 20s 15s 11s 1 4A 1 9A 2 1A 2 7A Operation voltage Power Electric current Time Time for tip temperature rise from 30 to 300 under standard operating voltage power and currents C M Y CM MY CY CMY K tiny电烙铁 使用说明 pdf 8 2015 12 7 10 06 57 ...

Страница 9: ...with the ground set screw 3 Connect the DC connector to Mini Soldering Iron plug the power cord and turn on the device accordingly Note Solder tip is connected inappropriate when sen err is displayed on the screen please reconnect under proper ins truction 3 200 100 400 Max 4 2 Default Settings Default Default Sl A C M Y CM MY CY CMY K tiny电烙铁 使用说明 pdf 9 2015 12 7 10 06 57 ...

Страница 10: ...displayed in sequence Ver2 01 Press DFU1 0 To enter DFU mode press Button A after DC12 24V power adapter is plugged into the control part The OLED screen will display DFU 1 0 when you operate properly To exit DFU mode unplug the power supply and turn the device on again without pressing any button to enter the standby mode C M Y CM MY CY CMY K tiny电烙铁 使用说明 pdf 10 2015 12 7 10 06 58 ...

Страница 11: ...ometer mode press two buttons simultaneously to enter the calibration mode Cal_X To exit thermometer mode long press any button Long press any button to exit thermometer mode Note Please operate Calibration Mode when the device is at room temperature Calibration failed Calibration success C M Y CM MY CY CMY K tiny电烙铁 使用说明 pdf 11 2015 12 7 10 06 58 ...

Страница 12: ...n will rise to the preset temperatures 9 Operation 4 3 Basic Control 4 3 3 Heating up Press 300 300 Ready for soldering In operation mode press two buttons simultaneously for 3 seconds will return to standby mode C M Y CM MY CY CMY K tiny电烙铁 使用说明 pdf 12 2015 12 7 10 06 58 ...

Страница 13: ...elease the button when the temperature reaches the expected value The temperature of Mini Sold ering Iron is now decreasing to the level you expect Increasing temperature Press Button B at least 2 seconds in Temperature Adjustment Mo de and release the button wh en the temperature reaches your expectation When the temperature increases to the level you expect then rel ease the button C M Y CM MY C...

Страница 14: ...eration 4 3 Basic Control 4 3 4 Temperature Adjustment 100 400 298 Soldering Iron will enter into the Automatic Compensation Mode when the custom temperature stabilizes for 60 seconds Tem perature will be compensated every 5 8 seconds The rightmost digital image represents the following meanings respectively Up arrows heating Down arrows cooling Wave lines Temperature stabilized C M Y CM MY CY CMY...

Страница 15: ...Sleep Mode Press 200 300 It will go back to operating temperature mode 300 in default when the user moves the device again In Sleep Mode the device will then enter the Standby Mode if it is not operated longer than the IDLE TIME setting Note IDLE_TIME 6 minutes in default can be customized and should not be shorter than 5 minutes minimum C M Y CM MY CY CMY K tiny电烙铁 使用说明 pdf 15 2015 12 7 10 06 59 ...

Страница 16: ...to 1 each step will progress in 1 2 5 25 When set to 2 25 each step will progress according to setting Temperature unit selection When operation voltage is lower than default voltage MINI SOLDERING IRON will return to standby mode Temperature calibration parameter MINI SOLDERING IRON automatic adjustment 200 180 seconds 360 seconds 10 10V 100 400 300 60 9999 seconds 300 9999 seconds 5 25 9 12V 0 i...

Страница 17: ...ed off before changing the tip 2 Remove the screw on operation side 3 Remove the tip and replace with another one 4 Fix the tip with the screw Note An sen err image on the screen indicates the tip is not properly installed C M Y CM MY CY CMY K tiny电烙铁 使用说明 pdf 17 2015 12 7 10 06 59 ...

Страница 18: ...th 4 Do not use rough material to clean the tip 5 If the tip is covered with oxide and difficult to joint the solder please apply 600 800 grit sandpaper and wipe the tip with Etha nol or Isopropyl alcohol Increase the tip temperature to 200 and joint solder immediately to avoid it oxidize 6 Do not use Flux which contains high chlorine or acid use the resin based flux only 5 3 Soldering Iron Tip Ma...

Страница 19: ... is plugged correctly A2 Check the voltage if it is lower than the system parameter s please reset it A1 This may happen occasionally when the tip is used for the first time A2 Check if the power cord is in loose or contact defectively A3 If the tip temperature is too high please lower the temperature to an appropriate value Set the temperature in appropriate level A4 If the tip is dirty please re...

Страница 20: ...ing it with a new tip A1 If the tip temperature rises higher than 400 please lower the temperature A2 The tip tins improperly A3 If there is not enough flux during operation please add some more flux A4 Don t wipe the tip with a high sulfur sponge or dry fabric A5 Don t use the tip to touch any organic materials such as plastic silicone oil or other chemicals A1 Check whether the voltage is lower ...

Страница 21: ...ips are consumable product once it is used the purchases can not be changed or returned 7 2 Default Parameter Setting The image CONFIG will be shown on the screen after connecting the Mini Soldering Iron to computer with a USB cable The CO NFIG means you are in Setting Mode you can set the default p arameters by opening config txt in the USB drive C M Y CM MY CY CMY K tiny电烙铁 使用说明 pdf 21 2015 12 7...

Страница 22: ...n will display default logo if the LOGON BMP is not saved in the USB drive 1 For firmware upgrade please visit seeed cc mini soldering iron 2 Hold Button A while connecting Mini Soldering Iron to your computer with a USB cable screen will display DFU1 0 after connecting successfully The virtual drive will be shown in your computer 8 digit serial number once the device enters the DFU Mode 3 Copy th...

Страница 23: ... FCC regulations Device must fulfill below 2 conditions 1 Device must not generate interference 2 Device must be able to resist any interferences on it including interferences that could cause dan gerous manipulation 8 3 Statement of Fulfilling CE Standard This is a trademark of European Union This product with CE logo on it fulfills related European Union laws and regulations C M Y CM MY CY CMY K...

Страница 24: ...C M Y CM MY CY CMY K tiny电烙铁 使用说明 pdf 24 2015 12 7 10 07 00 ...

Отзывы: