background image

39


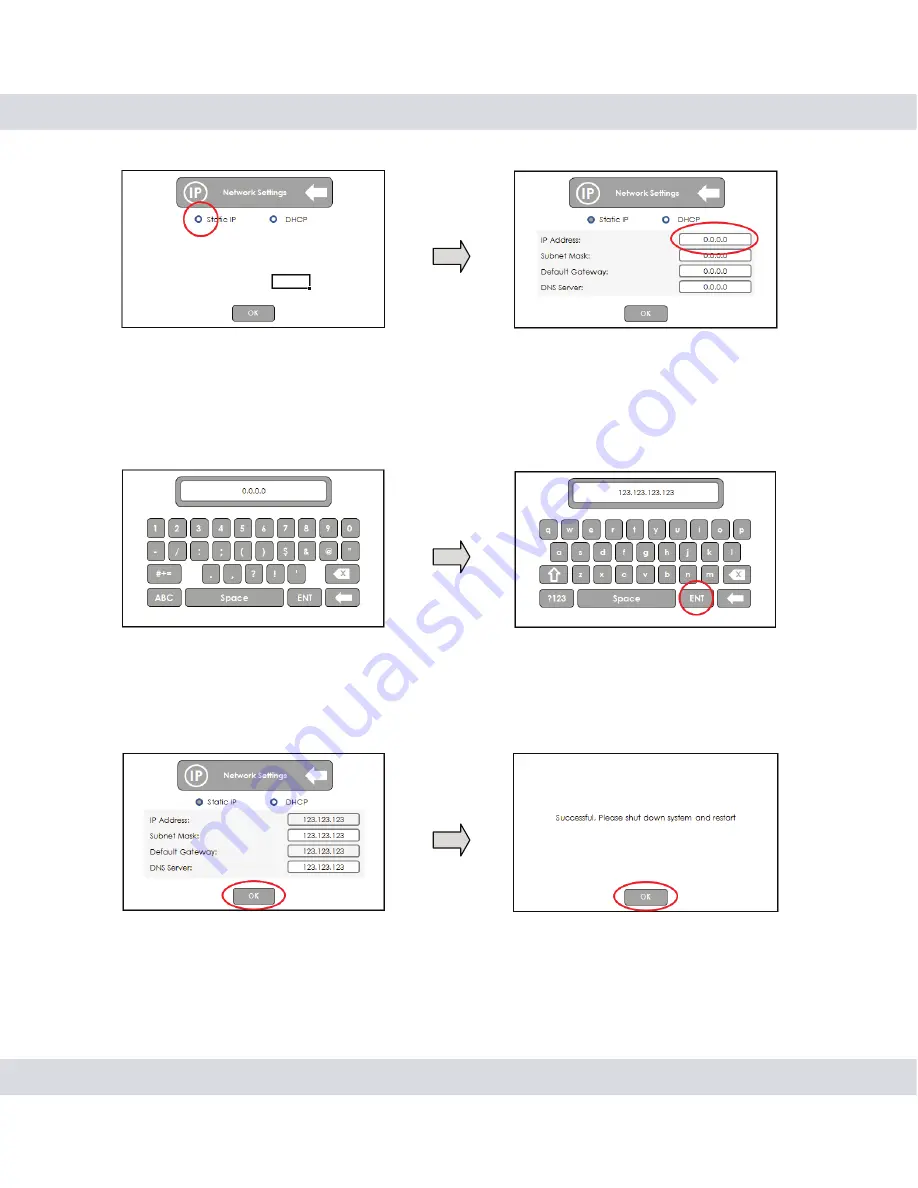
4. Using the onscreen key board enter the values for each of the 4 

categories (IP address, Subnet, Gateway & DNS server) and press the 

ENT key when you are done.  Pressing the back arrow will discard your 

entries. values.

5. When you are done entering the values for each category, press the 

OK button and restart your system when prompted.

• DHCP

Содержание DigiLCDNDVRB

Страница 1: ...DigiLCDNDVRB User s Manual INDOOR PAN TILT DIGITAL WIRELESS ISECURITY CAMERA SYSTEM ...

Страница 2: ...not cause any harmful interference 2 The equipment must receive and process any interference including any possible interference caused by operation mistakes After testing the product we confirm that the camera complies with the provision for class C digital equipment in the 15th part in FCC regulations and the receiver complies with the limitations for class B digital equipment in Part 15 of FCC ...

Страница 3: ... any warranty for merchantability or fitness for a particular purpose The exclusion of implied warranties is not permitted in some states and the exclusions specified herein may not apply to you This warranty provides you with specific legal rights There may be other rights that you have which vary from state to state Limitation of Liability The liability of SecurityMan Inc arising from this warra...

Страница 4: ...on Adding a Camera Recording Video Manual Recording Motion Detection Recording Photo Snapshots Enabling Photo Snapshots Manual Snapshot Motion Detection Snapshots Setting the Time Date Volume Control Pan Tilt and Zoom Pan Tilt SM 821DT only Zoom Playback Video Photo Snapshots DVR Menu Options Settings Camera Camera Pairing Brightness Control Motion Detection Network IP Setting Static IP 1 1 1 3 5 ...

Страница 5: ...System Date Time Recorder SD Card Format Formatting Your SD Card Overwrite Enabling Disabling Overwrite Power Saving Enabling Disabling Power Saving Screen Auto Lock Enabling Screen Auto Lock Upgrade Upgrading Your Firmware Reset Applying Factory Default Settings Language Volume Volume Adjustment Playback Playing Back Recorded Video Playing Back Photos Snapshots Loop PTZ Pan Tilt Zoom Pan Tilt SM ...

Страница 6: ... in the world The DigiLCDNDVRB utilizes the best digital wireless technology with a wireless transmission range of up to 490ft a Pant Tilt camera and a portable 7 touch screen LCD monitor which allows you take your iSecurity with you anywhere on your property Features Do it yourself D I Y easy to setup and use 2 4GHz digital wireless recording system Space saving 7 LCD Touch Screen monitor with an...

Страница 7: ... the same time in Quad mode at 15fps Single channel full screen auto sequential rotation or Quad view display Playback directly from the receiver or PC via SD card reader with any media player software Restrictions When using this product the safety precautions below must be taken to avoid possible legal liabilities and damages Retain and follow all product safety and operating instructions Observ...

Страница 8: ...carry out any illegal activities such as sneak preview and etc SecurityMan shall not be responsible for any consequences of illegal conducts made by users DO NOT put the plastic package bags in reach of children or babies Young children can choke on these items if they put them into their mouths DO NOT plug the AC adapter into the outlet in improper situations Plugging in an AC adapter with wet ha...

Страница 9: ...nstallation may also cause breakdown DO NOT touch shake or hold the antenna Touching shaking or holing the antenna might influence the receiving of electromagnetic wave and thereby influence the receiving effect DO NOT use the camera in complex environment the obstruction of stumbling block will affect the electromagnetic wave and influence the receiving range Wall tree and other stumbling block m...

Страница 10: ...ns exposure in direct sunlight Keep product away from heat sources such as electric heaters Do not use the camera near harmful chemicals Do not place product near any strong magnetic objects It might influence the normal operation of the product if used at the fringe range of normal temperature Please turn off the power when not in use Do not disassemble the product Do not shake or strike the prod...

Страница 11: ...6 Package Contents 1 x Mounting Bracket 1x SM 871DR 1x Ethernet Cable 2 x AC aDAPTERS Quick Start Guide 1x SM 821DT W Antennas Mounting Screws User s Manual ...

Страница 12: ...7 Product Basics CAMERA SM 821DT RECEIVER SM 871DR ...

Страница 13: ...uick Start Hardware Setup Installation RECEIVER SM 871DR NOTE The docking station must remain connected to your router in order for you to be able to remotely view you cameras using a Smartphone or tablet ...

Страница 14: ...9 CAMERA SM 821DT NOTE Please make sure that your cameras are paired to your receiver before mounting them ...

Страница 15: ... sitting on the docking station NOTE You will not be able to access your system remotely if the DVR is off the cradle 1 Open the Play Store on your mobile device Then search for and install the WatchBot application developed by Eric Xu Once installed tap on the WatchBot icon Fig 2 1 select to add a new device Fig 2 2 and then select the QR Scan option Fig 2 3 off the cradle ...

Страница 16: ...e app can capture your Device ID Create a System name Fig 2 5 and enter the Device Password that is associated with your system Fig 2 6 NOTE The default password is 123456 3 When you are done entering the Device Name and Password tap on Save Fig 2 7 Now select your device Fig 2 8 to bring up the live view screen Fig 2 9 ...

Страница 17: ...Open the App Store on your mobile device Then search for and install the WatchBot application developed by Long Xu Once installed tap on the WatchBot icon Fig 2 1 select to add a new device Fig 2 2 and then select the Scan option Fig 2 3 ...

Страница 18: ...at the QR Code located on the bottom of the dock station Fig 2 4 so that the app can capture your Device ID Create a System name Fig 2 5 and enter the Device Password that is associated with your system Fig 2 6 NOTE The default password is 123456 ...

Страница 19: ...ap on Save Fig 2 7 Now select your device Fig 2 8 to bring up the live view screen Fig 2 9 NOTE When accessing your system for the first time the app will prompt you for permission to use your phones microphone Please tap OK if you would like to hear audio from your camera when available ...

Страница 20: ...15 Basic Operations Turning the DVR On OFF To turn your DVR On Off press and hold the Power button Fig 2 7 Fig 2 8 Fig 2 9 ...

Страница 21: ...n then un lock the DVR by simply pressing and releasing the power button one more time NOTE Locking your DVR will hide all live view icons time motion rec etc Locking your system during recording will not affect the recording process When you first turn on your LCDDVR you will be prompted to calibrate the touch panel by tapping on the X located at the each corner of the screen ...

Страница 22: ...r and follow the steps below NOTE You can relocate the camera after you have successfully added it 1 Tap the Menu icon on the receiver and then tap on the Settings icon 2 Tap on the Camera icon and select which channel you want to add the new camera too NOTE You can add up to 4 cameras to the DVR Adding a camera to a channel that is currently occupied will replace the current camera Please select ...

Страница 23: ...o Manual Recording The LCDNDVR is equipped with two video recording methods Manual and Motion Detection Manual recording is activated by simply tapping on the Camera icon located at the top of each cameras live view screen and is deactivated automatically once the set time frame has expired NOTE Manual recording can only be activated for those channels that display the camera icon and the length o...

Страница 24: ...n can be activated deactivated by following the steps below NOTE Each motion detected recoding event is fixed at 2 minutes per event unless motion is continuously being detected 1 Tap the Menu icon on the receiver and then tap on the Settings icon 2 Tap on the Camera icon and select which camera you want to enable disable motion detection recording on NOTE You can switch between cameras by tapping...

Страница 25: ...ck to the previous screen or you can switch between cameras by tapping on the icons to begin configuring the next camera The LCDNDVR is equipped with two methods to take photo snapshots Manual and Motion Detection Before you can utilize the snapshot feature the DVR s recording method must be changed from Video to Photograph 1 Tap the Menu icon on the receiver and then tap on the Settings icon Phot...

Страница 26: ... live view screen and is deactivated automatically once the snapshot is taken 2 Tap on the System icon and select Recorder from the available options 3 On the Recorder Setup screen tap on Photograph and then tap on the back arrow located to the right of the Recorder Setup label to exit Manual Snapshot ...

Страница 27: ...Camera icon and select which camera you want to enable disable motion detection recording on NOTE You can switch between cameras by tapping on the icons 3 Now select Motion Detection from the available options and select the desired sensitivity level for the camera being configured NOTE When you are done you can press the back arrow located to the right of the Camera label to go back to the previo...

Страница 28: ...p on the Settings icon 2 Tap on the System icon and select Date Time from the available op tions 3 On the Date Time screen select the time format that you want to use Then tap on the value that you want to change and use the up down options to increase decrease its value Tap on the save option when you are done to save your changes ...

Страница 29: ...ps below NOTE Placing your cameras too close to the receiver will result in a loud undesirable screeching noise 1 Tap the Menu icon on the receiver and then tap on the Volume icon 2 Use and icons to adjust the volume as needed and tap any where on the screen when you are finished ...

Страница 30: ...e of the cam era by moving it Up Down Left Right at any given time 1 Tap on the cameras image that you want change the viewing angle on Tap the Menu icon on the receiver and then tap on the PTZ icon NOTE Pan Tilt features are only available on SM 821DT cameras 2 Use the Up Down Left Right options on the PTZ icon to move the camera in the desired rotation NOTE The SM 821DT is not an outdoor camera ...

Страница 31: ...TX and SM 821DT cameras 1 Tap on the cameras image that you want to zoom in on Tap the Menu icon on the receiver and then tap on the PTZ icon NOTE you can enlarge any your cameras quad mode image to single channel live view by simply taping on the cameras live view image ...

Страница 32: ...TE this only affects the live view image not the recorded events Playing back recorded events video photo can be done directly using the LCDDVR or on a computer by ejecting the SD card and inserting it into your computers media card reader The following will instruct you on how to playback recorded events using the LDCDVR 1 Tap the Menu icon on the receiver and then tap on the Playback icon NOTE T...

Страница 33: ...amera or you can view all events at once by tap ping on the camera icon that contains the letter A 3 Tap on any of the highlighted dates to view all recorded events for that day The event list screen will display each event in ascending order and also provides you with the option to delete any event by pressing the X The file naming convention for each event is as follows An event labeled A081356 ...

Страница 34: ...nd it will be playable us ing the DVR s playback feature and options Next event Back 1 sec Play Pause Delete Previous event Forward 5 sec Stop Back to event list Pictures Snapshots 1 Tap the Menu icon on the receiver and then tap on the Playback icon ...

Страница 35: ... each cameras event individually by tapping on a specific camera or you can view all events at once by tap ping on the camera icon that contains the letter A 3 Tap on any of the highlighted dates to view all recorded events for that day The event list screen will display each event in ascending order and also provides you with the option to delete any event by pressing the X The file naming conven...

Страница 36: ...s and features that will allow you to configure your security system based your preferences and requirements To access main menu options and features simply tap on the Menu icon at any time to display them DVR Menu Options 1 Settings DVR configuration 2 Volume Live view volume control 3 Playback Video Photo playback 4 Loop Live view auto rotation 5 PTZ Pan Tilt Zoom ...

Страница 37: ...ra settings are used to add a camera to your system adjust the brightness level and also enable disable motion detection for each camera independently The Camera pairing option is used to add cameras to your DVR To add a camera make sure that the camera is powered on and is no more than 2 feet away from the receiver and follow the steps below NOTE You can relocate the camera after you have success...

Страница 38: ...g a camera to a channel that is currently occupied will replace the current camera Please select a vacant channel 3 Now select Camera Pairing from the available options and keep pressing press release press release the Pairing Button located on the back of your camera until you see a green Check Mark on the screen NOTE Please repeat the process if a red X is displayed at any time during the pairin...

Страница 39: ...rightness level of each camera To adjust the brightness level make sure that the camera is powered on and follow the steps below 1 Tap the Menu icon on the receiver and then tap on the Settings icon 2 Tap on the Camera icon and select which camera you want adjust the brightness level on ...

Страница 40: ...vious screen or you can switch between cameras by tapping on the icons to begin configuring the next camera Motion Detection recording can be enabled disabled on a Per Cam era base and can be activated deactivated by following the steps below NOTE Each motion detected recoding event is fixed at 2 minutes per event unless motion is continuously being detected 1 Tap the Menu icon on the receiver and...

Страница 41: ...e desired sensitivity level for the camera being configured NOTE When you are done you can press the back arrow located to the right of the Camera label to go back to the previous screen or you can switch between cameras by tapping on the icons to begin configuring the next camera The Network settings will allow you to configure your DVR s network parameters Login passwords and display your system...

Страница 42: ...ure your DVR s network parameters DHCP Allows your router to automatically configure your DVR s net work parameters The IP Setting options will allow you to enable and configure the internet protocol to be used when accessing you r cameras remotely The two options are Static or DHCP recommended ...

Страница 43: ...in NOTE Please contact your network administrator for assistance 1 Tap the Menu icon on the receiver and then tap on the Settings icon 2 Tap on the Network icon and select IP Settings from the menu op tions available 3 Now select Static IP from the available options and tap on any of the available value slots IP Address Subnet Mask etc to begin inputting its values ...

Страница 44: ... 4 categories IP address Subnet Gateway DNS server and press the ENT key when you are done Pressing the back arrow will discard your entries values 5 When you are done entering the values for each category press the OK button and restart your system when prompted DHCP ...

Страница 45: ... needed to remotely access your system The Security Setting options will allow you to change the default Device and Admin passwords 123456 that are used when remotely accessing your DVR NOTE The default Device Admin password is 123456 Device Password Used to access your system remotely Admin Password Used to configure your system remotely using your smart phone Security Setting ...

Страница 46: ...rds tap the Menu icon on the receiver and then tap on the Settings icon 2 Tap on the Network icon and select Security Setting from the menu options available 3 Now tap on any of the available value slots Device Password Admin Password and use the on screen keyboard to begin inputting its values ...

Страница 47: ...discard your entries 5 When you are done entering the values for each category press the OK button and restart your system when prompted The information option provides you with detailed device configuration such as DVR and camera firmware versions network addresses and device id passwords Information ...

Страница 48: ...otifications device id passwords Alarm Time Alarm Volume Email Alert Alarm The Alarm Time option is used to adjust the Motion Detection audible alert length The Alarm Volume option is used to adjust the Motion Detection audible alert volume When selected use the and icons to adjust the volume level Alarm Time Alarm Volume ...

Страница 49: ...sure that you have your Email providers SMTP server and port number before you begin NOTE Please contact your Email provider or use Google as a tool for more assistance 1 To enable and configure your DVR s Email Alert feature tap the Menu icon on the receiver and then tap on the Settings icon 2 Tap on the Alarm icon and select Email Alert from the menu options available Email Alert Setting up Emai...

Страница 50: ...e your providers name followed by SMTP Port for more info User Name Email address associated with the SMTP server being used Password Password associated with the email account being used to send the emails SSL Checked if required by your email provider Email To The email address that you want the alert notifications to be sent to 4 Using the onscreen key board enter the values for each of the 5 c...

Страница 51: ...ory press the OK button and restart your system when prompted The System settings are used to configure basic DVR settings such as date and time SD card format language etc Date Time SD Card System Auto Lock Reset Recorder Power Saving Upgrade Language System ...

Страница 52: ...option is used to set your DVR to either take photos re cord video also set the length of each recorded video event The SD Card option is used to enable disable automatic overwrite and to format your SD card 30S 30 second video clip 60S 60 second video clip 120S 120 second video clip Photograph Enables snapshots only ...

Страница 53: ...ormatting Your SD Card To format your SD card tap the Format icon and then tap on Yes to proceed WARNING formatting your SD card will delete all its contents The Overwrite option is used to enable default disable the DVR s au tomatic overwrite feature Enabling the overwrite option allows the DVR to keep recording continuously once the SD card is full Format Overwrite ...

Страница 54: ...ck The Screen Auto Lock option is a feature used to keep un wanted users from using the DVR Enabling this option will disable the touch screen feature until the user presses the power button NOTE The Screen auto lock feature can also be enabled manually by pressing the power button during live view Enabling Screen Auto Lock To enable the Screen Auto Lock feature tap the Screen Auto Lock icon and t...

Страница 55: ...sing and holding the Power button and insert the SD card containing the updated firmware 2 Turn your DVR back on and tap the Menu icon on the receiver and then tap on the Settings icon 3 Tap on the System icon and select Upgrade from the options avail able ...

Страница 56: ...sed to reset your DVR to its factory default settings NOTE Restoring your DVR will reset all passwords and email settings Applying Factory Default Settings To reset your DVR to is factory default settings tap the Reset icon Tap on the Start option and then tap Yes to confirm Reset ...

Страница 57: ...rol your DVR s Live View volume level You can adjust your cameras volume level by following the steps below NOTE Placing your cameras too close to the receiver will result in a loud undesirable screeching noise 1 Tap the Menu icon on the receiver and then tap on the Volume icon Language Volume Volume Adjustment ...

Страница 58: ...n you are finished Playing back recorded events video photo can be done directly using the LCDDVR or on a computer by ejecting the SD card and inserting it into your computers media card reader The following will instruct you on how to playback recorded events using the LDCDVR Playback ...

Страница 59: ...ner 2 Set the month that you want to view recorded events on by tapping on the located to the side of the date banner and tap on any of the 5 camera icons The days that contain events will be highlighted NOTE You can choose to display each cameras event individually by tapping on a specific camera or you can view all events at once by tap ping on the camera icon that contains the letter A Playing ...

Страница 60: ...ent by pressing the X The file naming convention for each event is as follows An event labeled A081356 4 mp4 would mean that the event was created at 08 13 56 am on camera 4 mp4 is the file format 4 Tap on the dated event that you want view and it will be playable us ing the DVR s playback feature and options Next event Back 1 sec Play Pause Delete Previous event Forward 5 sec Stop Back to event l...

Страница 61: ...an choose to display each cameras event individually by tapping on a specific camera or you can view all events at once by tap ping on the camera icon that contains the letter A 3 Tap on any of the highlighted dates to view all recorded events for that day The event list screen will display each event in ascending order and also provides you with the option to delete any event by pressing the X Th...

Страница 62: ...ent list Previous event Delete The Loop feature is used to activate the DVR s Single Channel Live View Auto Rotation feature This feature is useful if you would like the DVR to display each camera s live view image in full screen for a set period of time NOTE Enabling the loop feature is not recommended for users who want to record multiple cameras at once Loop ...

Страница 63: ...y applicable to SM 821DT cameras The Pan Tilt feature allows you to adjust the viewing angle of the cam era by moving it Up Down Left Right at any given time 1 Tap on the cameras image that you want change the viewing angle on Tap the Menu icon on the receiver and then tap on the PTZ icon NOTE Pan Tilt features are only available on SM 821DT cameras PTZ Pan Tilt Zoom Pan Tilt SM 821DT only ...

Страница 64: ...amera The outdoor images used in this example were used to help give an example of the camera being moved in different directions Zooming in on the live view image can be done on both SM 816DTX and SM 821DT cameras 1 Tap on the cameras image that you want to zoom in on Tap the Menu icon on the receiver and then tap on the PTZ icon Zoom ...

Страница 65: ...ap on the area of the live view image that you would like to zoom in on and that portion of the image will be digitally enlarged on the screen You can exit from the zoomed image by simply taping anywhere on the screen at anytime or simply wait 2 minutes and the DVR will exit back to quad mode auto matically NOTE this only affects the live view image not the recorded events ...

Страница 66: ...at Video format SD card Video system Dimensions Weight Network port Power Dimensions Weight 2 4GHz 25fps only with effective distance Up to 490 ft clear line of sight up to 200 ft indoor 10 50 C 14 122 F 20 60 C 4 140 F 85 RH 10M 100M IEEE802 3 TCP IP DHCP SMPT HTTP DDNS UPNP PPPoE P2P H 264 6 9 7 x 6 1 x 5 9 inches 2 35 lbs CMOS Color 640 x 480 pixels NTSC PAL selectable 2 Lux IR o 0 Lux IR on Up...

Страница 67: ...eading the manual please feel free to contact us You can reach us by phone at 1 888 977 3777 from 8 30 AM to 5 30 PM Monday through Fri day Pacific Standard Time or by email techsupport securitymaninc com We will be happy to answer your questions and help you in any way we can ...

Страница 68: ......

Отзывы: