476
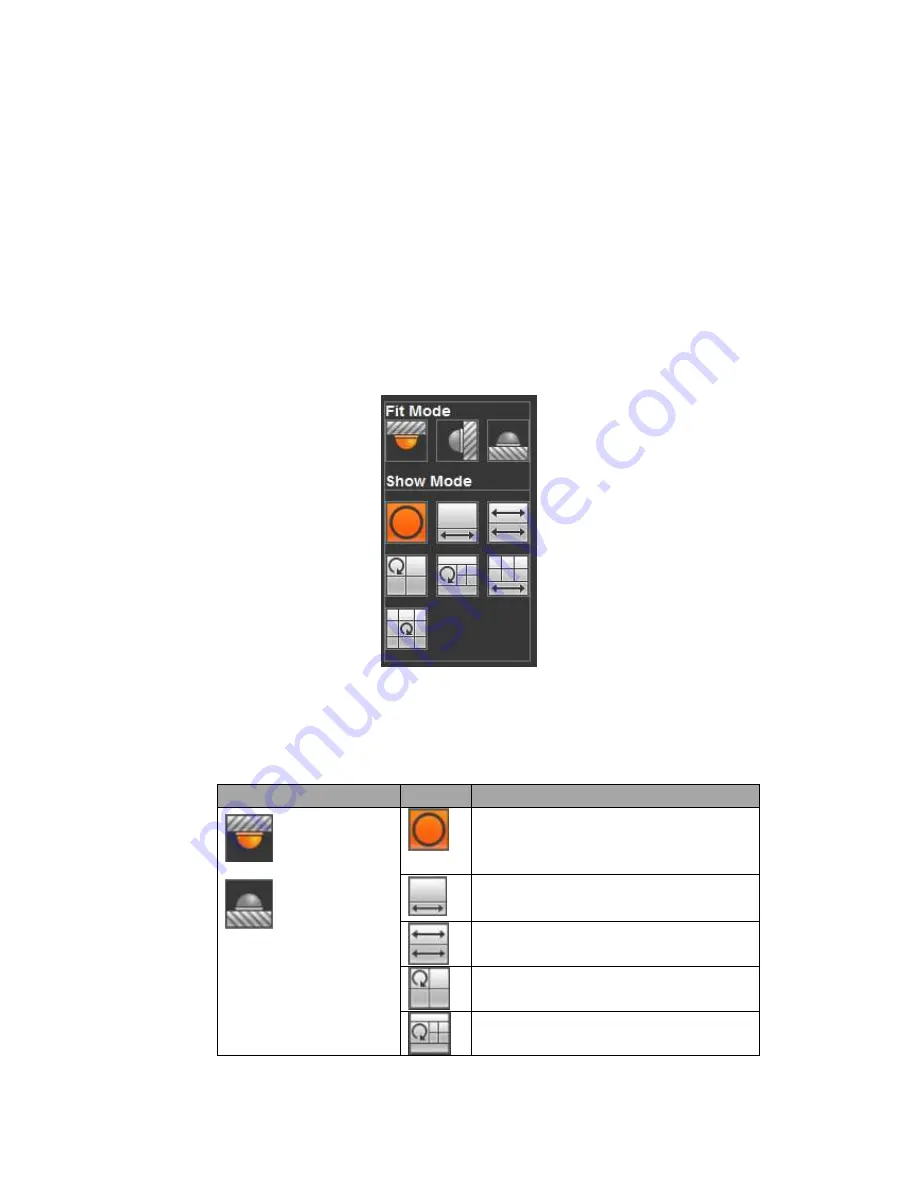
1: Fisheye: Click to adjust fisheye installation mode and display mode. See Figure
5-16. Please note this function is for some series only.
2: Digital zoom: Click this button and then left drag the mouse in the zone to zoom in.
right click mouse system restores original status.
3: Local record. When you click local record button, the system begins recording and
this button becomes highlighted. You can go to system folder RecordDownload to
view the recorded file.
4: Snapshot picture. You can snapshot important video. All images are memorized in
system client folder PictureDownload (default).
5: Audio :Turn on or off audio.(It has no relationship with system audio setup )
6: Close video.
5.6.1
Fisheye de-warp
Fisheye de-warp interface is shown as in Figure 5-16.
Figure 5-16
There are three installation modes: ceiling mount/wall mount/ground mount. The
different installations modes have different de-warp modes.
Please refer to the following sheet for detailed information.
Installation modes
Icon
Note
(
Ceiling mount
)
(
Ground mount
)
360°panorama original view
1
de-warp
1
panorama
stretching
2 panorama stretching view
1 360° panorama view+3 de-warp
windows
1 360°panorama view+4 de-warp
windows
Содержание PENDVR-EL8M4K
Страница 1: ...PENDVR EL8M4K ELITE SERIES...
Страница 19: ...247 2 3 Connection Sample...
Страница 127: ...363 restore original status Figure 4 115 Figure 4 116 4 9 1 3 1Upgrade Camera...
Страница 150: ...386 Figure 4 137 Figure 4 138...
Страница 157: ...393 Figure 4 145 Step 2 Draw tripwire 1 Click Draw button to draw the tripwire See Figure 4 146 Figure 4 146...
Страница 161: ...397 Figure 4 149 Step 2 Draw the zone 1 Click draw button to draw the zone See Figure 4 150 Figure 4 150...
Страница 163: ...399 Figure 4 151 Step 2 Draw the zone 1 Click draw button to draw the zone See Figure 4 152 Figure 4 152...
Страница 165: ...401 Figure 4 153 Step 2 Draw the zone 1 Click Draw button to draw a zone See Figure 4 154...
Страница 171: ...407 Figure 4 157 Figure 4 158...
Страница 172: ...408 Figure 4 159 Figure 4 160...
Страница 173: ...409 Figure 4 161 Figure 4 162...
Страница 176: ...412 Figure 4 165 Figure 4 166...
Страница 177: ...413 Figure 4 167 Figure 4 168...
Страница 183: ...419 Figure 4 177 Figure 4 178 4 9 4 1 2 2 Trigger Snapshot...
Страница 185: ...421 Figure 4 180 Figure 4 181 4 9 4 1 2 3 Priority...
Страница 191: ...427 Figure 4 186 Figure 4 187...
Страница 196: ...432 Figure 4 193 Figure 4 194...
Страница 209: ...445 Figure 4 209 For digital channel the interface is shown as below See Figure 4 210 Figure 4 210...
Страница 216: ...452 Figure 4 218 Step 2 Click Add user button in Figure 4 218 The interface is shown as in Figure 4 219 Figure 4 219...
Страница 282: ...518 Figure 5 69 Figure 5 70...
Страница 298: ...534 device Figure 5 86 Figure 5 87...
Страница 304: ...540 Figure 5 94 Figure 5 95...
Страница 305: ...541 Figure 5 96 Figure 5 97 Please refer to the following sheet for detailed information...
Страница 309: ...545 Figure 5 101 Figure 5 102 Figure 5 103 Please refer to the following sheet for detailed information...
Страница 332: ...568 Figure 5 136 Note For admin you can change the email information See Figure 5 137...
Страница 362: ...598 448K 196M 512K 225M 640K 281M 768K 337M 896K 393M 1024K 450M 1280K 562M 1536K 675M 1792K 787M 2048K 900M...


