Secure Data IS-FL-DA-256-4 Скачать руководство пользователя страница 15

Rev. 20190204A 

T

Contents


15 of 25 

All data and User settings have now been deleted from the USB KP. The next time you 
insert the USB KP into your computer, your system will generally prompt you to reformat 
it. Refer to 

Reformatting the SecureUSB

 on page 16. 

Brute Force Hacking Detection 

E

NTERING A 

U

SER 

PIN 

Status: Both Admin and User PINs have been created. 

If a User enters an incorrect User PIN ten consecutive times, regardless of the time 
intervals in-between attempts, the USB

’s brute force detection will trigger and 

the User 

PIN will be deleted

. All data remains on the USB and can be accessed by the Admin 

after entering the correct Admin PIN. 

Status: Only User PIN has been created. 

If a User enters an incorrect User PIN ten consecutive times regardless of the time 
intervals in between attempts, the USB

’s brute force detection triggers and the 

User PIN 

and encryption key will be deleted and all data will become inaccessible and lost 
forever

. The USB will need to be formatted before it can be reused. Refer to 

Reformatting the SecureUSB

 on page 16. 

E

NTERING AN 

A

DMIN 

PIN 

Status: Admin PIN, or Admin and User PINs have been created. 

If an Admin enters an incorrect Admin PIN ten consecutive times, regardless of the time 
intervals in-between attempts, the USB

’s brute force detection triggers and 

both the 

User and Admin PINs and the encryption key will be deleted and all data will 
become inaccessible and lost forever

. The USB will need to be formatted before it can 

be reused. Refer to 

Reformatting the SecureUSB

 on the next page. 

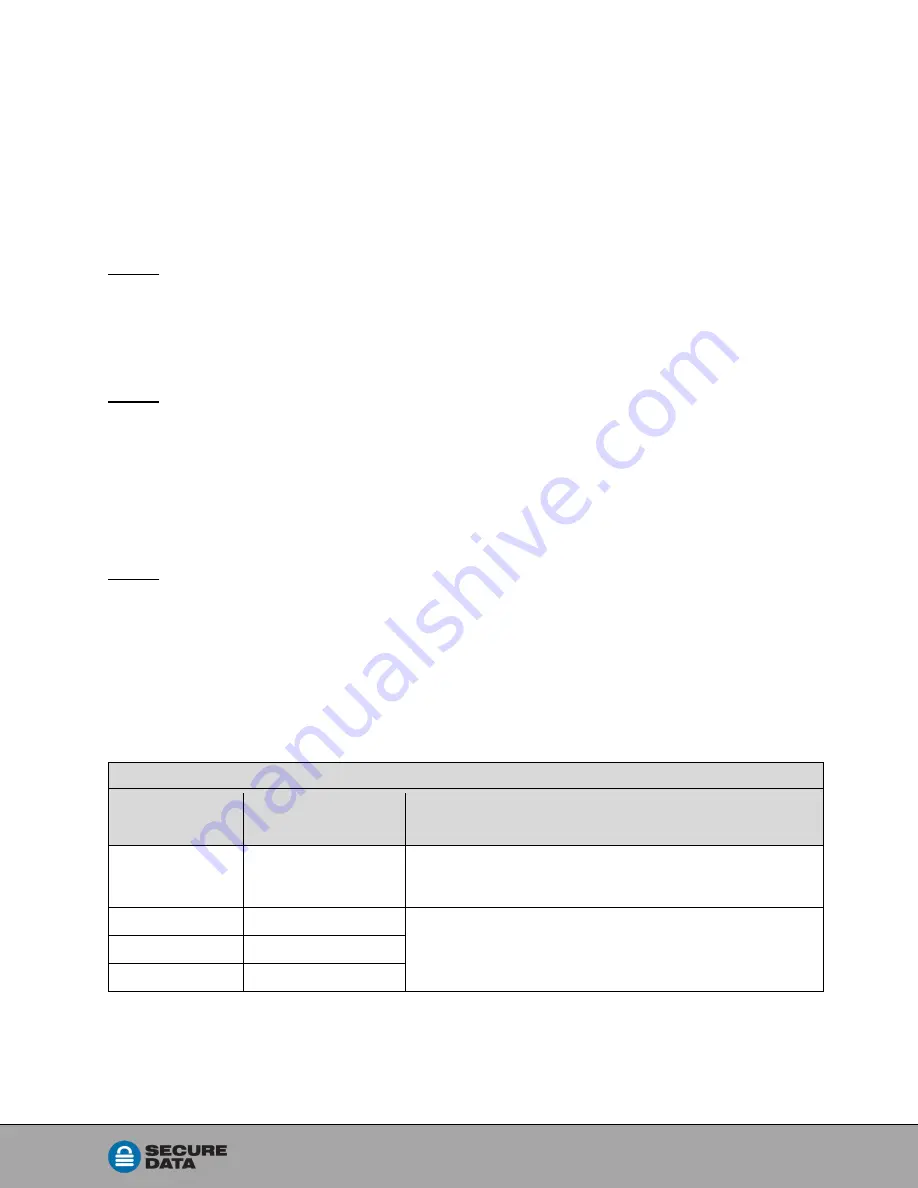
This table illustrates the different PIN states and what happens when Hacking Detection 
triggers. 

Hacking Detection 

PIN attempted to 

use to unlock 

PINs setup 

on the USB at the time 

After 10 consecutive incorrect PIN entries, the brute force 

mechanism triggers 

and does this: 

User PIN 

Admin & User PINs 

The User PIN will be deleted. 
All data will remain on the USB and can only be accessed 
by the Admin entering the correct Admin PIN. 

User PIN 

User PIN Only 

The encryption key will be deleted, and all data will be 
inaccessible and lost forever including the PINs. 

Admin PIN 

Admin & User PINS 

Admin PIN 

Admin PIN Only 

Содержание IS-FL-DA-256-4

Страница 1: ...K E Y P A D SecureUSB KP USER MANUAL...

Страница 2: ...e Options 7 Admin Mode 9 Button Pressing Conventions 9 Admin PINs 9 Admin Mode Options 12 Managing the USB 14 Verifying which PINs have Been Set 14 Deleting all Files in Admin Mode 14 Brute Force Hack...

Страница 3: ...kup and built in Antivirus features installed For more information please contact Support at SecureData REQUIREMENTS The USB must be connected to a computer for access except for during keypad use It...

Страница 4: ...nlocked and ready for keypad input Green blinking slowly Unlocked for use in Read Only Mode Green solid Temporarily unlocked 30 seconds and not inserted into a computer Blue Green solid Blue blinking...

Страница 5: ...erforming each step Unless otherwise noted all procedures start with the USB locked In this manual means press the key button twice means press it three times NOTE Each step in all procedures listed b...

Страница 6: ...hen locked its contents does not appear in your computer s File Manager Explorer or Finder 1 Prior to inserting the USB into a computer press 2 Enter the User PIN 3 Press 4 Within 30 seconds insert th...

Страница 7: ...from your computer Wait for the indication from your operating system User Mode Options The following headings describe options and features requiring only a User PIN For Administration options see A...

Страница 8: ...time it is unlocked SETTING THE TIMEOUT LOCK IN USER MODE To protect against unauthorized access when the USB drive is connected to a host computer and unattended the USB drive can be set to automati...

Страница 9: ...ings Button Pressing Conventions Many Admin procedures start with pressing and holding a number button down 1 or 7 for example and while holding it pressing button abbreviated in the steps below as Pr...

Страница 10: ...reate User PIN Can unlock USB with Admin PIN Can change Admin PIN when unlocked as Administrator Can perform Administrator commands SET SET Can unlock USB and access data with either User or Admin PIN...

Страница 11: ...hin 30 seconds NOTE If your computer goes into sleep mode while the USB is unlocked the USB may lock after some time depending on your power management settings regarding the USB port CREATING OR CHAN...

Страница 12: ...s PINs don t match NOTE If a mistake is made while defining a new Admin PIN or the procedure is not completed the USB retains the old Admin PIN Admin Mode Options The following headings describe enabl...

Страница 13: ...s is ready to be inserted into your computer If not inserted it will still be in Read Write Mode the next time it is unlocked SETTING THE TIMEOUT LOCK IN ADMIN MODE To protect against unauthorized acc...

Страница 14: ...nistrator can delete all data stored on the USB KP including User settings and PIN All Admin settings and only the Admin settings will remain on the USB For further use the USB will need to be reforma...

Страница 15: ...be formatted before it can be reused Refer to Reformatting the SecureUSB on page 16 ENTERING AN ADMIN PIN Status Admin PIN or Admin and User PINs have been created If an Admin enters an incorrect Admi...

Страница 16: ...ss momentarily The USB is now blank and locked If only the red LED lights the USB may already be blank Reformatting the SecureUSB In the event that hacking detection has been triggered or the USB has...

Страница 17: ...ume Label optional and click Start 6 At the popup warning message click OK to continue with formatting the drive This procedure will erase ALL data on the USB KP 7 The procedure will finish formatting...

Страница 18: ...gure 2 Initializing the Secure USB KP shown here as Disk 1 Until initialized it displays as RAW The hash marks indicate an unallocated drive 3 In the blank hashed area of the unallocated section right...

Страница 19: ...The SecureUSB is displayed here as Disk 1 It is Online and allocated Healthy and ready for use 7 Close the Computer Management dialog if it s still open When finished the New Volume usually E reads He...

Страница 20: ...Utility Dialog displays Figure 4 The Disk Utility Dialog Make sure the correct drive is highlighted There is only one External drive listed in this image 4 Ensure that your SecureData USB KP is highli...

Страница 21: ...Figure 5 SecureUSB displays under the list of External drives when done as well as on the desktop 5 Click Done in the message dialog when available SecureUSB is now displayed under External in the le...

Страница 22: ...er below Serial Number S N on the back of the device DETERMINING THE VERSION NUMBER In User Mode 1 Unlock the USB with your User PIN Refer to Unlocking the USB in User Mode on page 6 2 Press 3 Press 8...

Страница 23: ...ng the SecureUSB A Deleting All Files can only be done by an Admin and requires and Admin PIN After deletion the Admin PIN remains intact Resetting the drive can be performed by the User or Admin as n...

Страница 24: ...N OF THE PRODUCT OR 4 AS A RESULT OF SERVICE ALTERATION OR REPAIR BY ANYONE OTHER THAN SECUREDATA INC IN THE EVENT OF ANY OF THESE SITUATIONS THIS WARRANTY SHALL BE VOID THIS WARRANTY DOES NOT COVER N...

Страница 25: ...NS AND WARRANTIES INCLUDING ANY IMPLIED WARRANTY OF MERCHANTABILITY FITNESS FOR A PARTICULAR PURPOSE OR NON INFRINGEMENT ARE DISCLAIMED EXCEPT TO THE EXTENT THAT SUCH DISCLAIMERS ARE HELD TO BE LEGALL...

Отзывы: