ENFORCER Push-to-Exit Bar
2
SECO-LARM U.S.A., Inc.
Please read the manual carefully before beginning installation
1.
The push bar can be mounted in one of two ways, depending on customer needs: Hollow doors using
sex bolts – The sex bolts allow the push bar to be bolted to the door without the screws being exposed
on the outside of the door. Screws and sex bolts are included.
2.
Wood doors – Four wood screws are included to mount the push bar to a wood door.
NOTE:
When mounting the push bar, use a carpenters level to make sure it is mounted
properly. Measuring from the bottom of the door may result in a tilted push bar, as
the bottom of the door may not be level.
1x Push Bar
4x Locking washers
1x Key
4x Small plastic caps
4x Sex bolts
1x Large Plastic Cap
4x Machine Screws
1x SD-969-A18
4x Wood Screws
Armored door cord
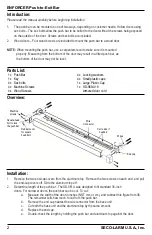
Overview:
Introduction:
Parts List:
Installation:
1.
Remove the two end-cap covers from the aluminum top . Remove the two screws on each end, and pull
the end-cap covers off. Slide the aluminum top off.
2.
Determine length of the push bar . The SD-961A was designed to fit standard 36-inch
doors. For narrower doors, the push bar can be cut. To cut:
a.
Measure the width of the door in inches (NOT mm or cm), and subtract this figure from 36.
The remainder tells how much to cut from the push bar.
b.
Remove the end cap nearest the wire connector from the base unit.
c.
Cut both the base unit and the aluminum top by the same amount.
d.
Replace the end cap.
e.
Double-check the length by holding the push bar and aluminum top against the door.
Machine
screws
Square-head
bolt to lock
the push bar
Rubber cover
for square
head bolt
Wire
Connector
Cut to size if
needed
Wires
End cap


