TRIDENT-3000
3000mm dia. Ocean Buoy
Latest products and information available at www.sealite.com
10
Step 5
Use a crane to turn the Float and Mooring Post upright.
Please Note: The buoy weighs over 2.3 tonnes. Please be
careful when rotating the Buoy.
Step 6
Open the door at the base of the Tower Assembly. Position
and secure the 55Ah battery in the base of the Tower
Assembly using the 2 x Hand Wheels and Battery Clamp.
Please Note: Push the door inwards and hold while releasing the latch, then open the door.
Step 7
Connect the negative (-) and positive (+) leads to the battery terminals.
Please Note: Cover the terminals with a protective grease after connection and testing is finalised.
Step 8
Test the Light by covering it with a dark cloth or jacket and wait 1 minute for activation.
Please refer to the SL125 Manual for more information on setting flash codes, intensity and
troubleshooting.
Step 9
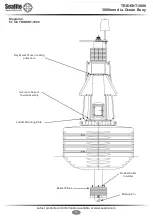
Position and secure the top mark to the Tower Assembly, using 4 x M8 Socket Head Cap Screws, Flat and
Spring Washers and Nuts.
Step 10
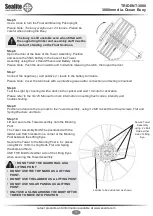
Lift and secure the Tower Assembly onto the Mooring
Post.
The Tower Assembly MUST be positioned with the
ladder and Hatch located on a corner of the Mooring
Post between the Lifting Eyes.
Secure the Tower to the Mooring Post in 8 x places
using M12 x 100mm Long Bolts, Flat and Spring
Washers and Nuts.
USE THE Bolt Holts either side of the Lifting Eyes
when securing the Tower Assembly.
Secure Tower
Assembly
using 2 x Bolt
Holes either
side of Lifting
Eye.
Ladder to be positioned as shown.
The buoy is still unstable even when fitted with
the supporting timber and assembly staff must be
careful if standing on the Float Sections.
• DO NOT USE THE GUARD RAIL AS A
LIFTING POINT
• DO NOT USE THE TOP MARK AS A LIFTING
POINT.
• DO NOT USE THE LADDER AS A LIFTING POINT
• DO NOT USE SOLAR PANELS AS A LIFTING
POINT.
• ONLY USE A SLING AROUND THE BODY OF THE
TOWER TO MOVE INTO POSITION


