


7. MAINTENANCE
WARNING! Before carrying out any maintenance ensure that the bandsaw is switched off, isolated from the mains supply
and that the blade is at a complete standstill.
Failure to comply with this instruction can cause serious injury.
7.1. LUBRICATION.
7.1.1. Ball bearings on the blade guide assemblies and blade wheels are
permanently sealed requiring no lubrication.
7.1.2. Keep all surfaces clean and free of rust, swarf and coolant build-up.
7.1.3. Lubricate vice screw lightly with grease.
7.2.
GEARBOx OIL.
7.2.1.
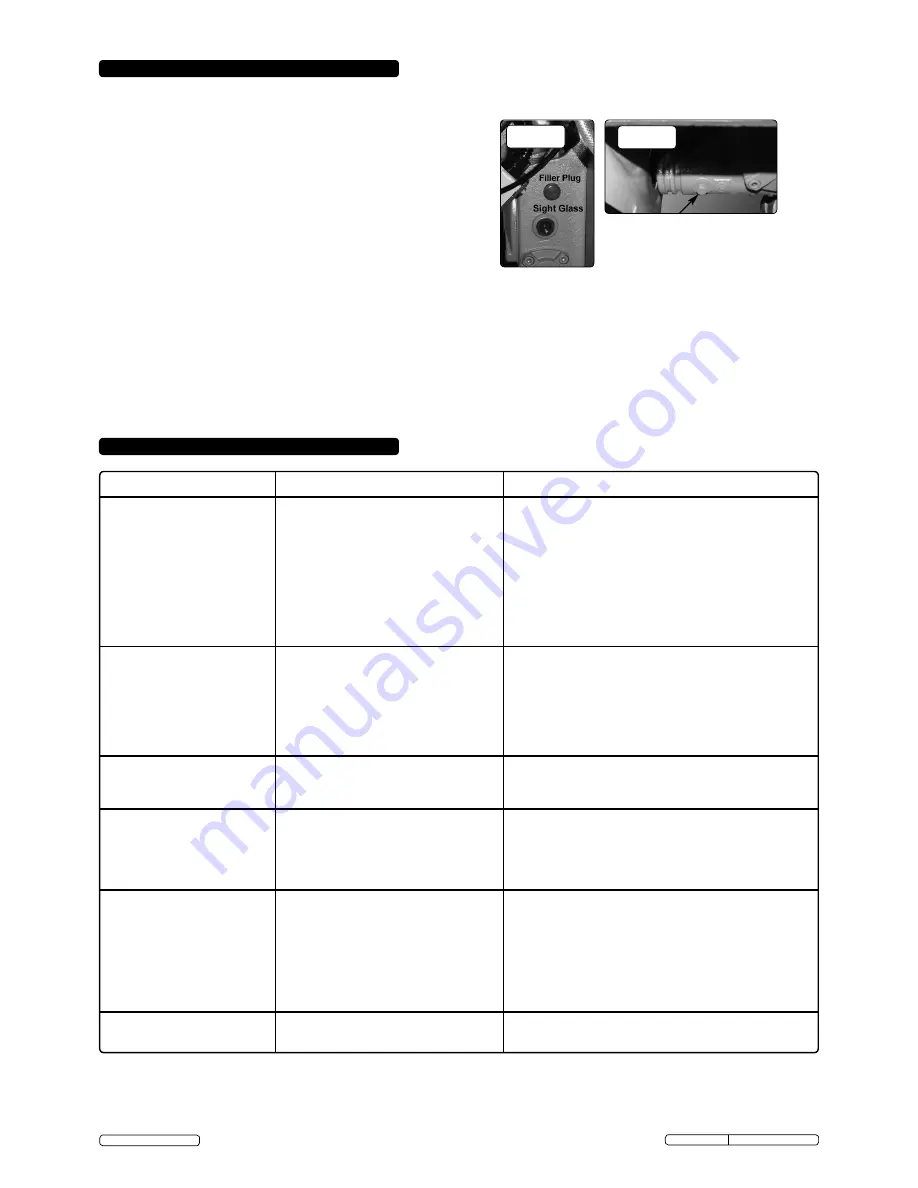
check the gearbox oil level
by means of the sight glass (fig.16).
With the arm lowered, the oil should be at the level of the red dot.
top up if necessary by means of the filler plug (fig.16).
7.2.2.
change gearbox oil after the first 50 days of operation and thereafter
every six months.
7.2.2. remove the drain plug (fig.17), drain oil and replace the plug.
7.2.3. fill the gearbox with approximately 850ml of sA20/50W gear oil.
7.3. GENERAL MAINTENANCE.
WARNING! Do not use compressed air to clean the bandsaw as metal filings may blow into the blade guide bearings and
other critical areas. There is also a danger of flying particles being released into the surrounding area.
7.3.1. use a small paint brush or parts cleaning brush to remove metal particles. If inaccessible (and ferrous) use a magnetic pick-up tool.
7.3.2. Wipe the saw down regularly with a clean dry cloth and protect all unpainted surfaces with light machine oil.
7.3.3. Keep blade guides clean and free of metal filings.
7.3.4. check the guide bearings frequently to make sure they are adjusted properly and turning freely.
7.4. BLADE CLEANING BRUSH.
7.4.1. replace the brush as soon as it becomes worn or damaged or blade life will be shortened significantly.
fig.16
fig.17
PROBLEM
CAUSE
SOLUTION
8. TROUBLESHOOTING
Workpiece is loose in the vice.
Incorrect speed or feed.
Blade is too course.
Workpiece is too course.
Incorrect blade tension.
Blade is in contact with workpiece when
saw is started.
Blade is rubbing on the wheel flange.
Blade guides are misaligned.
Blade is too thick.
Blade is too course.
Incorrect speed - too fast.
Inadequate feed
Hard spots or scale on the workpiece.
Blade is twisting.
Insufficient blade tension.
Blade is sliding.
Blade guides are worn.
Blade guides are misaligned.
Blade guide brackets are loose.
Blade tension too high.
Drive belt tension too high.
Blade too coarse or too fine.
Gears need lubrication.
Blade is binding in the cut.
feed pressure too great.
Blade guides are misaligned.
Inadequate blade tension.
Blade is dull.
Incorrect speed.
Blade guides too far from workpiece.
Blade guide assembly is loose.
Blade is too coarse.
Blade is binding in the cut.
Blade tension is too high.
Excessive blade breakage and/
or teeth ripping from the blade.
Premature blade dulling.
unusual wear on side or back
of blade.
motor overheating.
Bad, crooked or rough cuts.
Blade twisting.
clamp the workpiece securely.
Adjust the speed or feed to suit the workpiece.
replace with a finer blade.
use the saw at slower speed and use a finer blade.
Adjust blade tension.
Place blade in contact with the workpiece only after the
saw has started.
Adjust tracking.
Adjust blade guides.
use correct blade.
replace with a finer blade.
reduce blade speed.
Adjust hydraulic feed control and/or bow weight.
reduce blade speed, increase feed pressure.
replace blade and adjust to the correct tension.
Increase blade tension.
Increase blade tension and reduce blade speed.
replace blade guides.
Adjust guide pivots.
tighten blade guide brackets.
reduce blade tension.
reduce drive belt tension.
use a blade more suitable for the workpiece.
Lubricate the gears.
Decrease feed and blade speed.
Adjust hydraulic feed control and/or bow weight.
Adjust blade guides.
Increase blade tension.
replace the blade.
Adjust the speed.
Adjust guides.
tighten the guide assembly.
use a finer blade.
Adjust hydraulic feed control to decrease feed pressure.
Decrease blade tension.
Original Language Version
sm353cE.V2 Issue: 5 (L) - 30/05/17
© Jack sealey Limited


