background image

• 6 •

6.  CHARGING THE JUMP STARTER

IMPORTANT! CHARGE IMMEDIATELY AFTER PURCHASE, 

AFTER EACH USE AND EVERY 30 DAYS, OR WHEN THE 

CHARGE LEVEL FALLS BELOW 85%, TO KEEP THE INTERNAL 

BATTERY FULLY CHARGED AND PROLONG BATTERY LIFE. 

6.1  CHECKING THE LEVEL OF THE INTERNAL BATTERY

1. 

Slide the ON/OFF switch to the ON position. The LCD display will 

show the battery’s percentage of charge. A fully charged internal 

battery will read 100%. Charge the internal battery if the display 

shows it is under 85%.

2. 

To reduce the risk of electric shock, unplug the unit’s charging cable 

from a USB or wall charger before attempting any maintenance or 

cleaning. Simply turning off the controls will not reduce this risk.

3. 

When charging the internal battery, work in a well ventilated area and 

do not restrict the ventilation in any way.

6.2  CHARGING THE INTERNAL BATTERY

NOTE: 

Use a 2A USB charger (sold separately), or a 2A USB 

charging port to quickly recharge the jump starter. Using a charger 

with less than 2A will increase charge time. 

1. 

Plug the Micro USB end of the charging cable into the input port. 

Next, plug the USB end of the charging cable into a charger’s USB 

port. 

2. 

Plug your charger into a live AC or DC power outlet.

3. 

The LCD display will light, the digit begins to flash and show “IN”, 

indicating that charging has begun.

4. 

The jump starter will fully charge in 7-8 hours. When the unit is fully 

charged, the display will show “100%”.

5. 

When the battery is fully charged, disconnect your charger from the 

outlet, and then remove the charging cable from the charger and the 

unit. Slide the ON/OFF switch to the OFF position, if you are not using 

the unit immediately.

7.  OPERATING INSTRUCTIONS

7.1  JUMP STARTING A VEHICLE ENGINE

NOTE: 

Use only model number SSL-JC jump cables.


IMPORTANT: 

DO NOT

 use the jump starter while charging its 

internal battery.

IMPORTANT:

 Using the jump starter without a battery installed in the 

vehicle will damage the vehicle’s electrical system.

NOTE:

 The internal battery must have a charge of at least 40% to 

jump start a vehicle.

1. 

Turn the ignition OFF.

2. 

Plug the battery clamp cable into the jump starter’s output socket.

3. 

Lay the DC cables away from any fan blades, belts, pulleys and other 

moving parts. Make sure all of the vehicle’s electrical devices are 

turned off.

4. 

For a negative-grounded vehicle, connect the POSITIVE (RED) clamp 

from the jump starter to the POSITIVE (POS, P, +) ungrounded post 

Содержание SL69S

Страница 1: ...NUAL AND READ BEFORE USE This manual will explain how to use the unit safely and effectively Please read and follow these instructions and precautions carefully MODEL SL69S Jump Starter OWNER S MANUAL SL69S issue 2 10 11 06 02 20 ...

Страница 2: ... WARNING RISK OF EXPLOSIVE GASES WORKING IN THE VICINITY OF A LEAD ACID BATTERY IS DANGEROUS BATTERIES GENERATE EXPLOSIVE GASES DURING NORMAL OPERATION IT IS IMPORTANT THAT YOU FOLLOW THESE INSTRUCTIONS EACH TIME YOU USE THE UNIT To reduce the risk of battery explosion follow these instructions and those published by the battery manufacturer and the manufacturer of any equipment you intend to use ...

Страница 3: ...reduce the risk of a battery explosion follow these instructions and those published by the battery manufacturer and the manufacturer of any equipment you intend to use in the vicinity of the battery Review the cautionary markings on these products and on the engine 1 11 Do not set the unit on flammable materials such as carpeting upholstery paper cardboard etc 1 12 Never place the unit directly a...

Страница 4: ...Y CAUSE A BATTERY EXPLOSION TO REDUCE THE RISK OF A SPARK NEAR THE BATTERY 4 1 Plug the clamps into the unit and then attach the output cables to the battery and chassis as indicated below Never allow the output clamps to touch each other 4 2 Position the DC cables to reduce the risk of damage by the bonnet door and moving or hot engine parts NOTE If it is necessary to close the hood during the ju...

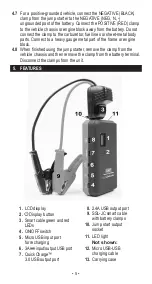
Страница 5: ...t of the frame or engine block 4 8 When finished using the jump starter remove the clamp from the vehicle chassis and then remove the clamp from the battery terminal Disconnect the clamps from the unit 5 FEATURES 1 LCD display 2 Display button 3 Smart cable green and red LEDs 4 ON OFF switch 5 Micro USB input port for recharging 6 3A input output USB port 7 Quick Charge 3 0 USB output port 8 2 4A ...

Страница 6: ... of the charging cable into a charger s USB port 2 Plug your charger into a live AC or DC power outlet 3 The LCD display will light the digit begins to flash and show IN indicating that charging has begun 4 The jump starter will fully charge in 7 8 hours When the unit is fully charged the display will show 100 5 When the battery is fully charged disconnect your charger from the outlet and then rem...

Страница 7: ...fer to section 10 Troubleshooting When the condition is corrected the smart cable will automatically reset NOTE Cold weather may affect the performance of the jump starter s lithium battery If you hear only a click and the engine does not turn over try the following With the jump starter connected to the car battery and the green LED illuminated on the smart cable turn on all lights and electrical...

Страница 8: ... ON position 2 Hold down the display button for 3 seconds 3 Once the LED light is on press and release the display button to cycle through the following modes Steady glow Flash for an SOS signal Flash in strobe mode 4 When finished using the LED light press and hold the display button until the light turns off 5 Slide the ON OFF switch to the OFF position 6 Recharge the unit as soon as possible af...

Страница 9: ...Red LED Green LED off beeps once per second The vehicle battery voltage is lower than 10 5V User can connect to jump starter and turn key to jump start the vehicle When cable is correctly connected to both battery and jump starter Green LED blinking Red LED off no beep Fake high battery voltage is detected but reverse charging protection did not activate User can turn key to jump the vehicle Smart...

Страница 10: ...en LEDs beeps once per second Temperature protection NOTE When the condition is corrected the smart cable will automatically reset 11 SPECIFICATIONS Auxiliary output USB x2 5V 2 4A 5V Quickcharge 3 0 Type C 5V 3A Cable clamp length 440mm Capacity 15Ah 3 2V 3 75Ah 12 8V Max current 1000A Max starting capacity 6L Petrol 3L Diesel Size W x D x H 95 x 40 x 185mm ...

Страница 11: ...be sorted taken to a recycling centre and disposed of in a manner which is compatible with the environment When the product becomes completely unserviceable and requires disposal drain any fluids if applicable into approved containers and dispose of the product and fluids according to local regulations Note It is our policy to continually improve products and as such we reserve the right to alter ...

Страница 12: ...ce with the above Directive s Technical file compiled by Jack Sealey Ltd Being the responsible person appointed by the manufacturer Signed Date Name Position Place Bury St Edmunds Lithium Jump Starter Power Pack SL69S v1 2014 30 EU EMC Directive 2011 65 EU RoHS Directive References to harmonised standard s EN 55032 2015 EN 55035 2017 25 July 2018 Steve Buckle Marketing Director XVII2813 Sealey Gro...

Отзывы: