M
EDALIST
P
RO
H
ARD
D
RIVE
I
NSTALLATION
G
UIDE
Medalist
Pro 9140 (ST39140A)
Medalist Pro 6530 (ST36530A)
Medalist Pro 4520 (ST34520A)
for ATA (IDE)-Compatible PCs
T
HE
E
ASIEST
W
AY
TO
I
NSTALL
Y
OUR
D
RIVE
DiscWizard
is a revolutionary
new Windows program that
makes it easy to install your
Seagate Medalist Pro drive.
DiscWizard helps you configure
your new drive and your computer. It analyzes your system,
lets you select various installation options and creates cus-
tomized step-by-step instructions. It also allows older comput-
ers to access the full capacity of large hard drives.
You can run DiscWizard to install your new hard drive if:
• You already have an existing, bootable hard drive in your
computer with at least 3 Mbytes of available disc space
and
• You are running Windows 3.
x or Windows 95.
If you can run DiscWizard, follow the instructions on the
DiscWizard diskette to install your drive. Refer to this installa-
tion guide if you need additional information.
If you cannot run DiscWizard, follow the instructions in this
installation guide to install and configure your new drive. This
symbol:
indicates that additional information on a topic
appears on the back of this sheet.
A
TTACHING
C
ABLES
AND
M
OUNTING
THE
D
RIVE
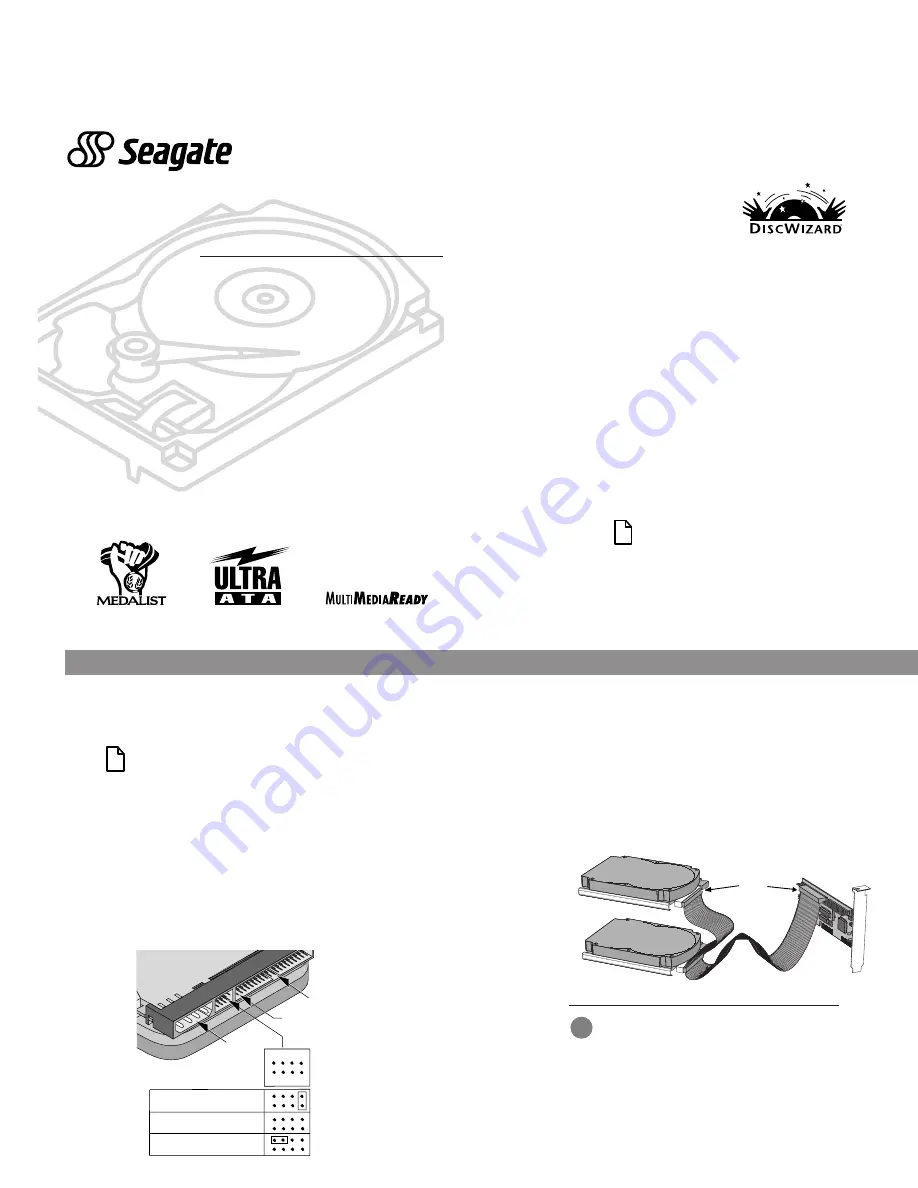
1 If you are installing a new ATA interface cable, attach one
end of the cable to the interface connector on your com-
puter or host adapter. The ATA cable must be no more than
18 inches long.
2 Thread the interface cable through the drive bay and attach
the connector at the end of the interface cable to your new
drive. If you have two drives, attach the second drive to
the second connector.
!
Caution. Make sure to align pin 1 on the com-
puter or host adapter interface connector with
pin 1 on your drive or drives. Pin 1 on the
interface cable is usually indicated by a stripe
along the edge of the cable.
1
1. O
NE
D
RIVE
OR
T
WO
?
If your new Seagate
®
drive will be the only drive in your com-
puter, you do not have to change any jumper settings. In this
case, skip ahead to “Attaching Cables and Mounting the Drive.”
If you already have one hard drive in your computer and you
are installing a second drive, you must configure one drive as a
master and the other as a slave. The master drive will be the
“boot” drive (drive C), from which the computer loads system
software when it first starts up. The drive is configured at the
factory for one drive only or master drive, with a jumper in-
stalled on pins G and H (see below). To configure the drive as a
slave, remove all the jumpers. The horizontal jumper on pins A
and C is a spare and does not affect drive operation. If you
need to change the jumpers on your existing hard drive, see the
Disk Manager online manual, or contact the drive manufacturer.
B D F
A C E G
H
Drive is slave
Master/slave
jumper block
pin 1
4-pin power
connector
40-pin ATA
interface
connector
One drive only or master
Spare jumper
Pin 1
P


