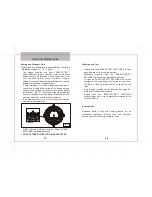
Sea-doo Seascooter Explorer SD6541 Скачать руководство пользователя страница 6

Getting Started

7

Fig.3

LED Battery
Status Indicator

Slide the Master Switch
down to "ON" position

When you use the SEA-DOO

®

 SEASCOOTER™ 

EXPLORER for the first time, the battery needs to be 
charged. Follow the safety cautions on pages 11, 12, 13 
and 14 and charging instructions on pages 15 and 16.

Your SEASCOOTER™ EXPLORER can be used for 
swimming, snorkeling or diving up to 50m/160ft (by 
qualified divers).

To use the SEASCOOTER EXPLORER follow these 
instructions.

1. Charge the battery and install just before use.

2. Place the SEASCOOTER™ EXPLORER into the water 

and rock gently to release trapped air.

3. 

Adjust buoyancy to suit conditions and personal 
preferences - see page 10, Adjustable Buoyancy.

4. When ready to set off, switch the Master Switch to the 

ON position (see fig.3).

Fig.4

Triggers

Master switch
is ON.

5. Pull and hold the left OR the right Trigger to start the 

Propeller (see fig.4). The SEASCOOTER™ EXPLORER 
will accelerate up to speed 1.(There is a short delay 
before the Propeller begins to rotate).

Fig.5

Slide the Master Switch

up to "OFF" position

6. To increase speed at any time, simply pulse the trigger off 

and on again within half a second. The SEASCOOTER™ 
EXPLORER will accelerate up to the next speed. Make 
sure that only one Trigger is being used at a time.

Note: If you want to hold both Triggers simultaneously then 
it is necessary to pulse both triggers together.

7. When at speed 3, further pulses will have no effect. 

8. To stop the Propeller, simply release BOTH Triggers.

9. Always set the Master Switch to the OFF position when it 

is out of the water. (see fig.5)

8

Содержание Seascooter Explorer SD6541

Страница 1: ...kmanship will be repaired or replaced by the Distributor without charge for parts or labor The product including any defective part must be sent to the Distributor within the warranty period The customer will pay for the expense of delivering the product to the Distributor The Distributor will pay for the expense of returning the product to the customer ALWAYS ACTIVATE YOUR WARRANTY IMMEDIATELY ON...

Страница 2: ...Contents Introduction 1 Parts diagram 2 WARNINGS 3 FIT RUBBER SEAL 5 BEFORE FRIST USE Getting started 7 Battery use 11 Care Maintenance 17 Trouble Shooting 19 Technical Specifications 24 ...

Страница 3: ...er Years of design and engineering have resulted in a powerful personal water propeller that gives you three speed outputs for up to 3 3mph 5 3km h for up to 120 minutes of use at a depth of up to 50m 160ft by qualified divers There are many features incorporated in this sophisticated design These include soft start power circuit battery status indicator water ingress alert overheating protection ...

Страница 4: ... Approved Life Preserver when using the SEASCOOTER EXPLORER for snorkeling DO NOT use alcohol or mind altering drugs prior to use this product Be aware of appropriate water levels tidal changes dangerous currents weather changes and strong offshore winds ALWAYS scout unfamiliar water Do not allow sun tan oils or lotions to be in prolonged contact with the SEASCOOTER EXPLORER plastic as it may caus...

Страница 5: ...AL BEFORE FIRST USE 5 6 1 Unlock four latches and remove Nose Cone 2 Both Rubber seal must be fitted as shown and lightly lubricated with the supplied grease Fit two seals in the grooves STEP 1 STEP 2 Fig 2a Fig 2b ...

Страница 6: ...oyancy 4 When ready to set off switch the Master Switch to the ON position see fig 3 Fig 4 Triggers Master switch is ON 5 Pull and hold the left OR the right Trigger to start the Propeller see fig 4 The SEASCOOTER EXPLORER will accelerate up to speed 1 There is a short delay before the Propeller begins to rotate Fig 5 Slide the Master Switch up to OFF position 6 To increase speed at any time simpl...

Страница 7: ...D will be off and the unit needs to be recharged Note The battery status indicator only functions when the propeller is turning 10 9 Fig 6 GOOD BEST Battery Status Indications operates when propeller is turning Flashing Green Battery FULL Flashing Orange Battery NORMAL Flashing Red Battery LOW Around 5 10 minutes of battery power remains Light OFF Charge it NOW Adjustable Buoyancy Plug in Ballast ...

Страница 8: ...d allow two minutes for any explosive gases to dissipate Do not use store charge the battery in temperatures above 40ºC 104ºF as excessive off gassing may occur Keep the battery and SEASCOOTER EXPLORER in the shade when not in use Always ensure the unit is dried thoroughly before opening the Nose Cone Only use the charger supplied with the SEASCOOTER EXPLORER Battery Use 12 11 RE CHARGE THE BATTER...

Страница 9: ...be replaced Battery Use CAUTION The battery supplied with your SEASCOOTER EXPLORER releases a potentially explosive gas during charging Charging should only take place in a well ventilated area away from children and naked flames or other ignition sources cigarettes sparks Charge the battery as soon as possible after use within 24 hours Always charge the battery to the fullest before using the SEA...

Страница 10: ...e battery is fully charged the GREEN LED flashes see Fig 12 9 Unplug the Charging Base from the mains 10 Allow battery to stand for 30 minutes before using it 11 Unplug the Battery Pod from the Charging Base 12 When ready to use reconnect to the unit in the correct position see fig 13 13 Make sure the O ring Seals and sealing surfaces are clean and lubricated before replacing the Nose Cone see fig...

Страница 11: ...e distributor If the catalyzer is wet it will not function and must be allowed to dry out before use ALWAYS remove the battery pod from SEASCOOTER EXPLORER immediately after use DO NOT STORE BATTERY POD IN SEASCOOTER 18 17 Washing and Care Always rinse the SEASCOOTER EXPLORER in fresh water and allow it to dry before storage Whenever possible rinse the SEASCOOTER EXPLORER in fresh water immediatel...

Страница 12: ...pressed make sure 1 The Master Switch is ON see fig 3 2 The Battery Pod is fully charged see page 15 charging the Battery Pod 3 The battery compartment is dry Blocked Propeller If the Propeller becomes blocked it will be necessary to open the Protective Grilles to remove the obstacle UNDER NORMAL USE the grilles must not be opened NEVER turn ON the propeller when it is blocked it will cause seriou...

Страница 13: ...erve safe diving practice 2 Remove nose cone and tip out any excess water 3 Wait two minutes for any gases to dissipate then remove battery pod 4 If salt water has entered rinse battery battery pod and housing with fresh water 5 Dry housing and battery pod thoroughly 6 A safety catalyzer to protect against explosive gas in normal use is held in a spring in the bottom of the battery housing If the ...

Страница 14: ...housing contact customer service center repair center for maintenance DO NOT OPERATE A UNIT WITH A SUSPECTED LEAK INTO THE MOTOR CHAMBER Unit Dimensions 12 6 x 12 6 x 28 32 x 32 x 71 cm Unit Weight 32 lbs 14 5 kg with rechargeable battery 12 5 lbs 5 7 kg without rechargeable battery Battery Type 1 x rechargeable battery pod Battery Life Approximately 2 hours Depth rating 50m 160ft Speed Up to 3 3 ...

Страница 15: ...e Maintenance Parts Battery Purchase PLEASE VISIT www seadooseascooter com SEA DOO and the BRP logo are trademarks of Bombardier Recreational Products Inc or its affiliates used under licence to Stallion asia Ltd For more information on SEA DOO products visit www sea doo com ...

Страница 16: ...a Return Repair Authorization Number before sending the product to the Service Centre Returned products must be shipped with original packaging including the polystyrene packing material and all defective parts Please contact our Customer Service Centre for assistance in handling your case For any questions or queries you may have regarding your SEA DOO SEASCOOTER please follow the below steps for...

Отзывы: