background image

QUARTZ ANALOG-DIGITAL CHRONOGRAPH MODELS –  TYPE B  

with alarm function

Includes Aerodinamico (SF 127.1, 127.2) and Aero Evo (SF 151.1, 151.2) quartz Ana-Digi models

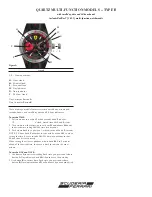
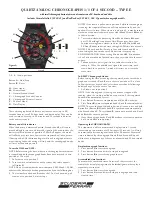
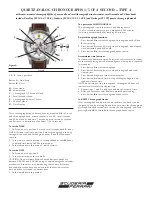
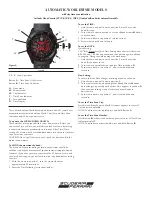
Legend

1, 2

 – Crown positions

Button 

A

 – Reset 

Button 

B

 – Mode Selection 

Button 

C

 – EL Backlight 

Button 

D

 – Start/Stop

H


– Analog Hour Hand

M


– Analog Minute Hand

S


– Analog Seconds Hand

E

  – Digital display 

K

  – Alarm ON Indicator

This analog-digital chronograph features analog Hour, Minute and 
Seconds hands, and a 6-digit LCD digital display (Hour, Minute, 
Second, Month, Day) with Calendar/Real Time in 12-hour or 24-hour 
format, daily Alarm with Snooze feature, 1/100 Chronograph split-
time function, and EL backlight. It may be used to time an event up 
to 23 hours, 59 minutes, 59.99 seconds in duration to the nearest 
0.01 second.

To select MODE:


Press Button 

B

 to cycle through the Modes in this order: 

REAL TIME 

à

 CHRONOGRAPH 

à

 ALARM 

à

 TIME SETTING 

à


REAL TIME.

To use EL Backlight:

 Press Button 

C

 at any time to illuminate the 

dial for 3 seconds to make reading digital display possible in low light 
conditions.

From Real Time Mode:

Press Button 

A

 to display Alarm setting.

Press Button 

D

 to display Date.

Press Buttons 

A

 and 

D

 simultaneously to turn Alarm ON or OFF. 

When Alarm is activated, a small bell symbol [        ] will appear in 
upper right of digital display.

TIME SETTING


To set Digital TIME:


1. Press Button 

B

 three times to advance to TIME Setting Mode; 

  Seconds display will blink. 
2. Press Button 

D

 to reset Seconds to 00. 

3. Use Button 

A

 to advance through TIME Setting Sequence in 

  this order: MINUTE 

à

 HOUR 

à

 DAY 

à

 MONTH. The active 

  digital field in current Setting Mode will blink.
4. Press Button 

D

 to adjust blinking number. 

5. Press Button 

A

 to confirm new setting and advance to next field 

  in setting sequence. 
6. Repeat steps 4 and 5 to complete TIME Setting sequence. 
NOTES: When setting the Hour, “H” is displayed for 24-hour format, 
and “A” or “P” for 12-hour format.
To select 12- or 24-hour format, press and hold Button 

D

: The 

display will cycle through time formats in this sequence: “A” (AM) 
time 

à

 “P” (PM) time 

à

 “H” (24H) time 

à

 “A” (AM) time.

If you press 

D

 while Seconds display reads 30 to 59, Seconds are 

reset to 00 and Time is set to next Minute; if you press 

D

 while 

Seconds display reads 00 to 29, Minute does not change.

To set Analog TIME:


1. Pull crown out to position 2. 
2. Rotate crown in either direction until hands indicate desired time. 
3. Press crown back in to position 1, flush against case.

CHRONOGRAPH


In this Mode, watch functions like a stopwatch to measure intervals 
of time to the nearest 0.01 second for the first 30 minutes; to the 
nearest 1.0 second from 30 minutes to 24 hours.
NOTE: You can return to Real Time mode while Chronograph is 
running by pressing button 

B

.

To operate CHRONOGRAPH:


From Real Time Mode, press Button 

B

 once to enter 

CHRONOGRAPH Mode; use Buttons 

D

 and 

A

 to operate 

the CHRONOGRAPH.

To measure the duration of a single, non-stop event:


1. Press Button 

D

 to start timing. 

2. Press Button 

D

 a second time to stop timing; read elapsed time 

  in digital display. 
3. Press Button 

A

 to reset display to zero.

Figure A

1 –  2

D

A

H

B

M

C

S

K

ß

ß

ß


Real Time 

Chronograph 

Alarm 

Time Setting

 (

Button B) 

(

Button B) 

(

Button B) 

E

Содержание Aero Evo

Страница 1: ...SCUDERIA FERRARI OROLOGI OPERATING INSTRUCTIONS ...

Страница 2: ... Heritage SF 107 6 107 8 107 13 quartz chronograph models 8 QUARTZ ANALOG CHRONOGRAPHS 1 1 OF A SECOND TYPE B with small chronograph minutes seconds counters and 24 hour hand Includes Paddock SF 104 104 1 quartz chronograph models 9 QUARTZ ANALOG CHRONOGRAPHS 1 1 OF A SECOND TYPE C with small chronograph minutes seconds counters 24 hour hand and date Includes Laptime SF 102 12 131 3 Aerodinamico S...

Страница 3: ...cuderia XX SF 116 1 116 2 Swiss quartz chronograph models 16 QUARTZ ANALOG DIGITAL CHRONOGRAPH MODELS TYPE A with alarm function Includes Laptime SF 102 4 102 6 102 8 quartz Ana Digi models 17 QUARTZ ANALOG DIGITAL CHRONOGRAPH MODELS TYPE B with alarm function Includes Aerodinamico SF 127 1 127 2 and Aero Evo SF 151 1 151 2 quartz Ana Digi models 18 AUTOMATIC WORLDTIME MODELS with city time zone i...

Страница 4: ...inst case Position 2 To set TIME Rotate crown in either direction To WIND an automatic movement by hand The motion of your arm during normal daily activities should be sufficient to keep the movement of your automatic timepiece wound However if you have not worn your watch for approximately 38 to 40 hours or more and the watch has stopped you will need to wind it by hand before setting the time 1 ...

Страница 5: ...Positions Position 1 Normal position Crown pushed against case Position 2 To set DATE Rotate crown either counterclockwise or clockwise depending on model Position 3 To set TIME Rotate crown in either direction CAUTION Never set the Date when the hands are between 9 00 PM and 4 00 AM Doing so could damage the calendar mechanism NOTE The functioning of the watch is not affected during date setting ...

Страница 6: ...e gradually between 2 00 AM and 4 00AM IMPORTANT Do not adjust the Day or Date between the hours of 9 00 PM and 4 00 AM when automatic calendar changes are in progress or the Day and Date may not change properly on the following day To manually wind an automatic movement The motion of your arm during normal daily activities should be sufficient to keep the movement of your automatic timepiece woun...

Страница 7: ...d H so when setting the time be sure to take AM PM time into account so that 24 hour hand is set correctly When setting the minutes advance minute hand M 4 to 5 minutes ahead of the desired time then turn it back to indicate the exact minute To set the DATE 1 Pull crown out to position 2 2 Turn crown counterclockwise until date indicator hand D points to correct date NOTE Date indicator hand D wil...

Страница 8: ...ection to set hour H and minute M hands to desired time taking AM PM time into account 3 Push crown back in to position 1 watch seconds hand S restarts NOTE 24 hour hand F will move in sync with hour hand H so when setting the time be sure to take AM PM time into account so that 24 hour hand is set correctly When setting the minutes advance minute hand M 4 to 5 minutes ahead of the desired time th...

Страница 9: ... watch for approximately 38 to 40 hours or more and the watch has stopped you will need to wind it by hand before setting the time 1 With the crown in position 1 turn the crown clockwise approximately 20 revolutions 2 Reset the Time following instructions below To set the TIME 1 Pull crown out to position 2 watch small seconds hand S stops 2 Turn crown in either direction to set hour H and minute ...

Страница 10: ...ss button A a second time to stop chronograph 3 Press button B to reset chronograph to zero Accumulated time functions To measure the combined time of a series of shorter events 1 Press button A to start chronograph 2 Press button A a second time to stop chronograph and read elapsed time 3 Press button A again to resume measurement 4 Press button A a fourth time to stop chronograph again and read ...

Страница 11: ...E is synchronized automatically with Chronograph Seconds hand C 3 Once Chronograph hands C and E have been reset to zero position reset the time and push crown back into position 1 Operating the CHRONOGRAPH This stopwatch is able to measure and display time in 1 second increments up to a maximum of 59 minutes 59 seconds It will stop automatically after running continuously for 60 minutes Measured ...

Страница 12: ...to set Chronograph Seconds hand C to zero to advance hand C rapidly press and hold Button A NOTE Chronograph Minute hand E is synchronized automatically with Chronograph Seconds hand C 3 Once Chronograph hands C and E have been reset to zero position reset the time and push crown back into position 1 Operating the CHRONOGRAPH This stopwatch is able to measure and display time in 1 second increment...

Страница 13: ...own out to position 2 2 Press Button A to set Chronograph Seconds hand C to zero to advance hand C rapidly press and hold Button A NOTE Chronograph Minute hand E is synchronized automatically with Chronograph Seconds hand C IMPORTANT Do not push crown back into position 1 while Chronograph Seconds hand C is advancing to zero position or timing mechanism will recognize the position at which hand C ...

Страница 14: ... M and 24 Hour F hands to desired time taking AM PM time into account NOTES 24 hour hand F will move in sync with Hour hand H so when setting the hour make sure 24 hour time is set properly RECOMMENDATION When setting Minute hand M first advance it 4 to 5 minutes ahead of desired time then turn it back to the exact minute 5 Take an accurate time signal from a radio news station for example When th...

Страница 15: ... chronograph and read the intermediate time 3 Press button B to resume chronograph function the 2 chronograph hands will quickly catch up with ongoing event Repeat steps 2 and 3 as many times as needed to take additional split times 4 Press button A to stop chronograph and take a reading of the final time 5 Press button B to reset chronograph hands to zero Timing two competitors simultaneously To ...

Страница 16: ...ements up to a maximum of 60 minutes It will stop automatically after running continuously for 60 minutes Simple chronograph functions 1 Press button A to start chronograph 2 Press button A a second time to stop chronograph 3 Press button B to reset chronograph to zero Accumulated time functions To measure the combined time of a series of shorter events 1 Press button A to start chronograph 2 Pres...

Страница 17: ...hands to any time outside that period reset the date and then reset hands to correct time 3 Push crown back in to position 1 To operate the CHRONOGRAPH This chronograph is able to measure and display time in 1 5 of a second increments up to a maximum of 60 minutes It will stop automatically after reaching 60 minutes Simple chronograph functions 1 Press button A to start chronograph chronograph han...

Страница 18: ...t move hour and minute hands to any time outside that period reset the date and then reset hands to correct time 3 Push crown back in to position 1 To operate the CHRONOGRAPH This chronograph is able to measure and display time in 1 5 of a second increments up to a maximum of 12 hours It will stop automatically after reaching 12 hours Simple chronograph functions 1 Press button A to start chronogr...

Страница 19: ... hours of continuous running Simple chronograph functions 1 Press button A to start chronograph chronograph hands C and E start moving 2 Press button A a second time to stop chronograph read elapsed time indicated by hands C and E 3 Press button B to reset chronograph hands to zero Accumulated time functions To measure the combined time of a series of shorter events for example the actual playing ...

Страница 20: ... When setting the Time H is displayed for 24 hour format and A or P for 12 hour format To select 12 or 24 hour format press and hold Button C The display will cycle through time formats in this sequence A AM time à P PM time à H 24H time à A AM time If you press D while Seconds display reads 30 to 59 Seconds are reset to 00 and Time is set to next Minute if you press D while Seconds display reads ...

Страница 21: ... 1 From Real Time Mode press Button B twice to enter ALARM Mode 2 Press Button D one or more times to turn ALARM and or CHIME ON or OFF in this sequence ALARM ON à CHIME ON à ALARM and CHIME ON à ALARM and CHIME OFF When ALARM and or CHIME are activated their icon s will appear in the Upper digital display To set the ALARM 1 From Real Time Mode press Button B twice to enter ALARM Mode 2 Press Butt...

Страница 22: ...nce through TIME Setting Sequence in this order MINUTE à HOUR à DAY à MONTH The active digital field in current Setting Mode will blink 4 Press Button D to adjust blinking number 5 Press Button A to confirm new setting and advance to next field in setting sequence 6 Repeat steps 4 and 5 to complete TIME Setting sequence NOTES When setting the Hour H is displayed for 24 hour format and A or P for 1...

Страница 23: ...the ALARM 1 From Real Time Mode press Button B twice to enter ALARM Mode Hours will blink 2 Press Button A to toggle between and select field to be set Hours or Minutes 3 Press Button D to adjust the blinking number in selected field 4 When correct number appears in blinking display press Button A to confirm setting 5 When finished with ALARM setting press Button B to return to Real Time mode To a...

Страница 24: ...revolutions 2 Reset the Time following instructions below To set the TIME 1 Unlock crown and pull it out to position 3 watch seconds hand S stops 2 Turn crown in either direction to set hour H and minute M hands to desired time 3 Push crown back in to position 1 watch restarts 4 Screw crown back down into case To set the DATE Quick Setting CAUTION Never use Quick Date Setting when the time is betw...

Страница 25: ...our automatic timepiece wound However if you have not worn your watch for 44 hours or more and the watch has stopped you will need to wind it by hand before setting the time 1 With the crown in position 1 turn the crown clockwise approximately 20 revolutions 2 Reset the Time following instructions below Crown Positions Position 1 Normal hand winding position flush against case Position 2 To set TI...

Страница 26: ...wake up the LED display 2 To move between the 3 Display Modes swipe your finger across regions C and D in either direction 3 To turn the watch OFF touch the Racing Shield in region A for about 2 seconds until the LED displays the word bye then goes dark NOTE If the 5 second LED display is activated five times a day battery life expectancy is 24 months More frequent operation will decrease battery ...

Отзывы: