background image

12

User Manual PSD3205

Maintenance

There are no user serviceable part inside

.Your

is thoughtfully engineered for ease of use,

accuracy and reliability. The instrument is carefully tested and calibrated using

standards traceable to National Laboratories.

Take care of your instrument by cleaning the exterior of the instrument regularly

with a dusting brush. Dirt which is difficult to remove on the casing & plastic parts,

can be removed with a moist cloth ( 99% water, 1% mild detergent) spirit or

washing benzene (petroleum ether) can be used to remove greasy dirt. The

display may be cleaned with water or washing benzene (but not with spirit-alcohol

solvents), it must then be wiped with a dry clean lint-free cloth. Under no

circumstances the cleaning fluid should get into the instrument. The use of

cleaning agents can attack the plastic & paint surfaces.

The power line fuse is located on rear panel on lower right side. In case, the

instrument does not show any sign of working, no LED is lit or there is no display

immediately switch OFF the mains power switch of the instrument and unplug the

mains cord from the mains socket. With the help of small flat blade screwdriver

remove the fuse cap of the fuse holder, located just below the socket. There is one

spare fuse kept in the fuse cap, replace it for the defective one. Press the cap so

that it locks in place . The rating of the fuse is 3 A , 250 V, slow blow, 5x20 mm glass

fuse. Do not use a fuse with a higher value other wise it may damage the

instrument in case, the mains voltage goes much higher than the rating of the

mains fluctuation of 10%.

PSD3205

PSD3205

Power Line Fuse Replacement

+

Dual Display

Tracking Multiple Power Supply

Содержание PSD3205

Страница 1: ...User Manual Dual Display Tracking Multiple Power Supply 3205 PSD...

Страница 2: ...nstrument contains proprietary information no part of this manual may be photocopied reproduced or translated without any prior written consent Information in this manual supercede all corresponding p...

Страница 3: ...tions 5 3 Front Panel ontrols 4 Operating Instructions 8 General Information 8 Safety 8 Operating Conditions 8 First Time Operation 9 Operation 9 6 Maintenance 12 Power Line Fuse Replacement 12 7 Disp...

Страница 4: ...as a constant current CC and constant voltage CV source for laboratories industries field testing applications featuring low power loss compact and light weight It provides isolated floated adjustabl...

Страница 5: ...0 30 V 3A B 0 30 V 3A 0 30 V continuously variable by means of coarse fine controls 3 A Max Voltage 10 mV Current 5 mA 10 m 2 5 mV at 30 V 3A 50 s 0 05 10 mV 0 05 10 mV 0 05 5mV C 1 mVrms 1 Adjustabl...

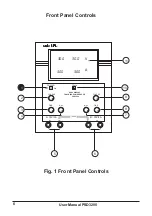
Страница 6: ...1 Front Panel Controls 6 User Manual PSD3205 30 0 V 3 00 COARSE FINE Imax COARSE FINE Imax POWER ON OFF 3 00 A V TRACK 1 2 3 4 5 6 7 8 9 11 10 A 30V 3A B 30V 3A TRACK DUAL DISPLAY TRACKING POWER SUPPL...

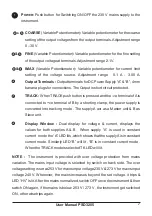
Страница 7: ...hat the supplyAis in constant current mode Similarly LED B will lit B is in constant current mode When theTRACK mode is selectedTK LED will lit The instrument is provided with over voltage protection...

Страница 8: ...tion must not be negated by the use of an extension cord without a protective conductor When removing the metal case or replacing the instrument must be completely disconnected from the mains supply I...

Страница 9: ...ns supply 230 V 10 On switch ON no undue observation should be noticed Once the instrument is switched ON the power ON is indicated by liting of displays The power supply has an electrically floating...

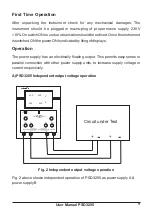
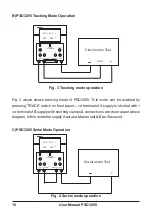
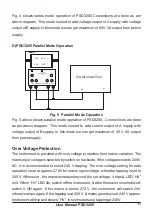
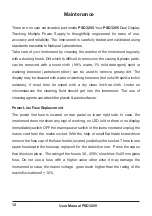
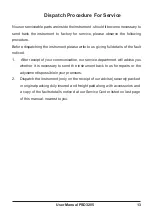
Страница 10: ...h shorting clamps connections are done as per above diagram In this mode t he supplyAact as a Master unit B as Slave unit Circuit under Test 30 0 V 3 00 COARSE FINE Imax COARSE FINE Imax POWER ON OFF...

Страница 11: ...eeds 240 V AC it is recommended to select 240 V tapping The over voltage setting for safe operation is set at approx 270 V for mains input voltage when the tapping is set to 240 V Whenever the mains i...

Страница 12: ...aning fluid should get into the instrument The use of cleaning agents can attack the plastic paint surfaces The power line fuse is located on rear panel on lower right side In case the instrument does...

Страница 13: ...l details of the fault noticed 1 After receipt of your communication our service department will advise you whether it is necessary to send the instrument back to us for repairs or the adjustment is p...

Страница 14: ...any defect failure or damage caused by accident negligence mis application alteration or attempt to repair service or modify in any way 3 This warranty does not include LED fuses batteries or accesso...

Страница 15: ...15 User Manual PSD3205 Notes...

Страница 16: ...chennai scientificindia com Indira Nagar Adyar Chennai 600 020 Scientific Mes Technik Pvt Ltd Ph 022 24211171 Room No 308 Building No 2 Fax 022 24333654 3rd Floor Sundar Nagar mumbai scientificindia...

Отзывы: