background image

Operation

11.  Note the position number on the side of the tube for future reference.

Handlebar adjustment

The handlebars may be adjusted to more accurately simulate the upper body position of road cycling. Raise or lower the 

handlebars for a more efficient, comfortable ride.

1.  To raise or lower the handlebars, loosen the locking pop pin. Pull out the spring-loaded release knob. This releases the 

locking pin from the preset handlebar position hole.

2.  Raise or lower the handlebars to the desired position.

Do not raise the handlebar above the STOP mark.

3.  When the handlebars are in the desired position, release the spring-loaded knob, re-positioning the locking pin in the 

desired, preset hole. Turn the handle clockwise to tighten the knob.

4.  Try several handlebar settings to find the most comfortable position. Note the position number on the side of the tube 

for future reference.

Foot positioning/pedal strap adjustment

Place the ball of each foot in the toe clip until the front of the shoe fits snugly in the toe clip cage. Rotate one foot to within 

arm’s reach, then tighten the webbed cloth strap of the toe clip around your shoe by pulling up on the strap. Pull up on the 

strap until the cage of the toe clip fits snugly around the shoe. Repeat for the other foot. Point your toes and knees directly 

forward to ensure maximum pedal efficiency.

Lower body workout

Once you are in position and sitting comfortably, slowly begin pedaling, with your hands resting comfortably on the handle-

bars. Pedal casually and rhythmically at a low resistance level until you feel secure and comfortable. As you feel more and 

more comfortable, experiment with seat positions and resistance levels.

Upper body positioning

For added enjoyment, comfort and variety during your workout, experiment with moving your hands to various positions on 

the handlebars.

• Do not attempt to ride this bike at high RPMs or in a standing position until you have practiced and are comfortable riding at 

slower RPMs.

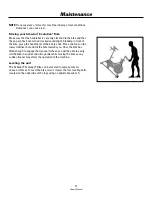
• After exercising, turn the adjustment control knob clockwise (+) to increase tension so the pedals will not rotate freely and 

possibly hurt someone.

Owner’s Manual

9

Содержание Evolution - SR Indoor Cycling Bike

Страница 1: ...Nautilus Bowflex Schwinn Fitness Pearl Izumi StairMaster Universal Nautilus Institute Owner s Manual Evolution Evolution SR Schwinn IC Bikes Nautilus Bowflex Schwinn Fitness Pearl Izumi StairMaster U...

Страница 2: ...at varying resistance levels develops cardiovascular fitness leg strength concentration and balance The Schwinn Evolution Bike should enable you to Increase your energy level Increase cardiovascular a...

Страница 3: ...ecifications 6 Features 7 Operation 8 How to use the Schwinn Evolution Bike 8 Maintenance 11 Moving your Schwinn Evolution Bike 11 Leveling your Schwinn Evolution Bike 11 Maintenance schedule 12 Chain...

Страница 4: ...HAVE COMPLETELY STOPPED Failure to follow these instructions may lead to loss of control and serious personal injury Examine this machine for loose parts or signs of wear Contact Nautilus Customer Se...

Страница 5: ...ny warning label if damaged illegible or missing Call 1 800 864 1270 if you need to replace warning label s Serial Number Label 1 Label 2 Label 1 General warning label Location On water bottle holder...

Страница 6: ...Dimensions 50 L x 22 5 W x 40 H 127cm x 57cm x 102cm Assembled Unit Weight 119 lbs 54 kg Packaged Shipping weight 124 lbs 56 kg Workout Area 89 L x 61 5 W 227cm x 156cm Maximum User Weight 300 lbs 13...

Страница 7: ...tes high inertia that best replicates the real world cycling experience Schwinn Smart Release System Evolution SR model only Patented design offers all the benefits of a fixed gear essential to the Sc...

Страница 8: ...rk different lower body muscle groups 1 Place one pedal in the upward position then place your foot in the toe clip and center the ball of your foot over the center of the pedal Your leg should be sli...

Страница 9: ...the front of the shoe fits snugly in the toe clip cage Rotate one foot to within arm s reach then tighten the webbed cloth strap of the toe clip around your shoe by pulling up on the strap Pull up on...

Страница 10: ...re is standard on the Schwinn Evolution SR Please verify that your exercise bike has this feature before utilizing stopping method 4 4 Apply back pressure to the pedals and the Smart Release system wi...

Страница 11: ...ends Place one foot on the lower stabilizer bar and tilt the bike towards you Once the bike has tilted enough to engage the transport wheel you will be able to easily roll the bike in any direction B...

Страница 12: ...d operating smoothly Inspect toe clips and toe straps for any signs of wear or rough movement Replace the components if any signs of wear are noticed Check that both pedals are secured and properly at...

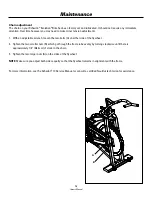
Страница 13: ...ither side of the flywheel 2 Tighten the two smaller nuts B which go through the frame tube evenly by turning clockwise until there is approximately 1 4 0 64 cm of slack in the chain 3 Tighten the two...

Страница 14: ...or at Nautilus Inc s election to the repayment of an amount of the purchase price of the exercise product in question Some states do not permit the exclusion or limitation of implied warranties or inc...

Страница 15: ...Tel 49 02203 2020 0 Fax 49 02203 2020 45 45 ITALY Nautilus Italy S r l Via della Mercanzia 103 40050 Funo di Argelato Bologna Tel 39 051 664 6201 Fax 39 051 664 7461 SwITZERLAND Nautilus Switzerland S...

Страница 16: ...trade marks or trademarks of Nautilus Inc Schwinn and the Schwinn Quality Seal are registered trademarks All other trademarks are owned by their respective companies Nautilus Inc World Headquarters 1...

Отзывы: