background image

24

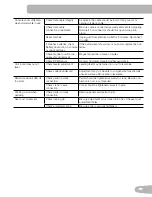
TROUBLESHOOTINg

Condition/Problem

Things to Check

Solution

No display/partial display/
unit will not turn on

If bike has AC adapter, check 
electrical (wall) outlet

Make sure unit is plugged into a functioning wall outlet.

If bike has AC adapter, check 
connection at unit

Connection should be secure and undamaged. Replace 
adapter or connection at unit if either are damaged.

If bike has batteries, check 
Battery Indicator on console 
or check batteries.

Replace the batteries. It may be necessary to replace the 
batteries although the Battery Indicator is not on.

Check data cable integrity

All wires in cable should be intact. If any are visibly crimped 
or cut, replace cable.

Check data cable
connections/orientation

Be sure cable is connected securely and oriented properly. 
Small latch on connector should line up and snap into 
place.

Check console display for 
damage

Check for visual sign that console display is cracked or 
otherwise damaged. Replace Console if damaged.

Console Display

If Console only has partial display and all connections are 
fine, replace the Console.
If the above steps do not resolve the problem, contact 
Customer Care for further assistance.

Unit operates but Contact 
HR not displayed

HR cable connection at 
Console

Be sure cable is connected securely to Console.

Sensor grip

Be sure hands are centered on HR sensors. Hands must 
be kept still with relatively equal pressure applied to each 
side.

Dry or calloused hands

Sensors may have difficulty with dried out or calloused 
hands. A conductive electrode cream such as “Signa 
Crème” or “Buh-Bump” can help make better conduct. 
These are available on the web or at medical or some 
larger fitness stores.

Handlebars

If tests reveal no other issues, Handlebars should be 
replaced.

Console displays “E2” error 
code

Check data cable integrity

All wires in cable should be intact. If any are cut or 
crimped, replace cable.

Check data cable 
connections/orientation

Be sure cable is connected securely and oriented properly. 
Small latch on connector should line up and snap into 
place.

Console electronics

If tests reveal no other issues, Console should be replaced.

No speed/RPM reading, 
Console displays “E3” error 
code

Check data cable integrity

All wires in cable should be intact. If any are cut or 
crimped, replace cable.

Check data cable
connections/orientation

Be sure cable is connected securely and oriented properly. 
Small latch on connector should line up and snap into 
place.

Check magnet position 
(requires shroud removal)

Magnet should be in place on pulley. 

Check RPM Sensor (requires 
shroud removal)

RPM sensor should be aligned with magnet and 
connected to data cable. Realign sensor if necessary. 
Replace if there is any damage to the sensor or the 
connecting wire.

Содержание a15

Страница 1: ...ASSEMBLY MANUAL OWNER S MANUAL Manual en Espa ol Latino Americano http www schwinnfitness com...

Страница 2: ...Maintenance 21 Troubleshooting 24 Warranty 27 Nautilus Inc 800 NAUTILUS 800 628 8458 www NautilusInc com Customer Service North America 800 605 3369 csnls nautilus com outside U S 01 360 859 5180 tec...

Страница 3: ...promise the safety of this machine and will void the warranty If replacement parts are necessary use only genuine Nautilus replacement parts and hardware Failure to use genuine replacement parts can c...

Страница 4: ...otection against harmful interference in a residential installation This equipment generates uses and can radiate radio frequency energy and if not installed and used in accordance with the instructio...

Страница 5: ...nter clockwise to loosen unless instructed otherwise 4 When attaching 2 pieces lightly lift and look through the bolt holes to help insert the bolt through the holes 5 The assembly can require 2 peopl...

Страница 6: ...talled Handlebar Bracket 2 1 Front Stabilizer 8 1 Console 3 1 Rear Stabilizer 9 1 Handlebars 4 1 Seat Post 10 1 Left Pedal L 5 1 Adjustment Knob pre installed 11 1 Right Pedal R 6 1 Seat 12 1 Water Bo...

Страница 7: ...ls Included Not Included 6 mm Item Qty Description Item Qty Description A 4 Carriage Bolt M8 x 65 C 4 Acorn Nut M8 B 8 Arc Washer M8 D 4 Hex Screw M8 x 15 A B C D recommended HARDWARE TOOLs 13mm 17mm...

Страница 8: ...lizer faces outward from the machine 2 Install Pedals Note The Left Pedal is reverse threaded Be sure to attach Pedals on the proper side of the Bike Orientation is based from a seated position on the...

Страница 9: ...is pre installed on the Main Frame Make sure the Adjustment Knob engages the Seat Post Do not set the Seat Post position higher than the stop mark MAX on the tube 5 4 X3 4 Install Console Mast on Main...

Страница 10: ...Make sure the Handlebar Bracket has an equal distance between the two ends of the bracket and the bracket mount on the Console Mast Do not crimp the cables Route the HR cable through the side hole in...

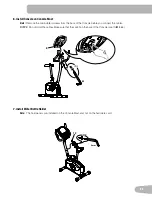
Страница 11: ...e back of the Console before you connect the cables NOTICE Do not crimp the cables Make sure that the switch on the back of the Console is set to B bike 8 2 7 Install Water Bottle Holder Note The hard...

Страница 12: ...ted for correct performance in accordance with the Owner s Manual Optional Power Adapter The console for your machine can operate on battery power or AC power For AC power it is necessary to order the...

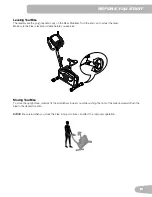
Страница 13: ...sure the bike is level and stable before you exercise Moving Your Bike To move the upright bike carefully tilt the Handlebars toward you while pushing the front of the bike downward Push the bike to t...

Страница 14: ...air information Maximum user weight limit 275 lbs 125 kg Do not use if you are over this weight This machine is for home use only Do not wear loose clothing or jewelry This machine contains moving par...

Страница 15: ...justable Seat M Battery Bay D Adjustment Knob N Machine Type Switch E Fully Shrouded Flywheel O Media Tray F Levelers P MP3 Input G Stabilizers Q Speakers H Transport Rollers R Headphones Output I Ped...

Страница 16: ...esistance level Note The Console keypad will not adjust the sound output for a connected media device Use the volume control on the media device LCD Display Data Program Display The Program Display sh...

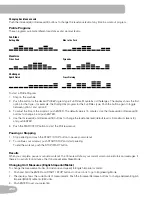
Страница 17: ...sole detects four stable pulse signals your initial pulse rate will be shown Once the Console has your initial heart rate do not move or shift your hands for 10 to 15 seconds The Console will now vali...

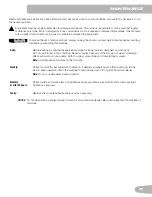
Страница 18: ...ates based on age As noted above your optimal target rate may be higher or lower Consult your physician for your individual target heart rate zone Note As with all exercises and fitness regimens alway...

Страница 19: ...fully tighten the knob Do not set the Seat Post position higher than the stop mark MAX on the tube Foot Position Pedal Strap Adjustment Foot pedals with straps provide secure footing to the exercise b...

Страница 20: ...ER 4 Use the Increase and Decrease buttons to change the resistance level default level is 3 maximum level is 8 and push ENTER 5 Push the START STOP button to start the Profile workout Pausing or Stop...

Страница 21: ...use examine the exercise machine for loose broken damaged or worn parts Do not use if found in this condition Repair or replace all parts at the first sign of wear or damage After each workout use a...

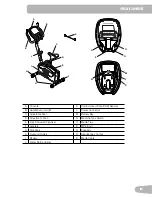
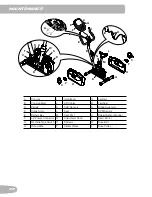
Страница 22: ...ers B Console Mast J HR Cables R Flywheel C Pedals K CHR Sensors S Brake Assembly D Crank Arms L Seat T RPM Sensor E Battery Bay M Seat Post U Speed Sensor Magnet F AC Power Connector N Adjustment Kno...

Страница 23: ...d and new batteries Do not mix alkaline standard carbon zinc or rechargeable Ni Cd Ni MH etc batteries Machine Type Switch The Machine Type switch on the Console is preset at the factory to B bike or...

Страница 24: ...ed securely to Console Sensor grip Be sure hands are centered on HR sensors Hands must be kept still with relatively equal pressure applied to each side Dry or calloused hands Sensors may have difficu...

Страница 25: ...be in place on pulley Check RPM Sensor Contact Customer Care for further assistance Unit rocks does not sit level Check leveler adjustment Leveling feet may be turned in or out to level bike Check su...

Страница 26: ...26 page intentionally left blank...

Страница 27: ...disasters power surges A machine placed or used in a commercial or institutional setting This includes gyms corporations work places clubs fitness centers and any public or privately entity that has...

Страница 28: ...Nautilus Bowflex Schwinn Fitness Universal 8000171 072312 B...

Отзывы: