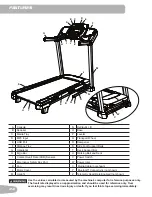
32
2. Push the User button to select the correct User profile. If you do not have a User profile set up, you can select a User
profile that has no customized data (default values only).
3. Push the Manual Category button.
4. Push the START button to begin the Manual program.
Note:
The Safety Key must be installed for a workout to begin. If not installed, the Console will display ,”INSERT
SAFETY KEY “. The Console will display “RAMPING UP” as the Walking Belt gets up to speed.
5. To change the Incline or Speed level, push the appropriate Increase or Decrease buttons. The time will count up from
00:00.
Note:
The maximum time for a Quick Start workout is 9 hours, 59 minutes and 59 seconds (9:59:59).
6. When done with your workout, push PAUSE/STOP to pause the workout. Push PAUSE/STOP again to end the work-
out.
Note:
The workout results are recorded to the current User Profile.
User Profiles
The Console lets you store and use 2 User profiles. The User profiles automatically record the workout results for each
workout, and allow the workout data to be reviewed.
The User profile stores the following data:
• Units
• Age
• Weight
• Lap (Distance of)
Select a User Profile
Every workout is saved to a User Profile. Be sure to select the proper User Profile before starting a workout. The last User
that completed a workout will be the default user.
User Profiles are assigned the default values until they are customized by editing. Be sure to edit the User Profile for more
accurate calorie and heart rate information.
Edit User Profile
1. From the Power-Up Mode screen, push t
he USER button to select one of the User Profiles.
2. Push and hold down the USER and OK buttons for three seconds to access the Edit User mode.
Note:
To exit the User Profile options, push the PAUSE/STOP button and the console will go back to the
Power-Up
Mode screen.
3. If this is the initial User setup, the Console displays the UNITS prompt and the current value.
Use the User Option Increase(
) or Decrease(
) buttons to change the value. Push the OK button to accept the
displayed value.
4.
The Console display shows the AGE prompt and the current value.
Use the User Option Increase(
) or Decrease(
) buttons to change the value. Push and hold down the Increase(
)
or Decrease(
) buttons to change the value quickly.
Push the OK button to accept the displayed value.
5.
The Console display shows the WEIGHT prompt and the current value.
Use the User Option Increase(
) or Decrease(
) buttons to change the value. Push and hold down the Increase(
)
or Decrease(
) buttons to change the value quickly.
Push the OK button to accept the displayed value.
6. The Console display shows the LAP prompt. This option controls the length of distance for a LAP during a workout. Use
the User Option Increase(
) or Decrease(
) buttons to adjust the LAP distance value. The default is “0.25” miles or
Содержание 510T
Страница 1: ...ASSEMBLY MANUAL OWNER S MANUAL 810 510T ...
Страница 17: ...17 3 1 7 Snap the Trays into the Console Assembly NOTICE Tray edges should be flush with the face of Console ...
Страница 18: ...18 5 12 G X2 8 Attach the Base Shrouds to the Frame Assembly ...
Страница 45: ...45 ...
Страница 46: ...46 ...
Страница 48: ... Nautilus Bowflex Schwinn 8021118 061519 A EN ...


