


76
C1
B
C
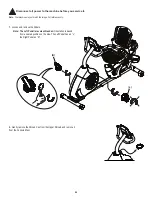
6.
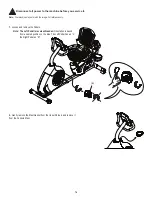
Observe the cable routing from the RPM Sensor (C) to the wiring
harness (B) on your machine. Carefully disconnect the RPM Sensor cable
(C1) from the wiring harness.
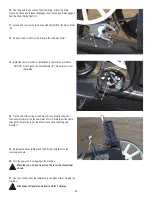
7.
Remove the hardware that attaches the RPM Sensor (C) to the Main
Frame. Carefully remove the old RPM Sensor and cable and discard it.
NOTICE:
Do not pinch or cut the cables.
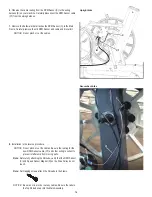
Recumbent bike
Upright bike
B
C1
D
C
8.
Installation is the reverse procedure.
NOTICE:
Do not pinch or cut the cables. Be sure the routing for the
new RPM Sensor cable (C1) and other wiring is correct to
prevent interference from moving parts.
Note:
Before fully attaching the Shrouds, verify that the RPM Sensor
(C) and Speed Sensor Magnet (D) on the Drive Pulley do not
touch.
Note:
Self-tapping screws attach the Shrouds to the Frame.
NOTICE:
Be sure not to pinch or cut any cables. Be sure the tabs in
the Top Shroud snap into the Main Assembly.


