background image

USER GUIDE

1 8

REM O T E C O N T RO L  

A .  B u t t o n  f u n c t i o n s

1 .  Up / Do w n  m o v e m e n t

When the   button is pressed, the TV bracket moves up to the position closest to the ceiling.

Upon pressing the   button, the TV bracket will move down to the position with the maximum tilt angle 

(default 75°).

Press the   button to stop the movement. (Remove all obstacles from the movement area).

2 .  M e m o r y  s e t t i n g

Press and hold the 

 or 

 button for 1 second and you will hear a beep indicating that the current 

position has been stored in memory. The 

 or 

 buttons can always be used to store another position.

3 .  M e m o r y  r e c a l l

Press the 

 or 

 button and the TV bracket will automatically move to the position stored under the 

 or 

 button.

4 .  Re s e t

If the TV bracket cannot be set to the highest position (0 degrees to ceiling) or lowest position (maximum 

tilt), unplug the power cord and plug it back in. Then press and hold the   button for 5 seconds.

The TV bracket will return to the highest position, i.e. the system has reset successfully.

5 .  Se t t i n g  t h e  t i l t  r a n g e  f o r  s l o p i n g  c e i l i n g s

The TV bracket can be adjusted from 0° to 75° as standard. Please set the tilt range when using the TV bracket on a 

sloping ceiling.

P r e p a r i n g :

 Reset the system (see the instructions under A. Button functions - 4. Reset).

St e p  1 :

 Press the  ,   and   buttons and set the correct position.

St e p  2 :

 Press and hold the 

 button until the unit beeps once. 

Repeat this step 5 times. The unit will emit a long beep to indicate successful setting.

N o t e :  

 Steps 1 and 2 must be completed within 2 minutes or the unit will not be set.

N o t e :

  The remote control requires two AAA batteries (

n o t  i n c l u d e d

).

B .  M a n u a l  m o d e

If you manually raise the TV ceiling bracket to any position (except the minimum position against the ceiling), it will 

automatically return to the minimum position against the ceiling.

C .  C o d i n g  o f  t h e  c o n t r o l  u n i t  a n d  r e m o t e  c o n t r o l s


St e p  1 :

 With the bracket switched on, press 

the small button on the control unit with a 

thin tool as shown. The device will beep to 

indicate that the control unit is ready for en-

coding.


St e p  2 :

 Press the 

 button on the remote 

control and the control unit will beep repeat-

edly for about 10 seconds, indicating that 

the remote control is being programmed. 

The process will be completed automatically 

until no beep is heard.

N o t e :

 The TV bracket can be paired with up 

to 20 remote controls. To delete all remote controls, press and hold the code setting button for 5 seconds and then re-

lease it. The device will beep twice to confirm successful deletion, otherwise deletion is not done.

Содержание 4004005035971

Страница 1: ...G ROOF TV BRACKET MODE D EMPLOI ET CONSIGNES DE SÉCURITÉ SUPPORT TV POUR PLAFOND INCLINÉ ISTRUZIONI PER L USO E AVVERTENZE DI SICUREZZA SUPPORTO TV PER SOFFITTI INCLINATI BEDIENINGSHANDLEIDING EN VEILIGHEIDSINSTRUCTIES TV SCHUIN DAK HOUDER max 400 3 max 108 mm 23 55 max cm 140 INCL INCLUSIVE QUICK CONNECT HOLE max 75 ...

Страница 2: ...gsanleitung beschrieben Jede andere Verwendung gilt als nicht bestimmungsgemäß und kann zu Sachschäden führen Das Produkt dient zur Montage von geeigneten TV Geräten an Decken oder Schrägen Es wird motorisch verstellt Die Bedienung erfolgt dabei über die beiliegende Fernbedienung Als Stromversorgung für die motorische Verstellung darf nur das mitgelieferte Netzteil verwendet werden Das Netzteil is...

Страница 3: ...ung gekommen sind Reinigen Sie das Gerät nicht wenn es noch an das Stromnetz angeschlossen ist Demontieren oder ersetzen Sie keine Komponenten während das Gerät noch an die Stromversorgung angeschlossen ist Ziehen Sie den Stecker aus der Steckdose wenn das System nicht benutzt wird und legen Sie den Netzstecker außer halb der Reichweite von Kindern ab WARNUNG Ge f a h r e n f ü r Ki n d e r u n d ...

Страница 4: ...Fachmann Je nach Untergrund z B Holz ist dafür geeignetes Montagematerial zu verwenden nur Schrauben und ohne Dübel usw Aufgrund des Gesamtgewichts des montierten Produktes und der Hebelwirkung ist auf eine stabile Befestigung zu achten Bestimmen Sie immer die Tragfähigkeit der Unterkonstruktion Die Unterkonstruktion muss mindestens das 10 fache des maximalen Gewichtes von Deckenhalterung und inst...

Страница 5: ...reitzustellen Der Monteur muss sich vergewissern dass der Untergrund das Gesamtgewicht des Geräts und aller daran befestigten Teile und Komponenten sicher tragen kann Der Monteur muss die Verwendung von geeigneten Schrauben und Dübel passend zum Untergrund sicher stellen 1 M O NTAGE H O LZ M AUER W ER K BETO N ...

Страница 6: ...BEDIENUNGSANLEITUNG 6 2 Entfernen Sie die unteren Schrau ben von der VESA Platte und be wahren Sie die beiden Schrauben zur späteren Verwendung auf ...

Страница 7: ...BEDIENUNGSANLEITUNG 7 3 ACHTUNG Ziehen Sie die Schrauben NIC H T zu fest an ...

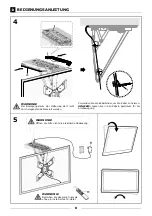
Страница 8: ...urch Gegenstände blockiert werden WARNUNG Betreiben Sie das Gerät niemals ohne ein installiertes TV Gerät WARNUNG Öffnen Sie bitte nicht die elektrische Abdeckung Verwenden Sie die Kabelbinder um die Kabel zu fixieren HINWEIS Lassen Sie in den Kabeln Spielraum für die Armbewegung ...

Страница 9: ...Anleitung unter A Tastenfunktionen 4 Modus zurücksetzen Sc h r i t t 1 Drücken Sie die Tasten und und stellen Sie die richtige Position ein Sc h r i t t 2 Drücken Sie die Taste und halten Sie sie gedrückt bis das Gerät einmal piept Wiederholen Sie diesen Schritt 5 mal Das Gerät gibt einen langen Signalton aus um den Erfolg anzuzeigen H i n w e i s Die Schritte 1 und 2 sollten innerhalb von 2 Minut...

Страница 10: ...e rote Betriebsanzeige zu sehen ist prüfen Sie bitte ob der Netzadapter richtig funktio niert Wenn der Netzadapter nicht funktioniert kontaktieren Sie uns Wenn der Netzadapter richtig funktioniert aber die TV Halterung nicht funktioniert kontaktieren Sie uns bitte Ab n o r m a l e s Ge r ä u s c h Bitte kontaktieren Sie uns En t s o r g u n g Elektrische und elektronische Geräte sowie Batterien dü...

Страница 11: ...s considered improper and may result in property damage The product is used for mounting suitable TV equipment to straight or sloping ceilings Its adjustment is motorised and can be controlled via the remote control provided Only the mains adapter supplied may be used as a power supply for the motorised adjustment The mains adapter is approved only for connection to an AC voltage of 100 240 V 60 5...

Страница 12: ...act with liquids Do not clean the unit when it is still connected to the mains Do not disassemble or replace any parts while the unit is still connected to the mains Unplug the unit from the mains when not in use and keep it out of the reach of children WARNING H a z a r d s f o r c h i l d r e n a n d p e r s o n s w i t h r e d u c e d p h y s i c a l s e n s o r y o r m e n t a l a b i l i t i ...

Страница 13: ...should be used only screws without plugs etc Due to the overall weight of the mounted product and the leverage effect care must be taken to ensure a stable instal lation Always determine the load bearing capacity of the underlying structure This structure must be able to support at least 10 times the maximum weight of the ceiling bracket and the installed screen to ensure adequate safety Plan the ...

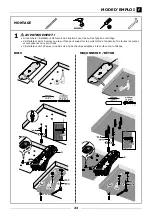
Страница 14: ...ther types of mounting The installer must ensure that the surface can support the total weight of the device and all parts and components attached to it The installer must ensure that screws and plugs suitable for the surface are used 1 M O UN T IN G W O O D M A SO N RY C O N C RET E ...

Страница 15: ...USER GUIDE 1 5 2 Remove the lower screws from the VESA plate and save them for later use ...

Страница 16: ...USER GUIDE 1 6 3 CAUTION Do N O T overtighten the screws ...

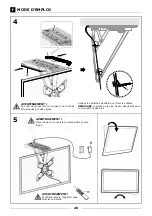
Страница 17: ...the bracket should not be blocked by objects WARNING Never use the device without an installed TV WARNING Do not open the cover of the electrical compart ment Use the cable ties to secure the cables NOTE Allow clearance at the cables for arm movement ...

Страница 18: ...iling P r e p a r i n g Reset the system see the instructions under A Button functions 4 Reset St e p 1 Press the and buttons and set the correct position St e p 2 Press and hold the button until the unit beeps once Repeat this step 5 times The unit will emit a long beep to indicate successful setting N o t e Steps 1 and 2 must be completed within 2 minutes or the unit will not be set N o t e The ...

Страница 19: ...s working properly If the mains adapter does not work please contact us Contact us if the mains adapter works properly but the TV bracket does not A b n o r m a l n o i s e Please contact us Di s p o s a l Do not dispose of batteries or electric and electronic devices in the normal household waste The consumer is le gally obliged to return electrical and electronic devices and batteries that are a...

Страница 20: ...e utilisation est considérée comme inappropriée et peut entraîner des dommages matériels Ce produit est utilisé pour le montage d équipements de télévision appropriés sur des plafonds droits ou inclinés Son réglage est motorisé la commande s effectue à l aide de la télécommande fournie Seul l adaptateur secteur fourni peut être utilisé comme alimentation pour le réglage motorisé L alimentation n e...

Страница 21: ...e nettoyez pas l appareil lorsqu il est encore branché sur le secteur Ne démontez pas et ne remplacez pas les pièces lorsque l appareil est encore branché sur le secteur Débranchez l appareil du secteur lorsqu il n est pas utilisé et gardez le hors de portée des enfants AVERTISSEMENT Da n g e r s p o u r l e s e n f a n t s e t l e s p e r s o n n e s a y a n t d e s c a p a c i t é s p h y s i q ...

Страница 22: ...il convient d utiliser des matériaux de fixation appropriés uniquement des vis sans chevilles etc En raison du poids total du produit monté et de l effet de levier il faut veiller à ce que l installation soit stable Détermi nez toujours la capacité de charge de la surface porteuse Elle doit être capable de supporter au moins 10 fois le poids maximal du support TV et de l écran installé pour garant...

Страница 23: ... types de montage L installateur doit s assurer que la surface peut supporter le poids total de l appareil et de toutes les pièces et composants qui y sont fixés L installateur doit s assurer que des vis et des chevilles adaptées à la surface sont utilisées 1 MON T A G E B OIS MA Ç ON N ER IE B É T ON ...

Страница 24: ...MODE D EMPLOI 2 4 2 Retirez les vis inférieures de la plaque VESA et conservez les pour une utilisation ultérieure ...

Страница 25: ...MODE D EMPLOI 2 5 3 ATTENTION N e s e r r e z p a s t r o p les vis ...

Страница 26: ...e bloquée par des objets AVERTISSEMENT N utilisez jamais l appareil sans téléviseur installé AVERTISSEMENT N ouvrez pas le couvercle du compartiment élec trique Utilisez les attaches de câble pour fixer les câbles REMARQUE Laissez du jeu au niveau des câbles pour le mouvement des bras ...

Страница 27: ... le support TV sur un plafond incliné Pr é p a r a t i o n Réinitialisez le système voir les instructions sous A Fonctions des boutons 4 Réinitialisation É t a p e 1 Appuyez sur les boutons et et réglez la position correcte É t a p e 2 Appuyez sur le bouton et maintenez le enfoncé jusqu à ce que l appareil émette un bip Répétez cette étape 5 fois L appareil émet un long bip pour indiquer la réussi...

Страница 28: ... nous contacter Contactez nous si l adapta teur secteur fonctionne correctement mais que le support TV ne fonctionne pas B r u i t a n o r m a l Veuillez nous contacter É l i m i n a t i o n Les appareils électriques et électroniques ainsi que les piles ne doivent pas être jetés avec les déchets ménagers Le consommateur est légalement tenu de remettre les appareils électriques et électroniques ain...

Страница 29: ...escritto in queste istruzioni per l uso Qualsiasi altro uso è considerato improprio e può causare danni alle cose Il prodotto è utilizzato per il montaggio di apparecchiature TV adatte a soffitti o sezioni di tetti inclinati È motorizzato Si aziona con il telecomando in dotazione Solo l adattatore di rete fornito può essere utilizzato come alimentazione per la regolazione motorizzata L alimentator...

Страница 30: ...ono state in contatto con liquidi Non pulire l unità quando è ancora collegata alla rete elettrica Non smontare o sostituire alcuna parte mentre l unità è ancora collegata alla tensione di rete Scollegare l unità dalla rete elettrica quando non è in uso e tenerla fuori dalla portata dei bambini AVVERTENZA Pe r i c o l i p e r i b a m b i n i e l e p e r s o n e c o n r i d o t t e c a p a c i t à ...

Страница 31: ...lo viti senza tasselli ecc A causa del peso complessivo del prodotto montato e dell effetto leva occorre prestare attenzione per garantire un instal lazione stabile Determinare sempre la capacità portante della struttura sottostante La struttura deve essere in grado di sostenere almeno 10 volte il peso massimo del supporto da soffitto e del monitor installato per garantire una sicurezza adeguata P...

Страница 32: ... montaggio L installatore deve assicurarsi che la superficie possa sostenere il peso totale del dispositivo e di tutte le parti e i componenti ad esso collegati L installatore deve assicurarsi che vengano utilizzate viti e tasselli adatti alla superficie 1 MON T A G G IO LEG N O MU R A T U R A C A LC ES T R U Z Z O ...

Страница 33: ...MA N U A LE IS T R U Z ION I 3 3 2 Rimuovere le viti inferiori dalla piastra VESA e conservare le due viti per un uso successivo ...

Страница 34: ...MA N U A LE IS T R U Z ION I 3 4 3 ATTENZIONE N ON S T R IN G ER E T R OPPO le viti ...

Страница 35: ... del supporto non deve esse re bloccata da oggetti AVVERTENZA Non utilizzare mai il dispositivo senza un televisore installato AVVERTENZA Non aprire il coperchio elettrico Usate le fascette per fissare i cavi NOTA Lasciare spazio nei cavi per il movimento delle braccia ...

Страница 36: ...e il sistema vedere le istruzioni in A Funzioni dei pulsanti 4 Modalità di reset Pa s s o 1 Premere i pulsanti e e impostare la posizione corretta F a s e 2 Premere e tenere premuto il pulsante finché l unità non emette un segnale acustico Ripetere questo passo 5 volte L unità emetterà un lungo segnale acustico per indicare il successo A v v e r t e n z a I passi 1 e 2 devono essere completati ent...

Страница 37: ...correttamente Se l adattatore AC non funziona contattateci Contattateci se l adattatore di rete funziona correttamente ma il supporto TV no S u o n o a n o m a l o Per favore contattateci S m a l t i m e n t o Le apparecchiature elettriche ed elettroniche e le batterie non devono essere smaltite insieme ai rifiuti domestici Il consumatore è tenuto per legge a restituire apparecchiature elettriche ...

Страница 38: ...eschouwd als niet beoogd en kan leiden tot materiële schade Het product wordt gebruikt voor het monteren van geschikte tv apparatuur aan plafonds of schuine dakdelen Het wordt motorisch versteld De bediening gebeurt met de meegeleverde afstandsbediening Alleen de meegeleverde netadapter mag als voeding worden gebruikt voor het motorisch verstellen De voeding is uitsluitend voor aansluiting op een ...

Страница 39: ...jn geweest Maak het apparaat niet schoon als het nog op de netspanning is aangesloten Demonteer of vervang geen onderdelen terwijl het apparaat nog op de netspanning is aangesloten Haal de stekker van het apparaat uit het stopcontact wanneer het systeem niet in gebruik is en houd het buiten het bereik van kinderen WAARSCHUWING Ge v a a r v o o r k i n d e r e n e n p e r s o n e n m e t v e r m i ...

Страница 40: ...voeren Afhankelijk van het oppervlak bijv hout moet geschikt bevestigingsmateriaal worden gebruikt alleen schroeven zonder pluggen enz Vanwege het totale gewicht van het gemonteerde product en het hefboomeffect moet gelet worden op een stabiele montage Bepaal altijd het draagvermogen van de onderliggende constructie De constructie moet ten minste 10 maal het maximumgewicht van de plafondmontage en...

Страница 41: ...or andere soorten mon tage De installateur moet ervoor zorgen dat het oppervlak het totale gewicht van het apparaat en alle eraan be vestigde onderdelen en componenten kan dragen De installateur moet ervoor zorgen dat voor de ondergrond geschikte schroeven en pluggen worden gebruikt 1 M O NTAGE H O UT M ETSELW ER K BETO N ...

Страница 42: ...BEDIENINGSH ANDLEIDING 4 2 2 Verwijder de onderste schroeven uit de VESA plaat en bewaar de twee schroeven voor later ge bruik ...

Страница 43: ...BEDIENINGSH ANDLEIDING 4 3 3 OPGELET Draai de schroeven NIET te vast aan ...

Страница 44: ... steun mag niet door objecten worden geblokkeerd WAARSCHUWING Gebruik het apparaat nooit zon der een geïnstalleerde tv WAARSCHUWING Open het elektrische deksel niet Gebruik de kabelbinders om de kabels vast te zetten AANWIJZING Laat ruimte in de kabels voor armbe weging ...

Страница 45: ...ructies onder A Functies van de knoppen 4 Resetmodus St a p 1 Druk op de knoppen en en stel de juiste positie in St a p 2 Houd de knop ingedrukt tot het apparaat één keer piept Herhaal deze stap 5 keer Het apparaat laat een lange pieptoon horen om aan te geven dat het is gelukt Aa n w i j z i n g Stap 1 en 2 moeten binnen 2 minuten worden voltooid anders wordt het apparaat niet gereset Aa n w i j ...

Страница 46: ...an of de netadapter goed werkt Als de netadapter niet werkt neem dan contact met ons op Neem contact met ons op als de netadapter wel goed werkt maar de tv steun niet Ab n o r m a a l g e l u i d Neem contact met ons op Af v a l v e r w e r k i n g Elektrische en elektronische toestellen alsook accu s mogen niet met het huishoudelijk afval verwerkt worden De verbruiker is wettelijk verplicht elekt...

Страница 47: ...ekarte vollständig ausgefüllt mit beizulegen Die Garantie und Gewährleistung bezieht sich nur auf solche Mängel die auf Herstellungs oder Ma terialfehler zurückzuführen sind Für Schäden aufgrund unsachgemäßer Hand habung oder unsachgemäßen Eingriffs sowie für Schäden verursacht durch Blitzeinschlag Über spannung Stromausfall Brand oder andere natür liche Katastrophen kann keine Garantie oder Ge wä...

Страница 48: ... O TLINE 49 09101 702 299 An s c h r i f t Schwaiger GmbH Würzburger Straße 17 90579 Langenzenn info schwaiger de www schwaiger de Irrtümer Abweichungen und Änderungen bei den technischen Angaben und Abbildungen vorbehalten ...

Отзывы: