Attachment and disassembly of the chuck
32
01.00|ROTA THWplus |en
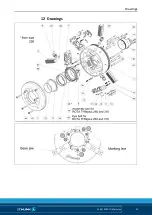
• With its slot for the jaw-change bolt (item 8), the eccentric bolt
(item 10) is joined to the wedge bar (item 9) in extension of the
groove. This is the position for operation and assembly of the
chuck. For disassembly, the eccentric bolt (item 10) has to be
turned clockwise by approx. 15° using a suitable tool.
• Push out the eccentric bolt (item 10) from the diagonal pull side
of the wedge bar (item 9) up to approx. 6 mm. The thrust bolt
(item 12) then becomes visible. The displacement force is re-
duced through slight pressure on the serration.
• Secure the thrust bolt (item 12) against flying off and then
completely remove the eccentric bolt (item 10) out of the
wedge bar (item 9).
• Take the angle with plunger pin (item 15) and pressure piece
(item 16) with compression spring (item 34) off the wedge bar.
• The pin (item 11) is securely glued into the eccentric bolt (item
10).
Clean all individual components and check them for damage and
wear.
Only original SCHUNK spare parts may be used.
The chuck is assembled in the same way but in the reverse order.
Before installation, lubricate parts well with LINO MAX special
grease.
CAUTION
Allergic reactions due to grease in contact with skin!
Wear gloves.
See also
Содержание ROTA THW plus 165-43
Страница 41: ...Drawings 01 00 ROTA THWplus en 41 Drawings 12 ...
Страница 42: ...Drawings 42 01 00 ROTA THWplus en ...


