


6
Montage- und Betriebsanleitung für
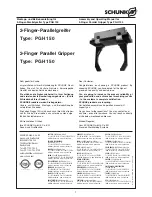
2-Finger-Parallelgreifer Type PGH 150
Assembly and Operating Manual for
2-Finger Parallel Gripper Type PGH 150
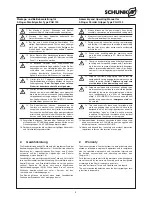
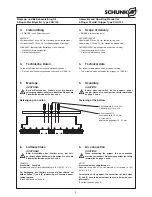
Zu
Closed
Auf
Open
Zu
Closed
Auf
Open
Seite
Side
[
1
]
Seite
Side
[
2
]
7.
Problemanalyse
Der Greifer bewegt sich nicht:
– Luftversorgung überprüfen
– Mindestdruck unterschritten
– Luftleitungen vertauscht
– Nährungsschalter defekt oder falsch eingestellt
– Nicht benötigte Luftanschlüsse nicht verschlossen
Der Greifer macht nicht den vollen Hub:
– Schmutz in der Führung unter dem Faltenbalg
– Mindestdruck unterschritten
Die Greifkraft lässt nach:
– Dichtungen überprüfen
– Greifer reinigen und neu schmieren
– Luftversorgung überprüfen
Der Greifer öffnet oder schließt stoßartig:
– Greifer reinigen und neu schmieren
8.
Wartung und Pflege
Unbedingt die Sicherheitshinweise auf den Seiten 3
und 4 beachten.
Um die Funktion des Greifers zu erhalten, müssen folgende
Hinweise beachtet werden:
– Blanke außenliegende Stahlteile müssen geölt oder gefettet
werden.
– Bei jeder Wartung die Dichtungen auswechseln (Dichtsatz liste
siehe Kapitel 9.1). Der Dichtsatz ist bei SCHUNK erhältlich.
– Soweit nicht anders vorgeschrieben, alle Schrauben, Gewinde-
stifte und Muttern mit einem Anzugsmoment nach DIN oder
Herstellerangaben festziehen und mit Loctite 243 sichern.
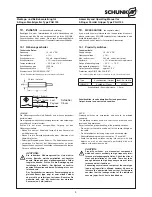
8.1 Wartungs- und Pflegeintervalle
Wartungsintervalle und Dichtungswechsel
7.
Trouble shooting
The gripper does not move:
– Check the air supply
– Minimum pressure not reached
– Air pipes confused
– Proximity switch defective or incorrectly set
– Unused air connections not closed
The gripper does not complete full stroke:
– Dirt inside the guidance below the bellows
– Minimum pressure not reached
The gripping force is becoming weaker:
– Check seals
– Clean the gripper and lubricate it again
– Check air supply
The gripper opens or closes jerkily:
– Clean the gripper and lubricate it again
8.
Maintenance and care
Please consider the safety information on pages
3 and 4.
In order to keep the gripper properly functionning, consider
the following notes:
– The blank exterior steel parts must be lubrified and greased.
– At every maintenance of the gripper all seals have to be
exchanged (see seal kit list, chapter 9.1). The seal kit is
available at SCHUNK.
– All screws, set screws and nuts should be fastened with the
corresponding torque (according to DIN or manufacturer’s
instructions) and be secured with Loctite 243.
8.1 Maintenance intervals
Maintenance intervals and exchange of seals
PGH
150
Wartungsintervalle (Mio. Zyklen)
2
PGH
150
Maintenance intervals (million cycles)
2


