background image


_________________________________________________________________________________________ 

schunk.com 


XND.00005.022_A – 10/2018   


 37


8


Assembly drawing 


Содержание KSG 100

Страница 1: ..._____________________________________ schunk com XND 00005 022_A 10 2018 1 Montage und Betriebsanleitung Installation and operating instruction Maschinenschraubstock Machine vice KSG H D SCHUNK GmbH Co Spanntechnik KG Lothringer Strasse 23 D 88512 Mengen ...

Страница 2: ...7 2 7 Persönliche Schutzausrüstung 7 2 8 Gewährleistung 7 3 Beschreibung des Spannmittels 8 3 1 Anwendungen 8 3 1 1 Spannbereich einstellen 8 3 1 2 Spannen 8 3 1 3 Lösen 8 3 1 4 Ausbau der Spindelbaugruppe 9 3 1 5 Einbau der Spindelbaugruppe 9 3 1 6 Systembacken wechseln 9 3 1 7 Abdeckbleche 9 3 2 Funktion 10 4 Betrieb Normalbetrieb 10 4 1 Aufspannen Ausrichten 10 4 2 Backensortiment 11 5 Wartung ...

Страница 3: ...10 3 Fehlersuche Störungsbeseitigung 19 10 4 Demontage Montage 19 11 KSG hydraulisch 20 11 1 Funktion 20 11 2 Technische Daten 20 11 3 Wartung Reinigung Instandhaltung 21 11 4 Fehlersuche Störungsbeseitigung 21 11 5 Demontage Montage 21 11 6 Risiken Hydraulik 22 12 Ausserbetriebnahme 22 13 Zertifikat 22 14 EG Einbauerklärung 23 ...

Страница 4: ...Bezeichnet eine mögliche gefährliche Situation Wenn die Information nicht befolgt wird können Tod oder schwerste Körperverletzungen Invalidität die Folge sein WARNUNG Bezeichnet eine möglicherweise gefährliche Situation Wenn die Information nicht befolgt wird können Sachschäden sowie leichte oder mittlere Körperverletzungen die Folgen sein Hinweis auf nützliche Tipps oder von Sachschäden HINWEIS B...

Страница 5: ... 70 0 kg Weitere Daten siehe aktueller Katalog Schunk stationäre Spanntechnik 2 2 Vernünftigerweise vorhersehbare Fehlanwendung Eine andere als die unter Bestimmungsgemässe Verwendung festgelegte oder über diese hinausgehende Benutzung gilt als nicht bestimmungsgemäss und ist verboten Jede andere Verwendung Bedarf einer Rücksprache mit dem Hersteller Beispiele für vorhersehbare Fehlanwendungen Spa...

Страница 6: ...ystembacken können zu Beschädigungen führen Hinweise dazu finden sich im Kapitel 4 Betrieb 2 3 2Hinweise zur Spanntechnologie Der Bediener stellt sicher dass die Spanngeometrie und die Spannkräfte der gewählten Bearbeitungsart entsprechen Die Spannkräfte werden nur bei einer korrekten Funktion des Spannmittels und bei korrekter Werkstückeinspannung erreicht Eine regelmässige Wartung und Reinigung ...

Страница 7: ...ng WARNUNG Augenverletzung durch fliegende heisse Späne Fliegende heisse Späne können zu schweren Augenverletzungen führen Bei sämtlichen Arbeiten an der Maschine gelten die Vorschriften der Arbeitssicherheit und Unfallverhütung Zu jeder Zeit ist eine persönliche Schutzausrüstung zu tragen insbesondere Sicherheitsschuhe Handschuhe und Schutzbrille 2 8 Gewährleistung Die Gewährleistung beträgt 24 M...

Страница 8: ...rungen zurückstellen damit ein Spalt von max 2 mm zum Werkstück entsteht Damit liegt die die Spannöffnung innerhalb des max Zustellhubes Einzelfertigung Für eine Einzelfertigung ist ein Spalt nicht zwingend notwendig Durch manuelles Vorspannen des Werkstückes am Rändelgriff wird die Vorspannkraft und somit die Endkraft erhöht 3 1 2Spannen Gewünschte Spannkraft am Einstellring 2 einstellen Vor dem ...

Страница 9: ...fluchten Kupplungsbolzen mit Werkzeug durch seitliche Bohrung einbauen Kontrollieren ob ein Einrasten des Bolzens in der Zugstange spürbar ist Markierung am Rändelstift Pos 120 muss bündig mit der Seitenfläche des Grundkörpers sein Je nach Baugrösse unterschiedlich Optische Kontrolle von oben Rändelstift entfernen und am Spannhebel einschrauben 3 1 6Systembacken wechseln Schrauben lösen und System...

Страница 10: ...n im Grundkörper oder mit seitlichen Spannpratzen und Befestigungs schrauben Auf eine Rasterplatte mit zwei Passschrauben durch Positionierbohrungen Ø12 F7 bzw Ø16 F7 Für besonders genaues Ausrichten wird empfohlen die feste Systembacke mit Messuhr abzufahren Der KSG kann werkseitig auch mit kundenspezifischen Positionier und Befestigungs bohrungen sowie Aufnahmen für verschiedene marktbegleitende...

Страница 11: ...nspruchung zweimal pro Woche 6 Fehlersuche Störungsbeseitigung Spanner ist schwergängig Demontieren reinigen und beschädigte Flächen vorsichtig abziehen Einstellring festsitzend Var 1 Einstellring zu stark eingedreht Spalt A beträgt ca 0 mm Einstellring muss zum Lösen im Gegenuhrzeiger Sinn gedreht werden Var 2 Einstellring zu stark ausgedreht Spalt A beträgt ca 2 mm Einstellring muss zum Lösen im...

Страница 12: ...Einstellring mehrmals hin und her drehen Gegebenenfalls Spindelbaugruppe austauschen Zustellhub der mechanischen Kraftkassette verstellt sich Ist dies beim Einstellen des Spannbereiches der Fall so ist eine erhöhte Dichtungsreibung im Rändelgriff zwischen Zugstange und Spindel vorhanden Aufquellen der Dichtung unter dem Einstellring durch Kühlflüssigkeit Verschmutzung o ä Spindelbaugruppe ausbauen...

Страница 13: ...chst horizontal ausrichten Lage der Sicherungsschraube für Bolzen nach oben ausrichten Durch das linke oder rechte Gewinde im Grundkörper mit Durchschlag o ä die seitliche Bohrung im Gehäuse der mechanischen Kraftkassette Pos 50 ausrichten Gewindestift Pos 140 auf der gegenüberliegenden Seite eindrehen bis der Zapfen in der Gehäusebohrung eingreift Zweiten Gewindestift Pos 140 eindrehen bis der Za...

Страница 14: ...u muss die feste Systembacke entfernt werden und der Kupplungsbolzen durch 90 Drehung des Spannhebels in vertikale Lage gebracht werden Nun kann der Bolzen mit dem Ausbauwerkzeug entfernt werden 7 2 Montage Bei Montage ausreichend schmieren Spindelbaugruppe in Grundkörper einfahren Durch drehen am Rändelgriff sicherstellen dass die Bohrungen der mechanischen Kraftkassette und der Spindelbaugruppe ...

Страница 15: ..._________________________________________________________________________________________ schunk com XND 00005 022_A 10 2018 15 8 Zusammenbauzeichnung ...

Страница 16: ...160 061 01 Spindelbaugruppe 1 70 GPS 100 020 11 GPS 125 020 11 GPS 125 020 11 Kupplungsbolzen 1 80 GPS 100 040 11 GPS 125 040 11 GPS 160 040 11 Schutzplatte zu Backe beweglich 2 90 GPS 125 028 12 Markenschild 2 100 GPA 100 025 01 GPA 125 025 01 GPA 160 025 01 Abdeckbleche 1 Satz 1 110 GPS 125 070 03 Spannhebel 1 120 GPS 125 077 02 Rändelstift 1 130 XNN 10311 471 XNN 10311 523 XNN 10301 625 Zyl Sch...

Страница 17: ...en leicht weichen können bis das Spiel in der Zapfenaufnahme aufgehoben ist Die Werkstückposition ist zu vermessen beziehungsweise der Nullpunkt ist erst nach 3 5 vorangegangenen Kraftspannungen festzulegen Handling der demontierten Pendelplatte Der konische Drehzapfen kann herausgezogen werden da er in Gegenrichtung nur durch einen O Ring in Position gehalten wird Beim Handling soll die Pendelpla...

Страница 18: ...it aussen wie möglich gespannt wird Abdeckschrauben so versetzen dass die gewählte Montageposition frei ist 6 fach Wendebacken positionieren und die Zylinderschrauben M12 lose einschrauben 6 fach Wendebacken auf die gewünschte Spannfläche drehen und Werkstück leicht vorspannen so dass die Spannflächen parallel am Werkstück anliegen Zylinderschrauben M12 der 6 fach Wendebacken mit 80 Nm festziehen ...

Страница 19: ...pensiert werden 10 2Wartung Reinigung Instandhaltung Siehe Seite 12 10 3Fehlersuche Störungsbeseitigung Siehe Seite 12 und 13 10 4Demontage Montage Das KSG 5A System ist kompatibel zu allen KSG Standard mit gleicher Baugrösse Um beziehungsweise Rückbau der Systembacke fest durch einfachen Backenwechsel siehe Seite 10 Um beziehungsweise Rückbau der bewegliche 5A Trägerbacke Ausbau der Spindelbaugru...

Страница 20: ...nnkraft erfolgt über die Regelung des Hydraulikdruckes gemäss Diagramm Hydraulik Anschlüsse KSG 125 H KSG 160 H 11 2Technische Daten Typ max Spannkraft max Spannhub Oel Volumen bei max Hub Spannzeit z B bei Pumpenleistung 3 6l min Ein Spanner Zwei Spanner KSG 125 H 40 kN 5 mm 13 cm ca 0 22 sec ca 0 45 sec KSG 160 H 70 kN 6 mm 21 cm ca 0 35 sec ca 0 70 sec 0 10 20 30 40 0 25 50 75 100 125 150 175 2...

Страница 21: ...er Hydraulikzylinder und die Spindelbaugruppen sind kompatibel zu allen KSG Standard 125 bzw 160 Ein Um beziehungsweise Rückbau erfolgt durch einfachen Austausch siehe Seite 10 und 14 Ausnahme KSG 160 H Aus bzw Einbau Spindelbaugruppe Systembacke fest entfernen Kupplungsbolzen mit Hilfe einer Schraube M5 nach oben herausziehen Spindelbaugruppe mit beweglicher Systembacke kann ausgebaut werden Einb...

Страница 22: ... beim Schliessen der Finger gequetscht werden kann Bei der Fertigung von eigenen Systembacken oder beim Einsatz von Alu Backen ist darauf zu achten dass Absätze vermieden werden welche zu Quetschgefahren führen Druckerhaltung während dem Betrieb Hydraulikzylinder können geringe Leckagen aufweisen Beim Fräsen müssen die Spannmittel stets vom Hydraulikaggregat versorgt werden um sicherzustellen dass...

Страница 23: ... festgestellt wurde dass die Maschine in die unvollständige Maschine eingebaut werden soll den Bestimmungen der Maschinenrichtlinie 2006 42 EG entspricht Angewandte harmonisierte Normen insbesondere EN ISO 12100 2011 03 Sicherheit von Maschinen Allgemeine Gestaltungsleitsätze Risikobeurteilung und Risikominderung EN 62079_2001 Erstellen von Anleitungen Gliederung Inhalt und Darstellung Der Herstel...

Страница 24: ...ent 29 2 8 Warranty 29 3 Description of the clamping device 30 3 1 Applications 30 3 1 1 Adjusting the clamping range 30 3 1 2 Clamping 30 3 1 3 Releasing 30 3 1 4 Removing the spindle assembly 31 3 1 5 Fitting the spindle assembly 31 3 1 6 Changing jaws 31 3 1 7 Cover sheets 31 3 2 Fuction 32 4 Operation standard operation 32 4 1 Clamping aligning 32 4 2 Jaw range 33 5 Servicing cleaning maintena...

Страница 25: ...rts 41 11 KSG hydraulic 42 11 1 Function 42 11 2 Technical data 42 11 3 Servicing cleaning maintenance 43 11 4 Troubleshooting eliminating faults 43 11 5 Removing and replacing parts 43 11 6 Risks of hydraulic system 44 12 Taking out of service 44 13 Zertifikat Certificat 45 13 1 Winkligkeit Angles 46 13 2 Form und Lagetoleranzen Form and positional tolerances 47 14 EC declaration of incorporation...

Страница 26: ...anent disability will result WARNING Indicates a potentially dangerous situation If the information is ignored it is possible that death or serious injury permanent disability will result WARNING Indicates a potentially dangerous situation If the information is ignored it is possible that material damage and light to medium injury will result Information on useful tips or for preventing material d...

Страница 27: ... 160 Standard 70 0 kg For further data please see the current catalogue Schunk stationary Workholding 2 2 Reasonably foreseeable misapplication Any application that is not in accordance with the Intended use or exceeds such intended use is considered not in accordance with the regulations and is forbidden Any other use of the device is subject to confirmation from the manufacturer Examples of fors...

Страница 28: ...2 3 2Notes on clamping technology The operator is responsible for ensuring that the clamping geometry and clamping forces are suitable for the intended processing The clamping forces can only be achieved if the clamping device functions correctly and the workpiece is correctly held in the device Regular servicing and cleaning in accordance with the operating instructions is mandatory in order to e...

Страница 29: ...ment WARNING Risk of eye injury through ejected hot fragments Ejected hot fragments can lead to serious eye injury The regulations for safety at work and the prevention of accidents always have to be observed when working with the machine Personal protection equipment must be worn at all times in particular safety boots gloves and safety goggles 2 8 Warranty The warranty period is 24 months from t...

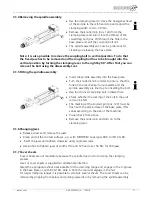
Страница 30: ...x 2 mm to the workpiece This means that the jaw opening is within the max closing range One off production For one off production a gap is not mandatory By pre tensioning the workpiece manually using the knurled knob both the pre tension and the final force are increased 3 1 2Clamping Use the setting ring 2 to set the required clamping force Before clamping the workpiece ensure that the vice is fi...

Страница 31: ...force cassette and the spindle assembly are lined up for inserting the bolt Use tool to insert coupling bolt in lateral hole Check whether the locking of the bolt in the pull rod can be felt The marking at the knurled pin pos 120 must be flush with the side surface of the base plate this varies according to the size of the machine Visual check from above Remove the knurled pin and turn on to the c...

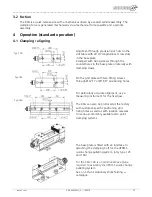
Страница 32: ...unterbores in the base plate or laterally with clamping claws On the grid plate with two fitting screws through Ø12 F7 or Ø16 F7 positioning holes For particularly accurate alignment use a measuring instrument for the fixed jaw The KSG can also be produced at the factory with customer specific positioning and fixing holes as well as with location recesses for various commonly available zero point ...

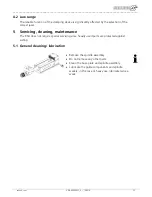
Страница 33: ...ffected by the selection of the correct jaws 5 Servicing cleaning maintenance The KSG does not require special servicing since heavily used parts are protected against soiling 5 1 General cleaning lubrication Remove the spindle assembly Do not remove any other parts Clean the base plate and spindle assembly Lubricate the guide components and spindle weekly in the case of heavy use lubricate twice ...

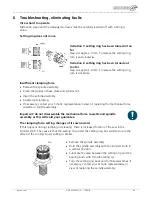
Страница 34: ...ssembly Re attempt clamping If necessary contact your Schunk representative in view of replacing the mechanical force cassette or spindle assembly Important do not disassemble the mechanical force cassette and spindle assembly as this will void your guarantee The clamping force setting changes of its own accord If this happens during clamping or releasing there is increased friction of the seal in...

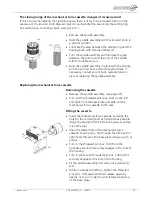
Страница 35: ... your Schunk representative in view of replacing the spindle assembly Replacing the mechanical force cassette Removing the cassette Remove the spindle assembly see page 35 Turn out the threaded pins pos 140 on the left and right from the base plate and slide out the mechanical force cassette to the rear Fitting the cassette Insert the mechanical force cassette and align the hole for the coupling b...

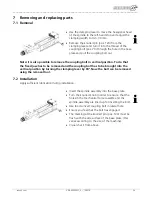
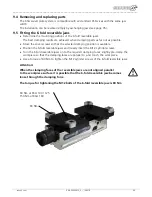
Страница 36: ...vertical position To do that the fixed jaw has to be removed and the coupling bolt has to be brought into the vertical position by turning the clamping lever by 90 Now the bolt can be removed using the removal tool 7 2 Installation Apply sufficient lubrication during installation Insert the spindle assembly into the base plate Turn the knurled knob in order to ensure that the holes in the mechanic...

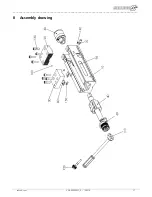
Страница 37: ..._________________________________________________________________________________________ schunk com XND 00005 022_A 10 2018 37 8 Assembly drawing ...

Страница 38: ...PS 160 061 01 Spindle assembly 1 70 GPS 100 020 11 GPS 125 020 11 GPS 125 020 11 Coupling bolt 1 80 GPS 100 040 11 GPS 125 040 11 GPS 160 040 11 Protection plate for movable jaw 2 90 GPS 125 028 12 Type plate 2 100 GPA 100 025 01 GPA 125 025 01 GPA 160 025 01 Cover sheets 1 set 1 110 GPS 125 070 03 Clamping lever 1 120 GPS 125 077 02 Knurled pin 1 130 XNN 10311 471 XNN 10311 523 XNN 10301 625 M10 ...

Страница 39: ...ocess the 6 fold reversible jaws can yield slightly until the play in the peg seating is eliminated The workpiece position must be measured the zero point should not be determined until after 3 to 5 power clampings Handling the demounted swivel plate The conical swivel peg can be pulled out since it is only held in position by an O ring in the counter direction When handling the swivel plate it sh...

Страница 40: ...the cover screws so that the selected clamping position is available Position the 6 fold reversible jaws and loosely insert the M12 cylinder screws Turn the 6 fold reversible jaws on to the required clamping faces slightly pre clamp the workpiece so that the clamping faces are parallel to and touch the workpiece Use a torque of 80 Nm to tighten the M12 cylinder screws of the 6 fold reversible jaws...

Страница 41: ...cing cleaning maintenance See page 37 10 3Troubleshooting eliminating faults See pages 38 and 39 10 4Removing and replacing parts The KSG 5A system is compatible with all standard KSG vices with the same jaw width The installation of the fixed 5A support jaw can be reversed by simply changing jaws see page 35 Reversing the installation of the movable 5A support jaw Removing the spindle assembly se...

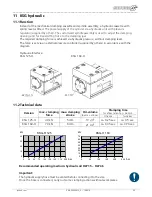
Страница 42: ... is set via an external pressure controller supplied by others in accordance with the diagram Hydraulic Interface KSG 125 H KSG 160 H 11 2Technical data Version max clamping force max clamping stroke Oil volume by max stroke Clamping time for aflow rate of e g 3 6l min One vice Two vices KSG 125 H 40 kN 5 mm 13 cm ca 0 25 sec ca 0 5 sec KSG 160 H 70 kN 6 mm 21 cm ca 0 35 sec ca 0 70 sec 0 10 20 30...

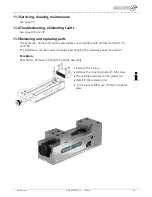
Страница 43: ...5Removing and replacing parts The hydraulic cylinder and spindle assemblies are compatible with all KSG standard 125 and 160 The installation can be reversed simply by exchanging the parts see pages 35 and 39 Exception KSG 160 H Remove or Fitting the Spindle assembly Remove the fix jaw Remove the coupling bolt with M5 screw The spindle assembly can be pulled out Install in the reverse order For th...

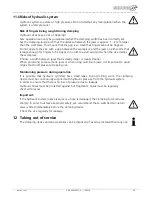
Страница 44: ...lamps the workpiece Choose a width between jaws that is clearly larger or clearly smaller When producing purpose made jaws or when using aluminium jaws it is important to avoid ridges that could present a trapping risk Maintaining pressure during operation It is possible that hydraulic cylinders have small leaks During milling work the clamping device must be continuously supplied with hydraulic p...

Страница 45: ... clamping lever for the tension is approx 160 closing and clamping action Max Anzugsment am Spannhebel max torque at clamping lever KSG 100 M max 37 5 Nm KSG 125 M max 57 5 Nm KSG 160 M max 62 5 Nm Max Spannkraft elektronisch gemessen Max clamping force measured electric KSG 100 F max 30 2 kN KSG 125 F max 40 2 kN KSG 160 F max 40 2 kN KSG 100 5A F max 18 2 kN KSG 125 5A F max 24 2 kN KSG 160 5A F...

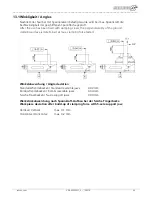
Страница 46: ... fixed with clamping claws the perpendicularity of the ground clamping surface is determined at max clamping force tested Winkelabweichung Angle deviation Standard Wendebacken Standard reversible jaws 0 02 mm Kombi Wendebacken Combi reversible jaws 0 04 mm 5 Achs Träerbacken 5 axle support jaws 0 04 mm Werkstückabweichung nach Spannkraft Aufbau bei der 5 Achs Trägerbacke Workpiece deviation after ...

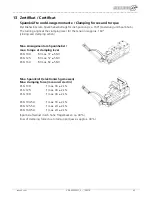
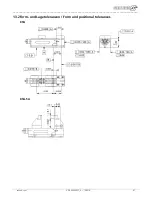
Страница 47: ..._________________________________________________________________________________________ schunk com XND 00005 022_A 10 2018 47 13 2Form und Lagetoleranzen Form and positional tolerances KSG KSG 5A ...

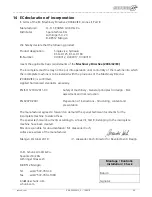
Страница 48: ...the provisions of the Machinery Directive 2006 42 EC is confirmed Applied harmonized standards especially EN ISO 12100 2011 03 Safety of machinery General principles for design Risk assessment and risk reduction EN 62079 2001 Preparation of instructions Structuring content and presentation The manufacturer agrees to forward on demand the special technical documents for the incomplete machine to st...

Отзывы: