


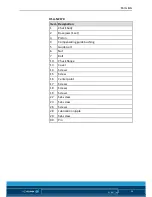


Chuck function
24
01.00| |en
HSA-NZ 170/2
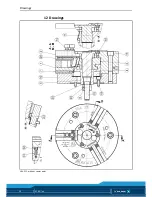
• Remove all screws (Item 26) and then remove the center
(Item 16). Unscrew the screws (Item 18) and remove the cover
(Item 13). Then unscrew further screws (Item 18) and remove
the guide bushing (Item 4).
• Pull the guide part (Item 5) with piston (Item 3) out of the
chuck body (Item 1). Pull out the bolt (Item 7). The guide part
(Item 5) and the piston (Item 3) can be detached from one
another by twisting the parts by 60° (bayonet connection).
• Slide the base jaws (Item 2) out of the guide and remove from
the chuck body.
• Remove the set-screw (Item 22). Remove the screw (Item 15)
and nut (Item 6).
HSA 400
• Unscrew the cylindrical screw (Item 18) and remove the guide
bushing (Item 4 or 11).
• Unscrew the screws (Item 29) from the chuck body.
• Remove the guide strips (Item 8 and 9). The base jaws (Item 2)
can now be removed.
• Pull the guide part (Item 5) with piston (Item 3) out of the
chuck body (Item 1). Pull out the bolt (Item 7). The guide part
(Item 5) and the piston (Item 3) can be detached from one
another by twisting the parts by 60° (bayonet connection).
• Remove the set-screw (Item 22). Remove the screw (Item 15).
HSA 630/2
• Unscrew the cylindrical screw (Item 18) and remove the guide
bushing (Item 4 or 11).
• Remove the cylindrical screw (Item 19) and set-screws
(Item 23). Remove the mounting (Item 10).
• Pull the guide part (Item 5) with piston (Item 3) out of the
chuck body (Item 1). Pull out the bolt (Item 7). The guide part
(Item 5) and the piston (Item 3) can be detached from one
another by twisting the parts by 60° (bayonet connection).
• Unscrew the screws (Item 8) out of the chuck body and slide
the base jaws outwards.


