background image

11

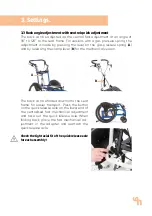
3.3 Back angle adjustment with central quick adjustment

The back can be adjusted via the central fast adjustment at an angle of 
90° to 120° to the seat frame. For versions with a gas pressure spring, the 
adjustment is made by pressing the lever on the gas pressure spring (

A

and by releasing the clamp lever (

B

) for the mechanical version.

The back can be folded down onto the seat 
frame for easier transport. Press the button 
on the quick release axle on the lower end of 
the centralised fast mechanical adjustment 
and take out the quick release axle. When 
folding back, place the fast mechanical ad-
justment in the adapter and reattach the 
quick release axle.

Check the tight axial fit of the quick release axle 

for each assembly!

3. Settings.

A

B

Содержание floyd

Страница 1: ...floyd Instructions for use floyd The robust seat pan sub frame ...

Страница 2: ...refully prior to initial commissioning of the product and to observe them Please note that gui delines and representations in these Instructions for use may deviate from your product due to differing equipment We reserve the right to make technical modifications Important information Ensure that these Instructions for use remain with the product Your schuchmann Team Many thanks ...

Страница 3: ...asic model 07 2 6 List of accessories 08 2 7 Product overview 08 2 8 General settings 09 2 9 Utilisation training 09 2 10 Climbing stairs 09 3 Settings 10 3 1 Seat tilt 10 3 2 Back angle adjustment with snap joint 10 3 3 Back angle adjustment with central quick adjustment 11 3 4 Seat height adjustment 12 3 5 Seat depth adjustment 12 3 6 Back unit adjustment 13 3 7 Push handles 13 3 8 Push bar 13 4...

Страница 4: ...g 21 7 3 Maintenance 21 7 3 1 Maintenance specifications 22 7 3 2 Maintenance plan 22 7 4 Spare parts 23 7 5 Duration of use and re use 23 7 6 Mounting repairing the tyres 23 8 Technical data 24 9 Guarantee 25 10 Identification 26 10 1 EU Declaration of Conformity 26 10 2 Serial number date of manufacture 28 10 3 Product version 28 10 4 Issue of the document 28 10 5 Name and address of the manufac...

Страница 5: ... and protect the environment to prevent environmental pollution and to improve the recycling of raw materials please note the disposal instructions in points 1 3 1 and 1 3 2 1 3 1 Packaging The packaging of the product should be kept for any future transport that might be required Should you have to return the product for repairs or in case of a guarantee claim please if possible use the original ...

Страница 6: ... seat pan can be adapted without any problems floyd is suited exclusively for use with an accom panying person 2 3 1 Indication Seating aids are used to compensate a disability with moderate to heavy incorrect sitting postures and or sitting instabilities The underlying dama ge as cause of the impaired sitting varies Often the interplay between pelvis and spine is disturbed due to congenital or ac...

Страница 7: ...limb on the footrests when entering and leaving the seat pan Apply the brakes when entering and leaving the seat pan Do not use floyd with defective worn or missing parts Use only accessories and spare parts made by Schuchmann otherwise you will compromise the safety of the user Only use the seat pan sub frame if all components have been correctly mounted and adjusted Please ensure that none of th...

Страница 8: ...intended to show you the designation of the most im portant components as well as the terms which you will find in these Inst ructions for use 2 Product description Guide wheels Knee lever brake Push bar Brake handles Base frame Quick release axle Rear wheels with hand rim and drum brake Clothing guard Base plate for external adapter Release lever Gas pressure spring Back rest support of seat unit...

Страница 9: ...a minimum of 2 accompanying persons The helpers may only hold on the the frame and firmly mounted frame parts without lifting floyd to carry When driving up stairs the helper at the back holds the chassis on the fixed handles and pulls over the steps and the helper at the bottom holds the front frame tubes and stabilises the position They also press the chas sis into the steps parallel to the floo...

Страница 10: ... pus hing Once the required seat angle has been achieved the gas pressure spring is blocked again by releasing the trigger lever There is an increased risk of tipping over with a tilted seat We therefore recommend using the optional anti tip mechanism 3 2 Back angle adjustment with snap joint The back frame can be precisely ad justed in the angle to the seat frame The adjustment is made after loo ...

Страница 11: ...ng A and by releasing the clamp lever B for the mechanical version The back can be folded down onto the seat frame for easier transport Press the button on the quick release axle on the lower end of the centralised fast mechanical adjustment and take out the quick release axle When folding back place the fast mechanical ad justment in the adapter and reattach the quick release axle Check the tight...

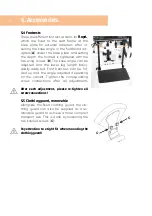
Страница 12: ...re springs must then be adjusted Loo sen the screw connections B for this and aligned to the corresponding hole distance in the same way as the ho rizontal tubes have been adjusted Tighten the screw connections again after all adjustments The setting may only may made with the seat unoccupied 3 5 Seat depth adjustment The depth of the base plate for moun ting the adapter including the seat pan can...

Страница 13: ...n height This takes place after loosening the two clamp levers A on the rear tubes The clamp lever must be tightened again after each adjustment 3 8 Push bar The design with the push bar is a more comfortable solution The angle of the push bar can be individually adjusted in addition to height adjustment using the joints with quick release B The height is adjusted after loosening the two clamp lev...

Страница 14: ...me By braking lightly on one side it is possible to achieve a steering movement when pushing Setting the drum brakes The drum brakes are set by turning the setting screws A in or out They are located at the lower end of the bra ke cable in the brake saddle Unscrew the screw a little for precise adjust ment until you hear a grinding noise with turning the rear wheel The bra ke jaws are placed light...

Страница 15: ...s pect to the danger of tipping over However manoeuvrability is lost If the rear wheels are mounted further to the front C the floyd is very manoeuv rable due to the shorter wheel distan ce However please note that there is a big risk of tipping over in this positi on This particularly applies if the seat surface is adjusted backwards see Point 3 5 Therefore always use the swing away anti tip mech...

Страница 16: ...s to the rear or front wheels the front wheels can be read justed by turning the two eccentric nuts C on the front wheel adapters It is recommen ded to use an angle bracket or similar After each adjustment please retighten all screw connections and make sure that both sides are adjusted equally After each adjustment please re tighten all screw connections 4 Handling of wheels A B C ...

Страница 17: ...ack takes place in the same way 5 3 Knee lever brake The knee lever brake serves as a par king brake Check that the brakes are in perfect working order and check the air pressure in the rear wheels be fore each use The brake is applied in the direction of travel by swinging the brake lever The correct distance bet ween the tyres and brake is important for the correct function of the brake It shoul...

Страница 18: ...eg length indivi dually adapted Foot benches can be fol ded up and the angle adjusted depending on the variant Tighten the corresponding screw connections after all adjustments After each adjustment please re tighten all screw connections 5 5 Clothing guard removable Alongside the fixed clothing guard the clo thing guard can also be supplied as a re movable guard to achieve a more compact transpor...

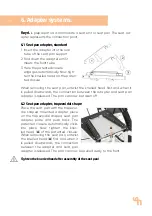
Страница 19: ...he connection between the adapter and seat pan adapter is released The pan can now be taken off 6 2 Seat pan adapter trapezoidal shape Place the seat pan with the trapezoi dal shaped mounted adapter piece on the trapezoidal shaped seat pan adapter plate and push back The patented closure automatically clicks into place Now tighten the knur led head A of the patented closure When removing the seat ...

Страница 20: ...apter Please use M6 self locking nuts min strength class 8 to fasten If using push in nuts in the seat place plea se secure the screws e g with Loctite against becoming loose due to vibrations and impacts When assembling a seat pan make sure that the seat pan body back and seat plate is made of a minimum of 3 mm aluminium sheet Also make sure that no sharp edges remain on the pan body 6 Adapter sy...

Страница 21: ...nd evenly applied with a soft cloth Alternatively wipes pre soaked with disinfectant can be used to wipe the products over the entire surface In both cases care must be taken to ensure complete wetting Disinfection in fully automatic disinfection systems is also possible and recommended The exposure times may vary and can be found in the manufacturer s ins tructions for the products used 7 2 Servi...

Страница 22: ... elements push handle armrests foot rests and leg guides Functionality of the gas pressure springs if necessary readjustment of the bowden cables Functionality of the safety elements anti tilt Functionality of brakes Functionality of the castors and rear wheels concentricity ease of operation Legibility of the type label Final complete functional check of the aid Check that all mounting parts and ...

Страница 23: ... by the specialist dealer The product is suited for re use Prior to forwarding on please follow the cleaning and disinfection instructions stated in Point 7 1 Accompanying documents such as these Instructions for use are part of the product and must be passed on to the new user No disassembly is required prior to re use In the case of storage it is re commended to fold the product to the smallest ...

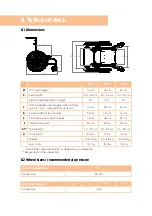
Страница 24: ...m 54 cm D Frame width at rear inside 35 cm 40 cm 44 cm E Front abduction width inside 45 cm 48 cm 52 cm F Seat frame width 30 cm 35 cm 35 cm G Total length 70 90 cm 73 93 cm 73 93 cm H Total width 65 cm 70 cm 74 cm Weight From 15 kg From 15 kg From 15 kg max load 120 kg 120 kg 120 kg Seat height adjustable by 8 cm depending on wheel size Depending on the wheel size H C F A G D E H C F A G D E B Gu...

Страница 25: ...ns with the delivery or handover of the goods Should a verifiable ma terial or manufacturing fault occur within this time period we shall after carriage paid return to us view the indicated damage and if applicable either repair or deliver a new product at our discretion 9 Guarantee ...

Страница 26: ...ür behinderte Menschen Technical aids for disabled persons DIN EN ISO 14971 2013 Medizinprodukte Anwendung des Risikomanagements auf Medizinprodukte Medical devices Application of risk management to medical devices DIN EN 12183 2014 Rollstühle mit Muskelkraftantrieb Anforderungen und Prüfverfahren Manual wheelchairs Requirements and test methods ISO 7176 1 2014 Rollstühle Bestimmung der statischen...

Страница 27: ...Rev 2 0 Seite 2 Diese Konformitätserklärung gilt nur für Produkte mit den oben genannten Artikelnummern und ist gültig bis zum 31 12 2023 This declaration of conformity applies only for products with above named Item numbers and is valid until 31 12 2023 Datum Date 01 04 2020 Unterschrift Sign Name Name Torsten Schuchmann Funktion Function Sicherheitsbeauftragter für Medizinprodukte Safety officer...

Страница 28: ...ss of the manufacturer specialist dealer supplying the product This product was manufactured by 10 Identification This product has been delivered by the following specialist dealer Schuchmann GmbH Co KG Rudolf Runge Str 3 49143 Bissendorf Germany Phone 49 0 5402 40 71 00 Fax 49 0 5402 40 71 109 info schuchmann de www schuchmann de Product name Item number Serial number schuchmann de info schuchman...

Отзывы: