6
SAFETY
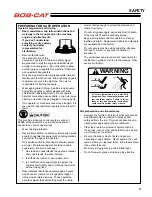
MOWING SLOPES
Operating on wet grass or steep
slopes can cause sliding and loss
of control. Wheels dropping over
edges, ditches, steep banks, or into water can cause
roll overs, which may result in serious injury, death
or drowning. Slopes are a major factor related
to accidents. Operation on slopes requires extra
caution.
– DO NOT mow slopes when grass is wet.
– DO NOT mow near drop-offs or water.
– Reduce speed and use extreme caution on slopes.
– Do not operate machine under any condition where
traction, steering, or stability is in question. Tires
could slide even if the wheels are stopped.
– Avoid sudden turns or rapid speed changes.
– Keep ROPS in the raised and locked position and
use seat belt.
– Do not mow on slopes if uneasy or uncertain.
Ultimate responsibility for safe operation on slopes
rests with the operator.
– Do not mow excessively steep slopes.
– With ride-on machines, including articulated
steering machines, mow up and down slopes, not
across, except for zero turn machines. Zero turn
machines should mow across slopes.
– With walk-behind machines, mow across slopes,
not up and down.
– With zero turn machines, mow across slopes, not
up and down. If the machine will not stay on the
slope, it is too steep.
– Mid-mount zero turn (belly mounted deck) machines
have much greater traction pointed up slope then
down slope. Be aware that traction may be lost
going down a slope. Do not operate a mid-mount
zero turn on slopes it cannot back up.
– Avoid starting or stopping on a slope. If tires lose
traction, disengage the blades and proceed slowly
straight down the slope.
– With a zero turn machine, if tires lose traction going
down a slope, steering control may be regained by
speeding up.
– Keep all movement on the slopes slow and gradual.
Do not make sudden changes in speed or direction.
– Do not turn on slopes unless necessary, and then
turn slowly and downhill when possible.
– Stay away from slopes if the ground is loose or if
caught in the rain during mowing.
– Use extra care with grass catchers or other
WARNING
attachments. These can change the stability of the
machine.
– Remove obstacles such as rocks, tree limbs, etc.
from the grass cutting area.
– Avoid driving over obstacles such as ruts, holes,
rocks and roots whenever possible. Be alert to dips
and rises. Uneven terrain can overturn a mower or
cause it to slide. Tall grasses can hide obstacles.
– Do not mow drop-offs, ditches or embankments.
The machine could suddenly turn over if a wheel
runs over the edge or an edge caves in.
– Follow the manufacturer's recommendations
for wheel weights or counterweights to improve
stability.
– Be aware that operating on wet grass, across
steep slopes or downhill may cause the mower to
lose traction. Loss of traction to the drive wheels
may result in sliding and loss of braking and
steering. Use a walk behind mower and /or hand
trimmer near drop-offs, ditches, steep banks or
water.
A ROPS is a Roll Over Protective Structure. The
ROPS reduces the risk of serious or fatal injury
in the unlikely event of a tip over, although the
system cannot protect the operator from all possible
injuries. It is not designed, made, or intended to
provide protection for a machine that is driven off an
embankment, retaining wall or similar situation. A
ROPS does not replace the need to exercise care
when operating on slopes.
IMPORTANT:
–
The ROPS is an integral and effective safety
device. DO NOT remove or alter the ROPS.
–
Keep Roll Bar in the raised position and use the
seat belt.
–
There is NO roll over protection when the roll
bar is lowered. Lower the roll bar only when
necessary. DO NOT use the seat belt when the
roll bar is in the lowered position. Raise the roll
bar as soon as clearance permits.
–
Do not cut, drill, modify or repair a ROPS
structure in any manner.
–
Replace a damaged ROPS.
–
Use extreme care when working close to fences,
ditches, trees, and on hills.
–
Check overhead clearances carefully before
driving under any objects.
–
DO NOT leave the operator's position while unit is
running.
–
DO NOT carry passengers.
Содержание 9995010
Страница 47: ...45 PARTS SECTION PARTS SECTION ...
Страница 50: ...48 FIGURE 2 BUMPER WRAP 4 3 6 2 7 8 9 10 1 5 5 ...
Страница 62: ...60 FIGURE 8 BATTERY BOX GUARDS 3 10 12 11 14 13 7 5 9 17 6 8 16 5 15 2 4 4 5 5 8 9 16 3 3 3 16 17 17 ...
Страница 70: ...68 FIGURE 12 FOLDING ROPS 10 7 5 2 6 13 1 14 1 11 3 1 4 9 8 7 5 3 2 9 4 6 12 15 15 ...
Страница 82: ...80 FIGURE 18 DECALS 9 7 17 6 10 13 12 11 1 5 4 6 8 2 3 6 6 16 18 14 20 19 15 ...
Страница 84: ...82 7 6 5 4 3 2 1 8 8 4 10 11 12 6 9 13 FIGURE 19 DECALS ...


