27
Setting the Tool
Note:
This tool is accurately adjusted before shipping from
the factory. Check the following accuracy and readjust if
necessary in order to obtain the best results in operation.
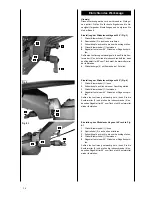
Installation of the Angle Fence at 90°, Fig. 3
1
Loosen the angle clamping lever (1).
2
Lock the ratchet lever (2) towards the inside.
3
Move the cutting head to the right until it rests against
the fence.
4
Tighten the angle clamping lever (1).
5
Test the saw blade with a 90° angle to the saw table.
If an adjustment is necessary, loosen the lock nut (3) and
position the socket screw (4) in such a way that the saw
blade stands at 90° to the table. Re-tighten the lock nut.
6
Set the angle fence (5) with the screw at 0.
Installation of the Angle Fence at 45° Left. Fig.4
1
Loosen the angle clamping lever (1).
2
Move the cutting head to the left until it rests against
the fence.
3
Tighten the angle clamping lever (1).
4
Test the saw blade with a 45° angle to the saw table.
If an adjustment is necessary, loosen the lock nut (5) and
position the socket screw (6) in such a way that the saw
blade stands at 90° to the table. Re-tighten the lock nut.
Installation of the Angle Fence at 45° Right. Fig. 4.1
1
Loosen the angle clamping lever (1).
2
Lock the ratchet lever (2) toward the outside.
3
Move the cutting head to the right until it rests against
the fence.
4
Tighten the angle clamping lever (1).
5
Test the saw blade with a 45° angle to the saw table.
If an adjustment is necessary, loosen the lock nut (5) and
position the socket screw (6) in such a way that the saw
blade stands at 90° to the table. Re-tighten the lock nut.
Réglage de la scie
N. B.:
La scie a été ajustée avec précision en usine avant son
expédition. Pour obtenir les meilleurs résultats, faire les
vérifications suivantes de la précision et ajuster de nou
-
veau au besoin.
Installation de l’angle de coupe à 90°, Fig. 3
1
Desserrez le levier de blocage d’angle (1).
2
Verrouillez le levier à cliquet (2) vers l’intérieur.
3
Déplacez la tête de coupe vers la droite jusqu’à ce
qu’elle repose contre le guide.
4
Serrez le levier de blocage d’angle (1).
5
Essayez la lame de scie avec un angle de 90° à la
table de scie.
Si un réglage s’avère nécessaire, desserrez le contre-
écrou (3) et ajustez la vis creuse (4) de telle manière
que la lame de scie soit à 90° de la table. Resserrez le
contre-écrou.
6
Réglez l’indicateur d’angle (5) avec la vis sur 0.
Installation de l’angle de coupe à 45° à gauche. Fig.4
1
Desserrez le levier de blocage d’angle (1).
2
Déplacez la tête de coupe vers la gauche jusqu’à ce
qu’elle repose contre le guide.
3
Serrez le levier de blocage d’angle (1).
4
Essayez la lame de scie avec un angle de 45° à la
table de scie.
Si un réglage s’avère nécessaire, desserrez le contre-
écrou (5) et ajustez la vis creuse (6) de telle manière
que la lame de scie soit à 90° de la table. Resserrez le
contre-écrou.
Installation de l’angle de coupe à 45° à droite. Fig.4.1
1
Desserrez le levier de blocage d’angle (1).
2
Verrouillez le levier à cliquet (2) vers l’extérieur.
3
Déplacez la tête de coupe vers la droite jusqu’à ce
qu’elle repose contre le guide.
4
Serrez le levier de blocage d’angle (1).
5
Essayez la lame de scie avec un angle de 45° à la
table de scie.
Si un réglage s’avère nécessaire, desserrez le contre-
écrou (5) et ajustez la vis creuse (6) de telle manière
que la lame de scie soit à 90° de la table. Resserrez le
contre-écrou.


