background image

 www.scheppach.com / 

 [email protected] / 

 +(49)-08223-4002-99 / 

 +(49)-08223-4002-58

53 / 60

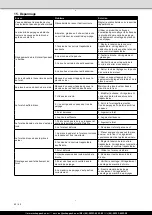
15. Schema dei guasti

Disturbo

Possibile causa

Rimedio

Gli assi tornano troppo velocemente o 

troppo lentamente nella loro posizione 

di uscita.

La tensione della molla non è 

impostata correttamente.

Per impostare la tensione si veda “Molla di 

richiamo mandrino”.

Il mandrino portapunta nonostante 

fissato nuovamente si stacca sempre 

dal mandrino.

Sporco, grasso o olio nel mandrino 

o nella parte interna del mandrino 

portapunta.

Usare un detergente comune per pulire 

la superficie superiore del mandrino e 

il mandrino portapunta. Si veda anche 

“Montaggio del mandrino portapunta”.

Forte rumore durante il funzionamento

1. Errata tensione della cinghia 

trapezoidale.

1.  Impostare nuovamente la tensione 

della cinghia trapezoidale. Si veda anche 

“Impostazione della velocità e la tensione 

della cinghia trapezoidale”.

2.  Il mandrino è troppo asciutto.

2.  Verificare il mandrino. Si veda anche 

“Lubrificazione“.

3.  La puleggia per cinghia sul 

mandrino è allentata.

3.  Verificare il dado sulla puleggia per 

cinghia affinché sia stretto in modo 

adeguato.

4.  La puleggia per cinghia sul motore 

è allentata.

4.  Stringere  la vite di regolazione sulla 

puleggia per cinghia sul motore.

Il legno si scheggia all’uscita del 

trapano

Nessun supporto idoneo sotto il pezzo 

in lavorazione.

Usare un supporto idoneo. Si veda anche 

“Impostazione del tavolo del pezzo in 

lavorazione”.

Il pezzo in lavorazione scappa dalle 

mani

Nessun supporto idoneo sotto il 

pezzo in lavorazione o non fissato 

correttamente.

Inserire un supporto sotto il pezzo in 

lavorazione o fissarlo.

Il trapano si surriscalda

1.  Velocità errata.

1.  Modificare la velocità. Si veda anche 

“Impostazione della velocità e la tensione 

della cinghia trapezoidale”.

2.  Non esce polvere di foratura dai fori 

del trapano.

2.  Verificare che i fori presenti sul trapano 

non siano intasati per permettere la 

fuoriuscita della polvere di foratura.

3.  Punta del trapano smussata.

3.  Rifare la punta del trapano.

4.  Avanzamento troppo scarso.

4.  Aumentare l’avanzamento.

Il trapano si fonde o il foro non è tondo

1.  Parte dura del legno o la lunghezza 

e l’angolo della punta del trapano è 

diversa.

1.  Rifare la punta del trapano.

2.  Punta del trapano piegata.

2.  Sostituire la punta.

La punta si blocca nel pezzo in 

lavorazione

1.  Il pezzo in lavorazione e la punta 

sono angolati o l’avanzamento è troppo 

grande.

1. Inserire un supporto sotto il pezzo in 

lavorazione o fissarlo. Si veda anche 

“Posizionamento del pezzo in lavorazione”.

2.  Tensione della cinghia trapezoidale 

insufficiente.

2.  Impostare la tensione della cinghia 

trapezoidale. Si veda anche “Impostazione 

della velocità e la tensione della cinghia 

trapezoidale”.

Scorrimento e vibrazione eccessiva del 

trapano

1.  Punta del trapano piegata.

1.  Usare una punta diritta.

2.  Usura dell’alloggiamento del 

mandrino.

 Sostituire l’alloggiamento del mandrino.

3.  La punta non è centrata nel 

mandrino portapunta.

3.  Verificare il centramento. Si veda anche 

“Impostazione del mandrino portapunta”.

4.  Il mandrino portapunta non è fissato 

correttamente.

4.  Fissare correttamente il mandrino 

portapunta. Si veda anche “Montaggio del 

mandrino portapunta”.

Содержание DP16SL

Страница 1: ...riginale 31 42 IT Trapano a braccio radiale Traduzioni del manuale d uso originale 43 53 Art Nr 5806801903 AusgabeNr 5806801850 Rev Nr 01 02 2018 DP16SL Nachdrucke auch auszugsweise bedürfen der Genehmigung Technische Änderungen vorbehalten Abbildungen beispielhaft ACHTUNG Vor Inbetriebnahme die Bedienungsanleitung genau durchlesen CAUTION Read the manual carefully before operating this machine AT...

Страница 2: ... www scheppach com service scheppach com 49 08223 4002 99 49 08223 4002 58 510 1 min A 1 800 1 min B 2 1300 1 min C 3 1800 1 min D 4 2430 1 min E 5 C 2 A B D E 1 2 3 4 5 8 ...

Страница 3: ... www scheppach com service scheppach com 49 08223 4002 99 49 08223 4002 58 1 2 4 5 6 8 7 9 10 11 12 13 15 14 3 16 17 17 1 2 3 5 6 18 14 7 19 A B C 1 2 32 32 ...

Страница 4: ... www scheppach com service scheppach com 49 08223 4002 99 49 08223 4002 58 3 1 2 8 4 2 1 10 9 11 18 7 7 5 7 5 2 4 2 8 20 6 5 3 4 5 6 7 8 9 10 ...

Страница 5: ... www scheppach com service scheppach com 49 08223 4002 99 49 08223 4002 58 1 5 4 7 2 21 21 14 14 22 17 19 11 12 13 14 15 16 17 18 ...

Страница 6: ... www scheppach com service scheppach com 49 08223 4002 99 49 08223 4002 58 23 7 25 24 27 28 15 30 30 31 A 19 5 6 29 19 20 21 22 23 24 25 26 29 ...

Страница 7: ... www scheppach com service scheppach com 49 08223 4002 99 49 08223 4002 58 27 ...

Страница 8: ...ang 10 4 Bestimmungsgemäße Verwendung 11 5 Sicherheitshinweise 11 6 Restrisiken 13 7 Technische Daten 14 8 Montage 14 9 Einstellungen 15 10 Inbetriebnahme 15 11 Reinigung und Wartung 16 12 Elektrischer Anschluss 17 13 Lagerung und Transport 17 14 Entsorgung und Wiederverwertung 18 15 Störungsabhilfe 19 16 Konformitätserklärung 57 17 Garantieurkunde 59 ...

Страница 9: ...beachten DE AT CH Schutzbrille tragen DE AT CH Gehörschutz tragen DE AT CH Bei Staubentwicklung Atemschutz tragen Erklärung der Symbole auf dem Gerät m DE AT CH Warnung Bei Nichteinhaltung Lebensgefahr Verletzungsgefahr oder Beschädi gung des Werkzeugs möglich DE AT CH Lange Haare nicht offen tragen Benutzen Sie ein Haarnetz DE AT CH Tragen Sie keine Handschuhe ...

Страница 10: ...rätes haftet nach dem gelten den Produkthaftungsgesetz nicht für Schäden die an diesem Gerät oder durch dieses Gerät entstehen bei unsachgemäßer Behandlung Nichtbeachtung der Bedienungsanweisung Reparaturen durch Dritte nicht autorisierte Fach kräfte Einbau und Austausch von nicht originalen Ersatz teilen nicht bestimmungsgemäßer Verwendung Ausfällen der elektrischen Anlage bei Nichtbeach tung der...

Страница 11: ...d 16 Vermeiden Sie unbeabsichtigten Anlauf Tragen Sie keine an das Stromnetz angeschlos senen Werkzeuge mit dem Finger am Schalter Vergewissern Sie sich dass der Schalter beim Anschluss an das Stromnetz ausgeschaltet ist 4 Bestimmungsgemäße Verwendung Diese Tischbohrmaschine ist zum Bohren von Metall Kunststoff Holz und ähnlichen Werkstoffen bestimmt und darf nur im privaten Haushaltsbereich verwe...

Страница 12: ...Schmuck Tragen Sie unbedingt eine Schutzbril 17 Verlängerungskabel im Freien Verwenden Sie im Freien nur dafür zugelassene und entsprechend gekennzeichnete Verlänge rungskabel 18 Seien Sie stets aufmerksam Beobachten Sie Ihre Arbeit Gehen Sie ver nünftig vor Verwenden Sie das Werkzeug nicht wenn Sie unkonzentriert sind 19 Kontrollieren Sie Ihr Gerät auf Beschädigungen Vor weiterem Gebrauch des Wer...

Страница 13: ...eachtung können Augenverletzun gen entstehen 9 Arbeitsplatz in Ordnung halten Unordnung in Ihrem Arbeitsbereich führt leicht zu Unfällen Lassen Sie keine Werkzeuge Gegen stände oder Kabel im unmittelbaren Arbeitsbe reich liegen Stolpergefahr Sorgen Sie für aus reichende Beleuchtung 10 Auf andere Personen achten Achten Sie bei der Benutzung des Gerätes auf andere Personen vor allem Kinder und halte...

Страница 14: ...ten Sie hierbei das die Zahnstangen führung am Ring 8 nach unten zeigt Fixieren Sie den Ring 8 durch anziehen der integrierten Madenschraube 20 6 Schrauben Sie den Klemmgriffe 6 in den Bohr tischhalter 7 Montage Maschinenkopf und Säule Fig 12 13 1 Setzen Sie den Maschinenkopf auf die Säule 2 2 Bringen Sie die Spindel der Bohrmaschine mit dem Tisch und der Grundplatte in Deckung und ziehen Sie die ...

Страница 15: ...e Klemmschraube 6 2 Stellen Sie den Bohrtisch 7 auf die gewünschte Höhe ein indem Sie an dem Verstellgriff für die Höhenverstellung 5 kurbeln 3 Ziehen Sie die Klemmschraube 6 wieder fest Hinweis Wir empfehlen die Tischhöhe so einzustellen dass die Bohrerspitze kurz über dem Werkstück ist Montage Bohrfutterschutz Fig 14 15 1 Setzen Sie den Bohrfutterschutz 14 auf das Spindelrohr auf und ziehen die ...

Страница 16: ...n Trichlorethan Chlor Ammoniak etc verwenden da diese Chemikalien Kunststoffe angreifen können Um Beschädigungen am Motor durch Bohrstaub zu verhin dern saugen oder blasen Sie den Motor regelmäßig aus Einstellen der Geschwindigkeit und der Keilrie menspannung Fig 22 23 m Achtung Vor dem Öffnen des Deckels ziehen Sie immer den Netzstecker Warten Sie vor War tungs Einstellungsarbeiten immer bis zum ...

Страница 17: ... Zum Schmieren des Antriebs fahren Sie die Achse he runter und geben Sie das Fett von oben in die Spindel unter der oberen Abdeckung Fahren Sie die Achse einige Male auf und ab Service Informationen Es ist zu beachten dass bei diesem Produkt folgende Teile einem gebrauchsgemäßen oder natürlchen Ver schleiß unterliegen bzw folgende Teile als Verbrauchsmaterialien benötigt werden Verschleißteile Koh...

Страница 18: ...tzen nicht über den Hausmüll entsorgt werden darf Dieses Produkt muss bei einer dafür vorgesehenen Sammelstelle abgegeben werden Dies kann z B durch Rückgabe beim Kauf eines ähnlichen Produkts oder durch Abgabe bei einer au torisierten Sammelstelle für die Wiederaufbereitung von Elektro und Elektronik Altgeräte geschehen Der unsachgemäße Umgang mit Altgeräten kann aufgrund potentiell gefährlicher ...

Страница 19: ...erkstück reißt aus der Hand Keine geeignete Unterlage unter dem Werkstück oder unzureichend befestigt Unterfüttern Sie das Werkstück oder be festigen Sie es Der Bohrer glüht aus 1 Falsche Geschwindigkeit 1 Ändern Sie die Geschwindigkeit Siehe auch Auswahl der Drehzahl und Keil riemenspannung 2 Es kommen keine Späne aus dem Bohrloch 2 Fahren Sie den Bohrer regelmäßig aus dem Bohrloch um die Späne h...

Страница 20: ...of delivery 22 4 Intended use 23 5 Safety information 23 6 Residual risks 25 7 Technical data 25 8 Assembly 26 9 Adjustment 26 10 Using your drill press 27 11 Cleaning and Maintenance 28 12 Electrical connection 28 13 Storage Transport 29 14 Disposal and recycling 29 15 Troubleshooting 30 16 Declaration of conformity 57 17 Guarantee certificate 59 ...

Страница 21: ...ructions to reduce the risk of inquiry GB Wear safety goggles GB Wear ear muffs GB Wear a breathing mask Explanation of the symbols on the equipment m GB Warning Danger to life risk of injury or damage to the tool are possible by ignoring GB Do not wear long hair uncovered Use a hair net GB Do not wear gloves ...

Страница 22: ...s caused by the product that occurs due to improper handling noncompliance of the operating instructions repairs by third parties not by authorized service technicians installation and replacement of non original spare parts non intended use A breakdown of the electrical system that occurs due to the non compliance of the electric regulations and VDE regulations 0100 DIN 57113 VDE0113 We recommend...

Страница 23: ...n it on and off 20 m Warning The use of any other accessory or attachment oth er than recommended it this operating instruction or the catalog may present a risk of personal injury 4 Intended use This pillar drill is designed for drilling metal plastic wood and similar materials It is intended for use in the private sector only Food and harmful materials may not be processed with the equipment The...

Страница 24: ... or are taking medication 18 Maximum workpiece size Workpieces max 20 x 20 cm may only be pro cessed if they can be clamped securely on the drill table or in the vise 21 Have your tool repaired by an expert This electric appliance is in accordance with the relevant safety rules repairing of electric appli ances may be carried out only by experts other wise it may cause considerable danger for the ...

Страница 25: ... in use 19 Check the tool for damage Before using the tool safety devices and any slightly damaged parts must be carefully checked to ensure that they are in good working order Vis ually examine the tool s power cable on a regular basis All parts must be correctly assembled and meet all the conditions required to ensure proper operation Unless otherwise specified in the operating in structions any...

Страница 26: ...oves up and down as desired retighten the inner locknut 4 8 If it is too loose repeat steps 3 5 If it is too tight repeat step 6 in reverse order 9 Using a flat spanner tighten the outer locknut 3 against the inner locknut 4 10 NOTE Do not over tighten and do not restrict the movement of the spindle 8 Assembly WARNING For your own safety never connect plug to power source outlet until all assembly...

Страница 27: ...mp or bolt to the table to avoid injury from spinning work and vise or tool breakage The angular play of the spindle Fig 19 With the spindle in a low position take it in your hand and try to make it revolving about its axis If there is too much play proceed as follows 1 Loosen lock nut 23 2 Turn the screw 24 clockwise to eliminate the play but without obstructing the upward and downward motion of ...

Страница 28: ... ing the switch on bring the drill down to the workpiece lining it up with the hole location Turn the switch on and pull down on the feed handles with onIy enough effort to allow the drill to cut Feeding Too Slowly might cause the drill bit to burn Feeding Too Rapidly might stop the motor cause the bett or drill to slip tear the workpiece loose or break the drill bit When drilling metal it may be ...

Страница 29: ...le collec tion center for proper disposal If you do not know the whereabouts of such a collection point you should ask in your local council offices Old devices must not be disposed of with house hold waste This symbol indicates that this product must not be disposed of together with domestic waste in compliance with the Directive 2012 19 EU pertaining to waste electrical and electronic equipment ...

Страница 30: ...tioning table and work piece Workpiece tom loose from hand Not supported or clamped property Support work piece or clamp it See Positioning table and work piece Drill bit bums 1 Incorrect speed 1 Change speed See Choosing speed and belt tensioning 2 Chips not coming out of hole 2 Retract drill bit frequently to remove chips 3 Dull drill bit 3 Resharpen drill bit 4 Feeding too slowy 4 Feed fast eno...

Страница 31: ...e lʼappareil 33 3 Ensemble de livraison 33 4 Utilisation conforme à l affectation 34 5 Consignes de sécurité 34 6 Risques résiduels 36 7 Caractéristiques techniques 37 8 Montage 37 9 Réglages 38 10 Mise en service 38 11 Nettoyage et maintenance 39 12 Branchement Electrique 40 13 Stockage et transport 40 14 Mise au rebut et recyclage 41 15 Dépannage 42 16 Déclaration de conformité 57 17 Bon de gara...

Страница 32: ... des lunettes de protection FR CH Portez une protection auditive FR CH Portez un masque anti poussière Légende des symboles figurant sur l appareil m FR CH Attention Danger de mort et risque de blessures et d endommagement de la machine en cas de non respect des instructions FR CH Ne pas laisser les cheveux longs détachés Utiliser une résille FR CH Ne pas porter de gants ...

Страница 33: ...ortera de la satisfaction et de bons résultats Remarque Selon la loi en vigueur sur la responsabilité du fait des produits le fabricant n est pas tenu pour responsable de tous les dommages subis par cet appareil et pour tous les dommages résultant de son utilisation dans les cas suivants Mauvaise manipulation Non respect des instructions d utilisation Travaux de réparation effectués par des tiers ...

Страница 34: ...comme p ex de lame des scie de foret et de tout autre outillage 15 Enlevez les clés à outils Avant de mettre l outil en marche assurez vous que les clés et outils de réglage aient été retirés 4 Utilisation conforme à l affectation Cette perceuse d établi est destinee a percer le metal les matieres plastiques le bois et autres materiaux semblables et doit uniquement etre utilisee dans le secteur de...

Страница 35: ...ments d outil 16 Evitez tout démarrage involontaire Ne portez pas d outil en ayant doigt place sur l interrupteur tant qu il est branché au réseau électrique Assurez vous que l interrupteur soit en position de coupure avant de brancher l outil au réseau électrique 17 Câble de rallonge pour l extérieur A l extérieur n utilisez que des câbles de rallonge homologués avec le marquage correspondant 18 ...

Страница 36: ...s en mouve ment et peuvent rester pendus Portez un filet à cheveux pour les cheveux longs Ne portez jamais de bijoux lors de travaux avec des machines outils Portez absolument des lunettes de protection Le non respect peut entraîner des blessures à l oeil 9 Gardez voter poste de travail en bon état d ordre Le désordre dans une zone de travail entraîne fa cilement des accidents Ne laissez pas traîn...

Страница 37: ... le logement de cré maillère de l anneau soit tourné vers le bas Fixez l anneau 8 en resserrant la vis à six pans creux dont il est pourvu 6 Vissez l une des poignées de serrage 6 dans le support de la table de perçage 7 Risques pour la santé par les poussières de bois ou copeaux de bois Porter des équipements de pro tection personnels tels que protection des yeux et masque anti poussière Risques ...

Страница 38: ...rrer à nouveau l écrou de serrage 27 Réglage de la hauteur de la table Fig 21 1 Desserrer la vis de serrage 6 2 Placez la table 7 à la hauteur désirée en tour nant la manivelle 5 3 Resserrer à nouveau la vis de serrage 6 Montage de la tête et de la colonne de la machine Fig 12 13 1 Placez la tête de la machine sur la colonne 2 2 Orientez la tête de la machine de façon à ce que la broche se trouve ...

Страница 39: ...rcer Maintenir l appareil propre Veiller à n utiliser que des produits de nettoyage sans essence trichloréthane chlore ammoniac etc car ces substances chimiques peuvent attaquer les ma tières plastiques Afin d éviter des dommages sur Remarque nous vous conseillons de régler la table de manière à ce que la pointe du foret soit juste au des sus de la pièce à percer Réglage de la vitesse et de la ten...

Страница 40: ...u d incendie Graissage Tous les roulements à billes sont graissés en usine et ne nécessitent pas de graissage ultérieur Graisser régulièrement toutes les rainures dans la broche Pour le graissage de l entraînement faire descendre l axe et introduire la graisse par le haut dans la broche sous le couvercle supérieur Ensuite déplacer l axe plusieurs fois vers le haut et vers le bas Informations servi...

Страница 41: ...ques 2012 19 UE et aux lois nationales ce produit ne doit pas être jeté avec les déchets ménagers Ce produit doit être remis à un centre de collecte prévu à cet effet Le pro duit peut par ex être retourné à l achat d un produit similaire ou être remis à un centre de collecte autorisé pour le recyclage d appareils électriques et électroni ques usagés En raison des substances potentielle ment danger...

Страница 42: ...sine s arrache de la main Manque d un support approprié sous la pièce à usiner ou fixation insuffisante Maintenir la pièce à usiner dans le mandrin ou la fixer Le foret chauffe à blanc 1 Vitesse incorrecte 1 Modifier la vitesse Voir également sélection de la vitesse et courroie trapézoïdale 2 Il ne sort pas de copeaux du trou de perçage 2 Sortir le foret régulièrement du trou de perçage afin de fa...

Страница 43: ...a 45 4 Utilizzo proprio 46 5 Norme di sicurezza 46 6 Rischi residui 48 7 Caratteristiche tecniche 49 8 Montaggio 49 9 Impostazioni 50 10 Funzionamento iniziale 50 11 Pulizia e manutenzione 51 12 Ciamento elettrico 52 13 Conservazione 52 14 Smaltimento e riciclaggio 52 15 Schema dei guasti 53 16 Dichiarazione di conformità 57 17 Certificato di Garanzia 59 ...

Страница 44: ... lesioni leggete le istruzioni per l uso IT CH Indossate gli occhiali protettivi IT CH Portate cuffie antirumore IT CH Mettete una maschera antipolvere m IT CH Attenzione Possibile per il mancato rispetto Pericolo di morte rischio di lesioni o danni allo strumento IT CH Non portare i capelli lunghi sciolti Utilizzare una retina per capelli IT CH Non indossare guanti ...

Страница 45: ... Casa produttrice scheppach Fabrikation von Holzbearbeitungsmaschinen GmbH Günzburger Straße 69 D 89335 Ichenhausen Gentile Cliente Ci auguriamo che la nostra nuova macchina Le per metta di lavorare con piacere e successo Nota In base all attuale normativa sulla responsabilità per danno da prodotti difettosi il costruttore dell apparec chio non è responsabile dei danni arrecati all apparec chio o ...

Страница 46: ...he l utensile non sia danneggiato Prima di usare l apparecchio Lei deve control lare attentamente l efficienza e il perfetto fun 4 Utilizzo proprio Questo trapano a colonna è concepito per perforare metallo materie plastiche legno e materiali simili e deve essere usato solo in ambito privato L apparec chio non deve essere usato per lavorare generi ali mentari e materiali nocivi per la salute Il ma...

Страница 47: ...i in luogo sicuro Gli utensili non usati si devono conservare in un luogo pulito asciutto e chiuso fuori dalla portata dei bambini zionamento dei dispositivi di sicurezza e parti eventualmente danneggiate Controlli il funzio nalmento delle parti mobili che non siano bloc cate che non vi siano parti rotte se tutte le altre parti sono state montate in modo giuste e che tutte le altre condizioni che ...

Страница 48: ...restazioni indicato Non usate apparecchi troppo deboli per lavori dif ficili Non usate utensili per scopi per i quali non sono stati concepiti 13 Nel lavorare assicurarsi di essere bene in equi librio Nel lavorare assicuratevi di essere bene in equili brio Evitate di assumere posizioni del corpo inso lite tenetevi sempre in equilibrio 14 Staccate la spina dalla presa di corrente quando l elettrout...

Страница 49: ...a Fig 14 15 1 Posizionare la protezione mandrino portapunta 14 sul mandino e stringere la vite a croce 22 Montaggio dell impugnatura alla manovella del gruppo verticale Fig 16 1 Avvitare l impugnatura 17 alla filettatura del mozzo Montaggio del mandrino portapunta Fig 17 1 Pulire il foro conico del mandrino portapunta 19 e il cono del mandrino con un panno pulito As sicurarsi che non vi sia presen...

Страница 50: ...erchio Per evitare il pericolo di ferite il trapano è spento automaticamente mediante un interruttore di sicurezza superficie superiore La presenza di sporco sulla superficie superiore non consente al mandrino portapunta di fermarsi in modo corretto Di con seguenza anche il trapano potrebbe muoversi in modo irregolare Se il foro conico del mandrino portapunta è estremamente sporco usare una soluzi...

Страница 51: ...larmen te tutte le scanalature del mandrino e la barra dentata 1 È possibile impostare diverse velocità per il man drino sul vostro trapano a colonna 2 Solo quando l apparecchio è scollegato è possibi le aprire la copertura Nella copertura della mac china è possibile accedere alle diverse possibilità di impostazione della velocità del mandrino 3 Allentare la cinghia di trazione sul lato destro del...

Страница 52: ...e Le informazioni sui centri di raccolta per dispositivi usati sono reperibi li presso la propria amministrazione comunale l a zienda municipalizzata per la nettezza urbana un centro autorizzato allo smaltimento di strumenti elettri ci ed elettronici usati o presso il servizio di nettezza urbana Per la lubrificazione dell azionamento abbassare l as se e versare dall alto il lubrificante nel mandri...

Страница 53: ...rto idoneo sotto il pezzo in lavorazione o non fissato correttamente Inserire un supporto sotto il pezzo in lavorazione o fissarlo Il trapano si surriscalda 1 Velocità errata 1 Modificare la velocità Si veda anche Impostazione della velocità e la tensione della cinghia trapezoidale 2 Non esce polvere di foratura dai fori del trapano 2 Verificare che i fori presenti sul trapano non siano intasati p...

Страница 54: ... www scheppach com service scheppach com 49 08223 4002 99 49 08223 4002 58 ...

Страница 55: ... www scheppach com service scheppach com 49 08223 4002 99 49 08223 4002 58 ...

Страница 56: ......

Страница 57: ... hebbende EG richtlijnen en normen RUS заявляет о соответствии товара следующим директивам и нормам ЕС PT declara o seguinte conformidade com a Directiva da UE e as normas para o seguinte artigo ES declara la conformidad siguiente según la directiva la UE y las normas para el artículo DK erklærer hermed at følgende produkt er ioverens stemmelse med nedenstående EUdirektiver og standarder SE försäk...

Страница 58: ... www scheppach com service scheppach com 49 08223 4002 99 49 08223 4002 58 ...
Страница 59: ...dentro de este plazo se torne inútil a causa de fallas de material o de fabricación Las piezas que no son fabricadas por nosotros mismos serán garantizadas hasta el punto que nos corresponda garantía del suministrador anterior Los costes por la colocación de piezas nuevas recaen sobre el comprador Están excluidos derechos por modificaciones aminoraciones y otros derechos de indemnización por daños...

Страница 60: ... 8 dienas nuo įrenginio gavimo momento Kitu atveju pirkėjo teisė reikšti pretenziją dėl šių defektų yra negaliojanti Savo įrenginiams mes garantuojame įstatymo nustatytą pilną aptarnavimą garantinio laikotarpio metu jei yra laikomasi gamintojo vartotojo susitarimo ir mes pažadame nemokamai pakeisti bet kurias mašinos dalis sugedusias dėl blogos medžiagos ar gamyklinio broko Mes neatsakome už dalis...

Отзывы: