ScentAir ScentWave Скачать руководство пользователя страница 8

8


SCENT EVENTS

The 

ScentWave

 uses a Scent Event to schedule the 

system to run at certain times and on specific days 
of the week. During a Scent Event, the system will 
use an On Time and Off Time on scheduled days 
of the week. The current Scent Level determines the 
fragrance intensity.
The 

ScentWave

 default settings are currently saved 

as Event 1 and can be edited. A total of six (6) Scent 
Events can be programmed. 

EDITING AN EVENT:

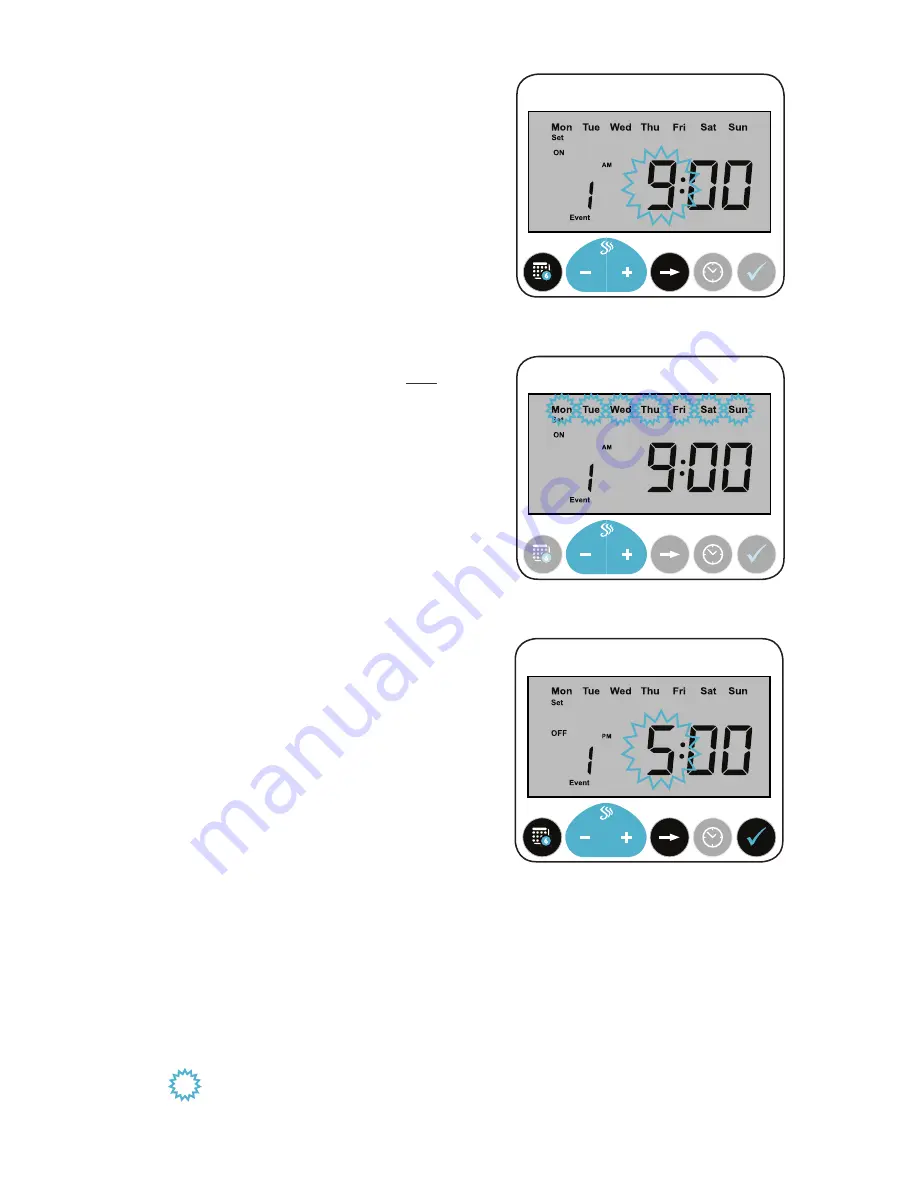
1.  Press EVENT SETTINGS to edit the first event; 

beginning with the hour slot. 

(Fig.8)

• 

Press 

-

 or 

+

 to adjust the hour that the 

system will use for On Time. 

2.  Press NEXT DIGIT once to move to the 

minutes for the On Time. 
• 

Press 

-

 or 

+

 to adjust the minutes in 

increments of five (5). 

3.  Press NEXT DIGIT again to move to the days 

of the week. 

(Fig.9)

• 

Press 

-

 or 

to choose between 17 

different Day Combinations. 

4.  Press NEXT DIGIT again to move to the 

hours for the Off Time. 
• 

Press 

-

 or 

+

 to adjust the hour. 

(Fig.10)

5.  Press NEXT DIGIT to move to the minutes for 

the Off Time. 
• 

Press 

-

 or 

+

 to adjust the minutes in 

increments of five (5). 

6.  Press the CHECK button at any time to save 

your changes. The display will blink and 
then change to show the Scent Level on the 
default screen.

SCENT

EVENT

PAUSE

RUN

EVENT OVERRIDE

EVENT 

SETTINGS

NEXT

DIGIT

RUN

MODE

Fig.8:

 The On Time hour slot will be flashing. Set and 

Event 1 will also be displayed.

Fig.10:

 The Off Time hour slot will be flashing. Set and 

Event 1 will also be displayed.

SCENT

EVENT

PAUSE

RUN

EVENT OVERRIDE

EVENT 

SETTINGS

NEXT

DIGIT

RUN

MODE

Fig.9:

 The Days Of The Week will be flashing. Set, Event 

1 and the On Time will also be displayed.

SCENT

EVENT

PAUSE

RUN

EVENT OVERRIDE

EVENT 

SETTINGS

NEXT

DIGIT

RUN

MODE

NOTE:

 Items flashing on the display are notified by the blue starburst in this manual.

Содержание ScentWave

Страница 1: ...nt 3 Getting Started 4 Control Panel 5 Scent Level 6 Fan Speed 6 Run Mode 7 Scent Events 8 Time Date 10 Lockcode 11 Plate less Arm Mounting SWD1005 12 Plate less Wall Mounting SWD1005 13 Wall Mounting...

Страница 2: ...ill be used for any active Scent Event There are seven 7 levels Set the system to one 1 for low fragrance intensity Set the system to seven 7 for high fragrance intensity Turn to Page 6 for more infor...

Страница 3: ...ar an area of high traffic volume 3 3 Crossing the path of airflow from a duct 3 3 In a discrete location 3 3 Close to the ground when possible 3 3 Within 10 3m of a power outlet AVOID POSITIONING 2 2...

Страница 4: ...1 Plug the ScentWave Cartridge cord into the connection on the inside bottom front of the ScentWave 2 Insert the ScentWave Cartridge by lining up the tabs on the cartridge and system and push in comp...

Страница 5: ...IONS The ScentWave functions and settings are controlled by the six 6 buttons under the display screen Some buttons may have alternate functions when held down Specific button details are found within...

Страница 6: ...the Scent Level Fig 3 SCENT EVENT PAUSE RUN EVENT OVERRIDE EVENT SETTINGS NEXT DIGIT RUN MODE Fig 2 Scent Level main display 4 5 6 7 3 2 1 MIN MAX FAN SPEED The ScentWave uses Fan Speed to control the...

Страница 7: ...current run mode PAUSE During an active event PAUSE mode will cause the system to stop running for the remainder of the current Scent Event Activating the PAUSE mode before a scheduled event will caus...

Страница 8: ...choose between 17 different Day Combinations 4 Press NEXT DIGIT again to move to the hours for the Off Time Press or to adjust the hour Fig 10 5 Press NEXT DIGIT to move to the minutes for the Off Ti...

Страница 9: ...e deleted 3 Press EVENT SETTINGS to review or create other scheduled events or press CHECK to save and go back to the home screen SCENT EVENT PAUSE RUN EVENT OVERRIDE EVENT SETTINGS NEXT DIGIT RUN MOD...

Страница 10: ...the year slot will flash 3 Press the CLOCK button one 1 more time DST will flash Fig 15 When DST is on the Month Day and Date Adv is displayed This is the day of the year that the machine will advanc...

Страница 11: ...r to adjust the digit value Press NEXT DIGIT to move to the next open slot Repeat step for all open digits 2 Press CHECK to confirm and lock DEACTIVATING THE LOCKCODE 1 Press the NEXT DIGIT button The...

Страница 12: ...Fig 18 Use the screwdriver to drive the screws into the holes holding the base in place 3 Attach the Mounting Arm to the ScentWave Attach the ScentWave to the pivot end of the wall mounting arm throu...

Страница 13: ...the wall Fig 21 Drive the screws into the anchors leaving 5 16 7 9mm between the top of the screw and the wall 2 Attach the ScentWave to the wall Line up the slots on the ScentWave system with the scr...

Страница 14: ...ter hole using the provided lock nut and screw Tighten using a screwdriver to secure the nut in place Fig 24 Attach the mounting plate assembly to the bottom of the ScentWave using the provided plate...

Страница 15: ...late to the ScentWave Attach the mounting plate to the bottom of the ScentWave using the provided plate screws pilot holes slotted or hex driver Fig 27 3 Attach the ScentWave to the wall Line up the s...

Страница 16: ...anada 1 704 504 2320 UK 44 1628 601 650 France 33 5 62 57 63 20 Hong Kong 852 3563 5566 www scentair com scentwave X X X X Small Opening Small Opening Large Opening Large Opening 3 13 79 5mm 2 30 58 4...

Отзывы: