Scania Radio Premium Скачать руководство пользователя страница 43

43 

  Activate the Bluetooth function on the Bluetooth device (if it is not already 

activated: see the manual for the Bluetooth device). A confirmation is shown when 
the Bluetooth connection has been correctly implemented. 


Note 

  If another Bluetooth device was connected to the system earlier then the 

device will now be disconnected. 

  It is only possible to connect one Bluetooth device at a time to the system 

regardless of whether it is an audio streaming device, a mobile phone or a 
combination device (e.g. mobile phone with integrated MP3 player). 

  If the Bluetooth connection fails then you must repeat the pairing or read 

through the manual for the Bluetooth device. 

  If the Bluetooth connection fails then you can remove already paired 

Bluetooth devices, see the chapter ”Disconnecting a paired device”. Then 
repeat the pairing.  


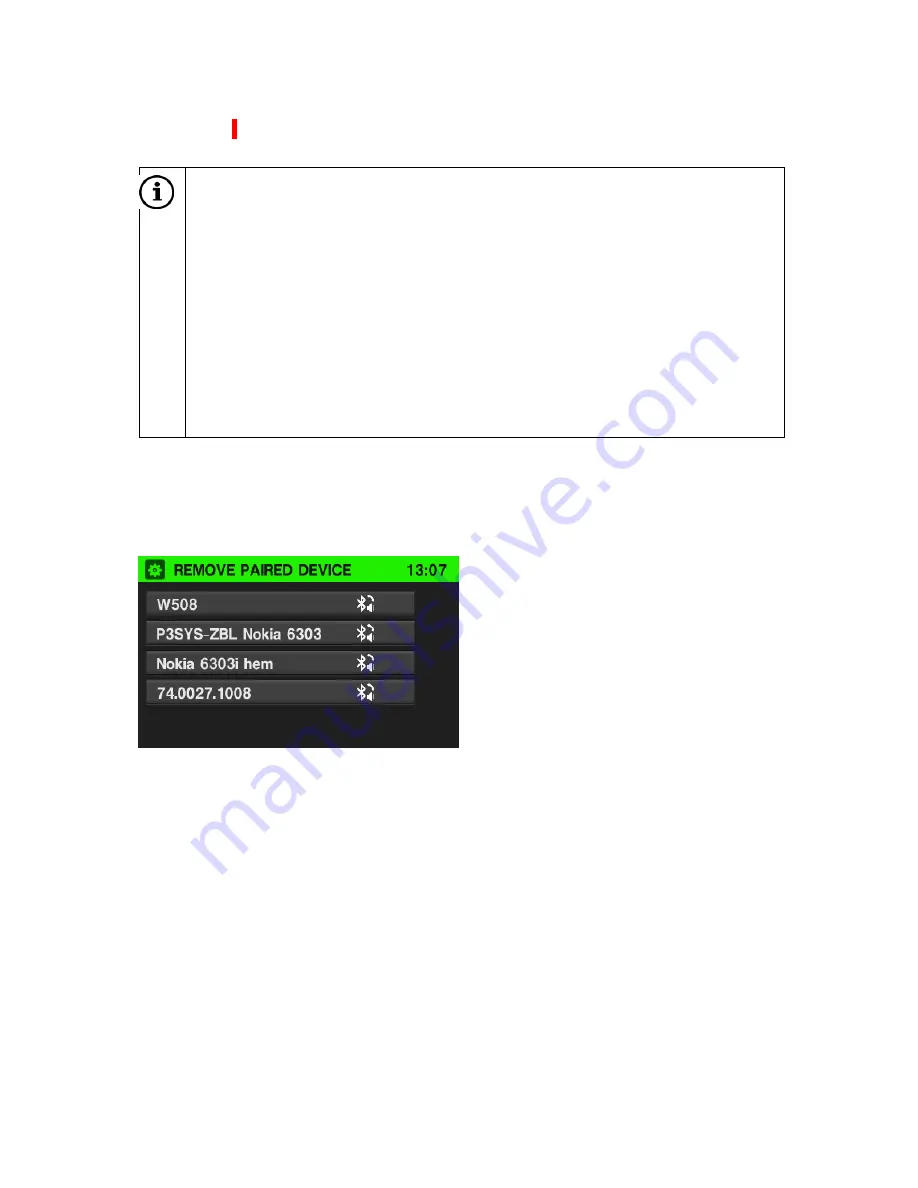
Disconnecting a paired device 

  Tap in the 

BLUETOOTH SETUP 

menu on 

Delete Paired Device.


A list of all Bluetooth devices that are currently paired with the system is shown. 


  Select the desired Bluetooth device. 

  Tap on 

Yes

 to confirm that the device should be removed. 

The device is removed from the list of paired devices. 

Содержание Radio Premium

Страница 1: ...1 Manual Radio Premium Complete manual for Scania Radio Premium This manual can be downloaded at www scania com manuals...

Страница 2: ...map 7 NAVI Open the menu for navigation 8 Slot for SD card for navigation 9 SETUP Opens the menu for system settings 10 Go back to the previous menu page 11 Multi function button In a menu Turn select...

Страница 3: ...3 16 MEDIA Change between different audio sources CD disc USB AUX Bluetooth 17 FM AM Start the radio mode and change between different sources FM1 FM2 AM...

Страница 4: ...13 Radio reception 13 Operating modes 14 Radio 14 Media 14 Navigation 14 Telephone 14 Use 14 Controls 14 Touch screen 14 Multi function button 15 Switching on the system 15 Automatic shutdown 15 Sett...

Страница 5: ...Storing a station 30 Retrieving a station 30 Media 31 Playing CDs 31 General Information 31 Playing CDs 33 Pausing playback Pause 34 Selecting a track 34 Skip to the next or previous track 34 Fast fo...

Страница 6: ...number 48 Accessing the voice mailbox 48 Incoming phone calls 48 Functions during a call 49 Temporary deactivation of the handsfree mode 49 Temporary deactivation of the microphone 49 Ending a call 49...

Страница 7: ...4 Information on the map 67 User defined points of interest POI 69 Maps 72 SD cards with maps 72 Replacing an SD card with maps 73 Steering wheel buttons 74 PIN list 75 Frequently asked questions 76 G...

Страница 8: ...udio Operating Guide where it is easily accessible for all users Warning texts The manual contains the following important warning texts Note This symbol is used for certain important information Warn...

Страница 9: ...g Only use the Scania Radio Premium and other functions when traffic situations permit The navigation system provides route guidance during navigation Follow them only on condition that you do not bre...

Страница 10: ...avigation The CD player contains a Class 1 laser which emits invisible laser beams that could damage your eyes Do not repair or otherwise modify the Radio with Navigation Consult a trained professiona...

Страница 11: ...e used in order to ensure a flawless function Damaged or dirty CD discs can lead to CD reader malfunction Handle CD discs with care Avoid damage to CD discs e g scratches Store CD discs in a protectiv...

Страница 12: ...e been marked using the symbol with a grey background Useful information is indicated by symbol You will also find the following special symbols and fonts used in the manual Identifies an action to be...

Страница 13: ...e is stationary Using the navigation system does not relieve you as a driver from your responsibility for a correct and careful driving style in traffic The road traffic regulations must always be fol...

Страница 14: ...menus via the touch screen It is not possible to use the multi function button Before a system function is performed you will often get a message prompting you to confirm that the selected system func...

Страница 15: ...ivate the screen buttons at the bottom of the menu via the touch screen Note Before a system function is performed you will often be prompted via a message to confirm that the selected system function...

Страница 16: ...mbol is shown on the screen Note The volume is switched on again automatically as soon as you change audio source The volume can also be set via the steering wheel buttons For more information see cha...

Страница 17: ...tton and tap on System With the touch screen Tap on a menu item in order to change a setting With the multi function button 11 Turn the multi function button 11 clockwise or anticlockwise in order to...

Страница 18: ...tion button 11 Set the scrolling direction on or Setting the clock Press the SETUP button Tap on System Tap on Clock Tap on the desired setting item and change it with either the screen or the multi f...

Страница 19: ...commands in navigation mode Return to factory settings Proceed as follows in order to reset all system settings and memories to factory settings In the SYSTEM SETUP menu select Factory settings Tap o...

Страница 20: ...ed by the system and is used automatically for all future voice commands until the setting is changed again Audio settings With the touch screen To open the AUDIO SETUP menu press the SETUP 9 button a...

Страница 21: ...e setting Press the multi function button 11 in order to confirm the setting The setting has now been changed Setting the volume for traffic announcements TA The volume for traffic announcements can b...

Страница 22: ...indicates that the volume will not increase with increasing vehicle speed If the speed dependent value is set to 5 then it indicates that the volume will increase to a maximum with increasing vehicle...

Страница 23: ...own automatically for as long as the vehicle s reverse gear is engaged Contact your Scania workshop for more information If no camera is connected then the device returns to the menu that was last act...

Страница 24: ...tivate the menu items Starting radio mode Switch on the system Press the FM AM 17 button The radio is activated The last played radio station will be played when the radio is switched on Note If an RD...

Страница 25: ...nd menu for AM You can save 6 AM stations using the station buttons Radio Data System RDS RDS is a system that transmits both encoded digital information and normal FM radio broadcasts RDS provides in...

Страница 26: ...is activated Tap on TA again to deactivate The TA function is only available in FM radio mode If the TA function is activated and the system receives a traffic announcement from an RDS station then th...

Страница 27: ...nal traffic announcements at any time regardless of the selected operating mode Activating or deactivating the priority for traffic announcements TA Read more about this in the chapter Navigation subc...

Страница 28: ...e or 1 button Press the or screen key and hold it depressed Turn the multi function button 11 clockwise or anticlockwise FM station list The FM station list includes all the available FM radio station...

Страница 29: ...dates the FM station list in the background This ensures that the station list always contains the FM stations that are available in the local area during a long journey The update takes time and so n...

Страница 30: ...frequency range in the top line of the menu see screenshot below The station currently playing will be saved If you press the station button 12 then the station will be retrieved from the station mem...

Страница 31: ...uch discs could get caught in the CD drive and damage it In which case it would be necessary to purchase an expensive replacement device Dirt and fluids on CD discs can smear the lens on the audio pla...

Страница 32: ...line music stores cannot be played back The following restrictions apply to data stored on an MP3 WMA CD disc Maximum number of folders playlists 200 Maximum number of files songs 800 A hierarchy of a...

Страница 33: ...ly and the CD or MP3 CD menu is shown Note If the inserted CD disc has already been played back in the CD player then the CD disc starts with the track that was played back last If there is already a...

Страница 34: ...if there is one tap on Folder Up or press the 10 button A list of all the folders on the CD disc is shown Select the desired folder Select the desired track in the folder Skip to the next or previous...

Страница 35: ...Repeating a track During the playback of an audio CD disc If the repeat mode is activated then the current track will be repeated until the repeat mode is deactivated again Tap on Repeat to activate o...

Страница 36: ...ot support all MP3 players USB devices SD cards hard drives or iPod models The system is not compatible with the Apple iPad Important information The external devices connected to the USB port must fu...

Страница 37: ...s Media Player version 9 There is no guarantee that the later versions are supported Playlists with the following extensions are supported m3u pls wpl The system supports bit rates up to 320 kbps at 4...

Страница 38: ...system Note Read the manual for your Bluetooth device before you connect your Bluetooth device to the system Pairing with a Bluetooth device Important information A maximum of 5 devices can be paired...

Страница 39: ...be fulfilled in order for it to be possible to use the system s Bluetooth music mode The system s Bluetooth function must be activated The Bluetooth function on the external Bluetooth audio source mus...

Страница 40: ...an AUX connection Make sure you always keep the AUX input clean and dry It is possible for example to connect a portable CD player with a 3 5 mm jack to the AUX input Use Press once or repeatedly on...

Страница 41: ...your phone and operator You can find more information about the functions that are supported in the manual for your mobile phone You can also ask your service provider about the functions that are su...

Страница 42: ...out the Bluetooth settings required in the manual for the connected Bluetooth device You can pair Bluetooth devices with the system from the BLUETOOTH SETUP menu PIN code exchange between the Bluetoot...

Страница 43: ...phone or a combination device e g mobile phone with integrated MP3 player If the Bluetooth connection fails then you must repeat the pairing or read through the manual for the Bluetooth device If the...

Страница 44: ...correct emergency number for the relevant region Making an emergency call Dial the emergency number e g 112 You will reach the emergency service centre Inform the duty personnel of the emergency situa...

Страница 45: ...must be paired with the system see the chapter Media in the subchapter Bluetooth audio connection section Pairing with a Bluetooth device Activating handsfree mode Press the 14 button PHONE is shown N...

Страница 46: ...elected contact is shown To make a call select the desired phone number Searching for a phone number If the phonebook contains many entries then you can use the search function to search for the desir...

Страница 47: ...special characters then tap 123 in order to change the keyboard Using call lists Incoming outgoing and missed calls are registered in the corresponding call lists Tap in the PHONE menu on Call List Th...

Страница 48: ...he entry for the voice mailbox with the phone number of the connected mobile phone Note It is possible that you will be required to enter a password on the mobile phone to access the voice mailbox Inc...

Страница 49: ...a call The PHONE menu is shown during an active phone call Temporary deactivation of the handsfree mode Tap on Private The call can only be continued via the mobile phone To return to the handsfree m...

Страница 50: ...h entry in the phonebook contact can have a first and last name and up to 5 phone numbers in different categories e g for Mobile Phone Work etc The phonebook in the mobile phone may contain different...

Страница 51: ...one Both phonebooks in the connected mobile phone will be downloaded into the system You can show the entries in both downloaded phonebooks if available Press the SETUP 9 button Tap on Bluetooth Tap o...

Страница 52: ...t load are always stored in full in the device in order to avoid inappropriate or hazardous route outlines being calculated General Information The system will guide you reliably to your destination e...

Страница 53: ...If the dynamic navigation system is activated then the traffic information is included in route calculation During this process the route outline is planned so that traffic problems related to presel...

Страница 54: ...e Set the following vehicle specifics Height Width Length Actual weight Gross vehicle weight Axle weight Number of axles Type of load dangerous water pollutant explosive Full trailer yes no Note You c...

Страница 55: ...nt position To save the address GPS coordinates shown in the address book tap on Save Show destination information Select this option to show the address GPS coordinates for the next waypoint if it is...

Страница 56: ...n as well as navigation Select destination Tap on Destination The following screen is shown Note When the navigation system is active you can add a waypoint an intermediate destination on the route to...

Страница 57: ...or desired special character Use one of the following input sequences Country name City name Postcode Street name Street number or Country name Street name Street number City name Postcode Tap on the...

Страница 58: ...entered address The new destination is marked with a chequered flag Adding a waypoint Press the NAVI 7 button and tap on Destination or Previous destinations Tap on Add waypoint Enter or select a wayp...

Страница 59: ...symbol together with the black marked section of road in the map indicate that there will be a traffic event on the selected street or motorway Distance to the next street on the route Estimated time...

Страница 60: ...een previously used for navigation You can select an entry in this list and set it as a new destination Selecting a previous destination Press the NAVI 7 button Tap on Previous destination The list of...

Страница 61: ...AVI 7 button Tap on Options The ROUTE OPTIONS menu is shown The following menu options are available Truck attributes Set different vehicle configurations in up to 4 different profiles Dynamic navigat...

Страница 62: ...gating to the intermediate destination then the navigation system will automatically recalculate the route outline in order to take you to the final destination TRAFFIC INFO menu Press the MAP 6 butto...

Страница 63: ...ngle street or several consecutive streets from the current route outline To exclude a street select the street in question To exclude several consecutive streets select the first and last street in t...

Страница 64: ...n the navigation system The following settings options are available MAP SETUP Under MAP SETUP the following settings options are available Map View Use this option to change between the two dimension...

Страница 65: ...und sample after each change Position Information Use this option to show the address GPS coordinates for the current position To save the address GPS coordinates shown in the address book tap on Save...

Страница 66: ...ter User defined points of interest POI and Downloading user defined POIs for more information Remove User POIs From System This option is only available if user defined POIs have been downloaded into...

Страница 67: ...ing There is truck specific information available about the road the road is suitable for the currently set vehicle specifics There is truck specific information available about the road the road is n...

Страница 68: ...d J Current vehicle position K Currently selected map scale Note To change the scale turn the multi function button 11 If the auto zoom mode is activated then the map scale will be automatically chang...

Страница 69: ...tem look in the menu for the user defined POIs for a name e g David s place that can be used as a destination during navigation Proceed as follows in order to create POIs Note You must create a separa...

Страница 70: ...relevant warning message e g sharp bend is shown Proceed as follows in order to create warnings for POIs Create a separate text file with any name and the file extension asc e g PoorRoads asc Enter t...

Страница 71: ...drive e g L myPOIs where L is the root directory on the USB device Save the text file with the waypoints in the myPOIs folder Create a subfolder named myPOIWarnings in the myPOIs folder Save the text...

Страница 72: ...ay deviate from the names used at the time of map production You can order a new SD card with maps in order to have access to the latest map data Risks for the device Do not use SD cards that are crac...

Страница 73: ...r use force to open the cover for the SD card slot Press on the inserted SD card in order to release it Carefully pull the SD card out of the slot Carefully insert the new SD card with the label side...

Страница 74: ...n among the saved stations or audio track on CD disc USB or Bluetooth device Long press Search among available radio stations or fast forward rewind the track forward or backward 2 and 4 Raise or lowe...

Страница 75: ...derived from input power of radio Pin A15 B12 GND Kl 31 B13 12V switched hard wired to B11 in total 1 0A output voltage is derived from input power of radio Pin A15 B14 Ignition Kl15 B15 Battery Kl 3...

Страница 76: ...radio programme The radio system has the RDS function AF Alternative Frequencies and it is always activated For this reason the device changes to an alternative frequency for a station when the recep...

Страница 77: ...at home The music system is not exposed to any major mechanical stress which is the case in a vehicle e g vibration high temperature Follow the recommendations in the chapter Preparing an MP3 CD if y...

Страница 78: ...gation will proceed properly It is not possible to enter the destination s address Entered postcode belongs to a post office box common for business addresses Such postcodes cannot be used when enteri...

Страница 79: ...ead in the position display See the More navigation functions section Position display If the vehicle is transported by train or ferry then there is interference in the GPS reception When the vehicle...

Страница 80: ...rating voltage 12 W 10 8 V 15 6 V Power consumption Use 1 3 A Max approx 4 0 A Standby 3 mA Fuse Current rating 10 A Output Nominal output 4 x 20 watt 4 ohm Output level UB 14 4 V 8 0 V K 2 5 Frequenc...

Страница 81: ...er 35 16 000 Hz MP3 CD 20 20 000 Hz Temperature range Operating temperature 20 to 70 Storage temperature 40 to 85 Dimensions and weight 2 DIN cover WxDxH 190 x 159 x 110 mm Cap WxH 192 3 x 123 9 mm We...

Страница 82: ...quency range between 148 5 and 283 5 kHz Primarily for broadcasting national radio programmes across national borders MP3 MP3 is a method for compressing audio data on CD discs developed by German Fra...

Страница 83: ...re Digital Memory Card A memory card format that provides functions for Digital Rights Management TA Traffic Announcement RDS service Traffic announcements on the radio are broadcast with preset volum...

Отзывы: