


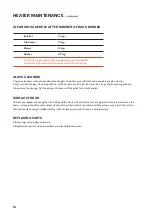


HEATER MAINTENANCE
Unplug and let the stove cool before any maintenance or cleaning. Some brands of pellets produce more ash and clinkers,
therefore stove cleaning frequency greatly depends on the quality of the pellets. Not maintaining a regular cleaning
schedule will cause the stove to have a low burning efficiency and void the warranty.
CLEANING
There will be some ash and small amounts of tar in exhaust pipe. This will vary from pellet ash content and stove operation.
The exhaust vent system should be checked and cleaned semi-annually or every two tons of pellets.
1.
For maximum efficiency and preventing hot ash flying out, please keep the door closed and sealed during burning.
(The burning chamber must always be closed and sealed when the appliance is in operation).
2.
The pellet fire should operate with a bright yellow flame and pellets should be actively burning. If there is a build up of
unburnt pellets and large amounts of smoke venting through the heater, follow instructions for cleaning the burn pot.
3.
Do not modify this appliance in any way and only use genuine spare parts installed by a qualified technician when
undertaking any repairs.
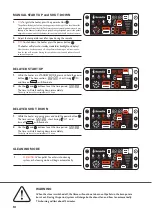
BURN POT CLEANING
1.
The combustion fan comes on at high speed and blows the by-products of combustion out of the
burn pot every hour.
2.
The burn pot should be cleaned thoroughly after burning about 10 bags of pellets.
3.
The burn pot has holes on the bottom and sides which provide combustion air to the pellets. The extreme
temperatures in the burn pot can cause the impurities in the pellets to form ash and clinkers. After the stove
has cooled down, open front door and remove burn pot.
Scrape the inner bottom and sides of burn pot to remove all ash and clinkers with a screwdriver.
4.
Clean igniter bar carefully. Although it is ceramic, it can be easily broken with hard scuffing.
5.
Make sure that all the gaps in the bottom of burn pot are accessible. Place the burn pot in the same position
from which it was removed. Ensure that the high side of burn pot is towards the front of the stove. Push the
burn pot down so the surface is tight against the steel which supports the pot.
Do not substitute for any other grate or pot in this stove.
14
Содержание Verdant LE
Страница 2: ......
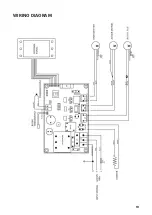
Страница 21: ...19 WIRING DIAGRAM...
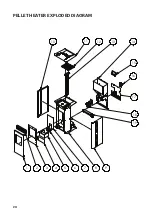
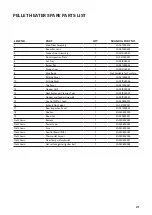
Страница 22: ...20 PELLET HEATER EXPLODED DIAGRAM 1 2 3 4 5 6 7 8 9 18 17 15 13 11 14 10 19 12 16...
Страница 26: ...24...
Страница 27: ...25...
Страница 28: ...www scandiastoves com au 1300 HEATER 432 837...