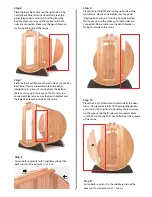
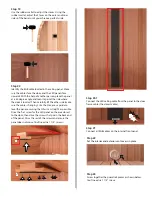
scandia Traditional with Wood Door Скачать руководство пользователя страница 9

8

Step 25

Carefully slide the Guard Rail over the Electric Heater. 
Locate the pre-made holes, and with the help of a drill, 
screw the guard rail in place. You'll need six 1 1/4" screws.
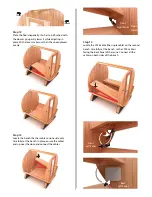
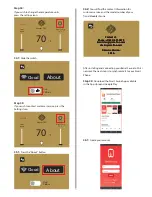
Step 24

Screw the Electric Heater in place, ensuring it is 12" from 
the floor. Please make sure the heater's centered between 
both benches. 

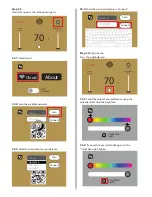
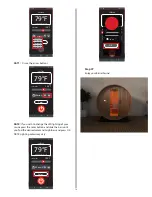
Step 26 Control Relay Box

Connect the NEMA Cable to the Control Relay Box.

Содержание Traditional with Wood Door

Страница 1: ...BARREL SAUNA Mod Traditional with Wood Door Owners Manual and Installation Guide customerservice scandiamfg com 1 877 467 2862...

Страница 2: ...ber of people inside the sauna Before maintenance or cleaning ensure the sauna heater is off Use Scandia Sauna Oil to protect surfaces from wear and tear Do not use abrasive cleaners flammable product...

Страница 3: ...l Back Central Panel Smart Sauna Wi Fi Controller Back Right Panel Back Left Panel Ultra Sauna Eletric Heater J Box LED Ceiling Door Frame Left Bench 2 Bench Leg Bench Leg Barrel Sauna Kit Rubber Mall...

Страница 4: ...dry surface such as a deck or concrete floor and not directly on the grass sand dirt or snow Make sure that you have access to a 220 volt electrical power source If you wish you can also assemble it...

Страница 5: ...ide of the sauna Step 8 Fasten both segments to the middle section of the back wall You ll need two 2 screws Step 11 Fasten both segments to the middle section of the back wall You ll need two 2 screw...

Страница 6: ...t it has been placed evenly Step 13 Locate the bench that has cables on one side only Carefully set the bench in place ensure the cables end up near the door and connect the cables Step 14 Locate the...

Страница 7: ...a well shaped circle Adjust the metal strap using locking pliers and an adjustable wrench Repeat this process with the second metal strap 17 1 Before finishing place the final left right and center S...

Страница 8: ...r side make sure the cable is hanging Use the Staves as a guide to level the panel ensuring that this is as straight as possible Drive the first screw for the LED panel on the area closest to the door...

Страница 9: ...with the help of a drill screw the guard rail in place You ll need six 1 1 4 screws Step 24 Screw the Electric Heater in place ensuring it is 12 from the floor Please make sure the heater s centered...

Страница 10: ...s with a 220V 10 AWG 4AWG electrical outlet please call a certified electrician Materials required for the installation Nema 10 30R 1 piece Step 31 Use the sliders to adjust the temperature and time a...

Страница 11: ...F Target Temp 75 F Timer 0 min OFF LINE 10 Step 32 Cloud Set up press the settings icon gear 32 4 Enter the password and press Connect 32 1 Select cloud Step 33 Lights Set up Press the Lightbulb icon...

Страница 12: ...n 1 0 4b Contact Us Phone 1 888 691 5470 Email design am finn com dealers am finn com Firmware Version 1 0 4b Contact Us Phone 1 888 691 5470 Email design am finn com dealers am finn com Firmware Vers...

Страница 13: ...com k Schmidt hotmail com 12 36 2 Check the confirmation email in your mailbox 36 5 Press the QR code icon 36 3 Access your account with your email address and your password 36 6 Scan the QR code loca...

Страница 14: ...246F284 1min s Color 79 F Last ActiveTime 14 13 34 TARGETTEMP 150 F 246F284 1min s Color 13 36 7 Once the Sauna ID appears next to the QR code press submit 36 8 This will take us to the main screen cl...

Страница 15: ...olor 5 minuties 10 minuties 15 minuties 20 minuties 25 minuties 79 F Last ActiveTime 14 13 34 TARGETTEMP 76 F 246F284 1min s Color OK USEWHITE 14 36 11 Or use the arrow buttons Step 37 Enjoy your Barr...

Страница 16: ...scandiamfg com customerservice scandiamfg com 1 877 467 2862...

Отзывы: